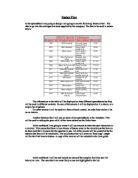
- It highlights the white areas of the page that the users are supposed to be looking at
- It is an imposing colour that works well for the purpose of continuity in the entire workbook
On the 'Home Page' i will also use the designated blue colour.
In my workbook I will include a home page that will allow the user to access the whole program with very little hassle. The home page I will construct will utilise the use of macros that are attached to control buttons. This makes navigation of the workbook a lot easier.
The GNVQ Sports Catalogue Group:
Technical Documentation
The above screen dump shows the home page of the system. When the ‘Home’ button is pressed this is the screen that is presented.
The Macros that run on this page are:
When the Catalogue button is pressed:
When the Customer button is pressed:
When the New Customer button is pressed:
When the Stock button is pressed:
When the Stock Chart button is pressed:
When the orders button is pressed:
When the Invoice button is pressed:
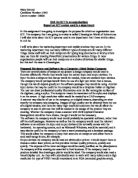
The above view is that of the Customer page.
The macros active on this page are:
When the Home button is pressed:
When the New Customer button is pressed: see macro listed on previous page.
When the Sort List button is pressed:
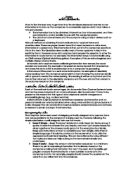
The Stock screen above has the following macros running on it:
When the Home button is pressed: see macro listed on previous page
When the Replenish Stock button is pressed:
The order screen has the following macros placed on it.
Complete Order: too see this macro look at appendix 1(attached sheet)
Invoice: this macro is the same as the one on the ‘Home’ page
Home: this is the same macro as the one placed on the previous page.
On the Invoice the macros that are present are:
Billing Address: See appendix 2
Print Invoice:
Home: see the Home macro on the previous sheets
All of the macros that are present in my system are attached to buttons that are appropriately.
In my program I used the VLOOKUP function to import information from one worksheet to another. I also linked this function to the IF function. This means that the information is only imported if certain criteria are met.
This function is evident in the ordering process. I use this so that the user only has to type in the customer ID and the program does the rest.
The formula that I use is: =IF(Orders!B19="","",VLOOKUP(Orders!B19,Customer!$A$3:$G$17,2))
This function looks to see if the customer ID is typed. If it is then it looks for the same customer ID on the customer page and imports the surname.
To import the Name the following formula is used:
=IF(C19="","",VLOOKUP(C19,Customer!A3:C17,3))
To import Address 1 the following formula is used:
=IF(B19="","",VLOOKUP(B19,Customer!A3:G17,4))
To import the Town the following formula is used:
=IF(B19="","",VLOOKUP(B19,Customer!A3:G17,5))
To import the County the following formula is used:
=IF(B19="","",VLOOKUP(B19,Customer!A3:G17,6))
To import the Postcode the following formula is used:
=IF(C19="","",VLOOKUP(C19,Customer!B3:H17,6))
There are other examples of formula like this in my program but these are the ones that illustrate its use the most.
Data entry: to enter data, i.e. new customers, the system uses data entry forms. The example for this is in the user guide.
When I started to employ the idea of using forms I came across a problem. The program would not run the macro for the data entry form. I overcame this problem by not selecting the header of the page. This allowed the macro to run.
Stock Chart: as instructed I have included a chart that is linked to the stock levels. The columns of the chart adjust according to the values on the stock worksheet. (See example on Appendix 3)
The Link Between The Chart And Sheet: for the example of the linked stock graph see Appendix 3.
Functions used: in this spreadsheet I use the following functions that are supported:
Appendix 1
Sub Completeorder()
'
' Completeorder Macro
' Macro recorded 15/03/2002 by Clarendon School
'
'
Range("D3:E16").Select
Selection.Copy
Sheets("Invoice").Select
Range("E4").Select
Sheets("Orders").Select
Range("D3:D15").Select
Application.CutCopyMode = False
Selection.Copy
Sheets("Invoice").Select
Selection.PasteSpecial Paste:=xlValues, Operation:=xlNone, SkipBlanks:= _
False, Transpose:=False
Range("G11").Select
Sheets("Orders").Select
Range("B19:H19").Select
Application.CutCopyMode = False
Selection.Copy
Sheets("Invoice").Select
Range("L20").Select
Selection.PasteSpecial Paste:=xlValues, Operation:=xlNone, SkipBlanks:= _
False, Transpose:=False
Columns("D:D").EntireColumn.AutoFit
Columns("C:C").EntireColumn.AutoFit
Application.CutCopyMode = False
With Selection
.HorizontalAlignment = xlCenter
.VerticalAlignment = xlBottom
.WrapText = False
.Orientation = 0
.ShrinkToFit = False
.MergeCells = False
End With
Range("C23").Select
Sheets("Stock").Select
Range("F6:F18").Select
Selection.Copy
Range("E6").Select
Selection.PasteSpecial Paste:=xlValues, Operation:=xlNone, SkipBlanks:= _
False, Transpose:=False
Range("I6").Select
Selection.PasteSpecial Paste:=xlValues, Operation:=xlNone, SkipBlanks:= _
False, Transpose:=False
Range("E6:E18").Select
Application.CutCopyMode = False
Selection.Copy
Sheets("Orders").Select
Range("F3:F15").Select
ActiveSheet.Paste
Range("D3:D15").Select
Application.CutCopyMode = False
Selection.ClearContents
Range("B19").Select
Selection.ClearContents
End Sub
Appendix 2
Sub BillingAddress()
'
' BillingAddress Macro
' Macro recorded 19/03/2002 by Clarendon School
'
'
Range("N20").Select
Selection.Copy
Range("C24").Select
ActiveSheet.Paste
Range("M20").Select
Application.CutCopyMode = False
Selection.Copy
Range("D24").Select
ActiveSheet.Paste
Range("O20").Select
Application.CutCopyMode = False
Selection.Copy
Range("C25").Select
ActiveSheet.Paste
Range("P20").Select
Application.CutCopyMode = False
Selection.Copy
Range("C26").Select
ActiveSheet.Paste
Range("Q20").Select
Application.CutCopyMode = False
Selection.Copy
Range("C27").Select
ActiveSheet.Paste
Range("R20").Select
Application.CutCopyMode = False
Selection.Copy
Range("C28").Select
ActiveSheet.Paste
Range("C24:D29").Select
Application.CutCopyMode = False
With Selection
.HorizontalAlignment = xlLeft
.VerticalAlignment = xlBottom
.WrapText = False
.Orientation = 0
.IndentLevel = 0
.ShrinkToFit = False
.MergeCells = False
End With
Application.CommandBars("Stop Recording").Visible = True
End Sub
Appendix 3
- Navigating the Program
When the software is first turned on you are presented with a title screen and navigation menu (see screen dump)
All of the buttons that are visible take you to the spreadsheets that are relevant to the titles. I.e. the Stock command button takes you to the screen that controls all of the stock issues.
This allows for the user to easily navigate the system and makes
it easier for the operator to fulfil the
needs of the customer faster.
All of the screens have a
‘Home’ button that allows you to go
direct to the title screen and navigation
menu.
- Entering New Customers
If the user wants to enter a new customer it can be done in two ways.
- From the Title screen using the ‘New Customer’ button
- From the Customer Screen again using the ‘New Customer’ Button
Both ways of entering anew customer use the same method. This is a form that appears when you press the button. (Example of form shown below)
Once the data has been entered a Customer ID needs to be created. This is created by using the first two letters of the surname, the first four digits of the phone number and then putting the whole surname on the end. (The customer must be made aware of their ID, as it is needed when they wish to order.)
Once the new customer has been entered you must press the ‘sort list’ button because other wise the program will not work.
- Customer Ordering
If the customers are not sure of the price or specified use of the football there is a catalogue screen showing all of these.
When the user wishes to commence with the order they need to go to the order screen. (Shown below)
Pressing the ‘Orders’ button on the ‘home screen’ does this. The operator will then have to take customer ID and type it into the space shown. This will then automatically look up the rest of the customer’s details and fill them into the adjoining cells.
To make the order all the user has to do is enter the quantity of each football wanted into the ‘Qty’ column. When this is done the total price is calculated.
When the order is complete the user then has to press the ‘Complete Order’ button. When this is pressed all of the information on the order form is placed onto the ‘Invoice’ screen of the system.
3.1 Invoicing the Customer
The user then has to press the ‘Invoice’ button to get to invoice screen. (see next page for example)
Once on the ‘Invoice’ screen then all that is left to do is press a few buttons. The billing address for the invoice is generated automatically when the billing address button is pressed.
To print the invoices simply press the ‘Print Invoice’ button.
Example of Printed invoice
4. Stock Control
Most of the stock in this program is automated. This includes the updating of the stock once an order is placed.
Another way of seeing the company stock is to view the ‘Stock Graph’. Pressing the button that is situated on the ‘Home’ page easily does this. This function also allows the user to easily produce a hard copy of the stock situation.
The only thing that needs to be done manually is the replenishment of the stock. This is easily done by pressing the ‘Replenish Stock’ button.
5. Closing the Program
To log off of the program simply return to the ‘Home’ page and use the cross button in the top right hand corner of the window.