Getting Started
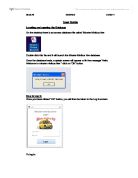
When you have opened up the Mastercare System, the first screen that you will see will be a Login window. This is a security feature of the program that ensures only Mastercare employees can access the information stored within the system. The window will look like this.
You need to enter your system username and password to be able to log into the system. Next to the box “Username” is an arrow pointing down. Click this arrow to select your username. Then, in the password box, type in your password and then click “Log In”. If you are unsure about any of this, click “Help” at the bottom right corner of the page and you will be shown a window with
useful information on regarding the login system.
If your password is correct, you will see this
message telling you that your log in has been
successful. If your password is incorrect, you will
get the chance to try again and then will see this
message. If you require further help logging into the
system, you can view contact details in the “log in help” section.
Using The System
If you have logged into the system as the administrator you will see a message box asking if you would like to go to the “Admin” section of the system.
The admin area is where you can perform tasks that other users have no access to. If you want to create or edit users, click the “Create/Edit Users” button.
You will now be navigated to the “Add/Delete/Edit Users” form. This form is where you can add new users, delete users, or change current user’s passwords.
You can use the navigation buttons along the bottom row to change the record on view and to perform the other task previously mentioned. If you want to change a password, just select the user and
overwrite the old password with your desired new one. When you are finished, click the “Save User” button and then click “Back To Admin” to take you back to the “Admin” area.
From here, you can exit the system by clicking “Exit Application”. You can log out by clicking “Log Out” or you can go to the main form by clicking “Go To Main Form”.
You will see the “Main Form” that is used as a navigational form which lets you move to the four input forms. To access any of the four input forms, just click the relevant button. To close this form and return to the “log in” screen, click close. When you want to add customers into the database click on “Customer”. You will then be taken to a form that contains all of the boxes to input the customer’s information. This form is shown below.
This form is used to enter
the customer’s information
that you will need when
creating a job report for
them. The “CustomerID” box
is produced automatically.
The options for “Customer
Title” are included in this
form. To view these options,
click the down arrow next
to the box and then select
the option that fits the customer. The “Customer Address 2” box does not need to be filled in. It is an optional box for customers that have a second part to their address. The “Telephone Number” box is set out so that the correct layout for a telephone number is used. You will not be able to enter an invalid telephone number into this box. A layout is also used for the “Post Code” box which has the same affect. The six buttons at the bottom of the form are for switching between records, adding new records, saving and deleting records. There is also a button that will navigate you back to the main form where you can either log out or select another form to view. If you click “Back to Main Form” and then click “Supplier” you will be navigated to the supplier form. This form is shown below.
This form is used to enter the supplier’s information which you will need when ordering new stock and editing the current stock in the database. The “SupplierID” box is produced automatically. The “Telephone Number” box is set out so that the correct layout for a telephone number is used. You will not be able to enter an
invalid telephone number into this box. A layout is also used for the “Post Code” box which has the same affect. All fields in this form are required to have data entered in them before moving on. The six buttons at the bottom of the form are the same as all of the other data entry forms that have been previously mentioned. If you click “Back to Main Form” and then click “Stock” you will be navigated to the stock form. This form is shown below.
This form is used to enter the stock information which you will need when ordering new items of stock and creating a job an invoice for you and the customer. The “StockID” box is produced automatically. From the “SupplierID” combo box, you should select the relevant
Supplier that the new item of stock is associated with. “Stock Quantity” has a range check validation where you must enter a value greater or equal to 0. This is because it is impossible to have a stock quantity of a negative number. “Stock Price” must have a currency value in the field. The six buttons at the bottom of the form are the same as all of the other data entry forms that have been previously mentioned. If you click “Back To Main” and then click “Jobs”, you will be navigated to the jobs table, which is shown below.
This form adds together all of the information that has been added in the other three forms. The “Job ID” box is set automatically and gives each job an identification number. The “Customer ID” box has an arrow that you click to select the customers unique identification number. The “Product Type” box
is used for storing what electrical product was repaired for the customer so that if the customer requires another repair you can see if it is the same product and therefore possibly be able to diagnose the problem quicker. The “Hours” box is used to calculate the cost of the repair when creating the customer’s invoice. “Stock ID” is the stock identification number for the required stock that is used to repair the product. The identification number will link to one particular stock item in the “Stock
Table” (entered in another form). You can use
multiple amounts of stock to repair one product
because when you have selected one item, you
will see a message box asking if you would like
to add another. If you select yes, another drop
down menu will appear and let you select a
further item of stock. The 6 buttons on the bottom of
this form do the same action as those mentioned in the “Customer Form”. The “Preview Invoice” and “Print Invoice” buttons are used to create the customer and yourselves a report that contains the customer’s details, the job details and the financial details of the job. If you would like just to print an invoice off, without seeing it, click the “Print Invoice” button. If you would like to view the invoice on screen before printing it, click “Preview Invoice”. You can still print off the invoice from the preview screen. If you click “Preview Invoice”, you will get taken to a report that is similar to the one shown below.
This invoice clearly shows the customer’s information which includes their name and address and it also shows the job and stock identification numbers. The total labour costs are pre-calculated, depending on the current hourly labour cost at the company and the number of hours the job took to complete (which was entered in the “Jobs Form”. The sub total adds together the total labour costs and the price of the stock item(s) that were used to complete the job. The final figure is the amount that the customer owes and is calculated by the sub total times with VAT added on.
At the bottom of the report is a button that enables you to print off a number of these invoices, as long as your printer is turned on.
Backing Up The System
Regular backups of the system will need to be made so that any data loss does not destroy weeks of information. To backup the system you should follow these steps.
- Insert the USB device with the Mastercare system on
and go to “My Computer” (a shortcut to here is located
on the desktop, shown right).
- Double click the icon called “USBDISKPRO” (shown right)
to take you to the folder where the system is contained.
- Open the sub folder(s) until you are in the folder that contains the Mastercare system.
- With the mouse, right-click the file
“Mastercare System” and select “Copy”
(shown right).
- Next, you have to find the directory that
you want the backup to be stored. This
is best if it is a different media (storage
device) than the one that contains the
hard copy of the system.
- When you have found the directory that
you want the backup to be stored in,
right-click with the mouse and select
“Paste”. There could be a few second
waiting time, but after that you system
will have been backed up successfully.
Printing a Document
The only form that has a direct link to printing a document is the “Jobs Form” which directly prints an invoice. This can also be done when previewing the Invoice. You can manually select to print anything in the system, whether it be a form or report. To do so you should take the following steps.
- First of all, find the form or report that you would like to print.
- On the toolbar at the top, there is a menu called file. Left-click this menu and scroll down to “Print”.
- Make sure that your printer is connected and turned on. Select the number of copies that you would like and then click “OK”
-
Your document should now print successfully.
Frequently Asked Questions
- I cannot start the computer.
A - Make sure that the plugs are plugged in and the sockets are turned on. Also, make sure your monitor is turned on.
Q- I cannot open the system.
A - If you are using a short-cut to open the system, try opening it from the directory that you installed the system into. If you still can’t open the system, either use the back-up copy of it or restart your computer and try again.
Q- It isn’t printing any of the data that I want to print.
A- Make sure that the printer is connected to the computer and that it is turned on. If it still doesn’t print, try consulting your printer manual.
Q- When I try to open the system it says ‘Windows cannot find the file’.
A- Revert back to the backed up copy of the system and install it like you did previously.
Q- When I try to open the USB device with the system in it I get an error message stating the device cannot be found.
A- Remove the USB device and then try entering it again. If you still have problems try entering it into a different USB slot. If that doesn’t work, restart your computer and try again.
Q- The system is not accepting my password.
A- Make sure that you are typing it in correctly and check to make sure the caps lock isn’t on as the password is case sensitive. If it doesn’t let you in, ask the administrator to change your password. If he cant enter, use the contact details below to get in touch.