Sources for images
In order for me to complete my coursework I needed to obtain graphics from some sites. These ages were in “.wmf” format, I needed images in this format so that I could insert them into the program which I was using to create the stencil (2d design).
Developing of the stencil
Firstly as I began to start the coursework I downloaded a few pictures from the internet which I could use in order to create pictures on my stencil. These pictures were downloaded from a site which I had found on the internet.
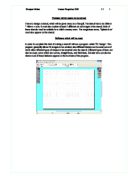
once I had downloaded these pictures I opened the program which I was going to use in order to make the stencil, this program was called 2d design. Once I had opened it I firstly made a rectangle shape of the maximum dimensions I did this to ensure that I that stencil which I was making did not exceed the maximum size limit for the stencil.
Once I had done this I filled the rectangle shape with a green colour. I did this so that any shapes which were to be images which were to be placed onto the stencil could be cut out and left as white; this would represent the empty space which appears on a stencil.
Filling the rectangle with a colour
In order to fill colour into the rectangle I first had to click on the rectangle with the cursor on the screen. Then after I had to move the cursor to the fill button towards the top of the screen and click on the fill button.
Once I had clicked on the fill button a small window appeared automatically on this window I had to choose the type of fill which I required. In my case because I needed the whole shape to be filled with colour I clicked on the “solid fill button”.
After I had done this I clicked on the “ok” button and then moved the cursor to “colour” button which was located right next to the “fill” button. Once I had clicked on this a window came up which showed all the different colours which could be placed inside the rectangle. Out of all the colours I chose to use a dark green colour.
After I had chosen the colour which I needed, I clicked on the “ok” button. And then the rectangle became filled with the green colour.
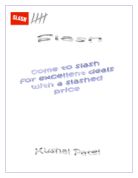
Now I began to create parts of the stencil. To begin with I firstly decided to insert the name of the magazine which is, “splash it on”. To insert text I first had to click on the text button which was present in the toolbar that appeared on the left of the screen.
Once I had clicked on the text button a small window appeared automatically onto the screen. On this window I basically had to insert the text which I wanted to appear onto the slide, so as I needed the name of the magazine to appear I wrote “splash it on” inside the small box.
On the small window which appeared I could also change some of the settings of the text. I could change the font type and could also resize the text to make it bigger or smaller, I could also change the colour of the text and the lining which goes along the border of the text. I could also change the font style i.e. make ti bold, italic, regular and normal.
After making all the changes which I needed in the font I clicked on the “ok” button to confirm all the changes and then after I had done this the text appeared on the screen and then by using the mouse I adjusted it into its correct position. I made the text have a white coloured outline so when the stencil would be sprayed the outline of the text will be left.
After I had inserted the text I began to insert the animal images onto stencil. To do this I first clicked on the file button and then imported the image from its saved location after it had opened I adjusted the images to be in their specific places and then filled them in with white colour so that they would leave the shape behind of the animal once they had been sprayed or coloured on. For features on the animal image like the eyes or nose I had to make them filled with a colour so that once they were sprayed on they would leave a mark behind representing and showing that particular feature.
Once I had imported the images I decided to create a picture using the auto shape features which had been provided by the program in order to do this I decided to create a bunch of balloons. To create these all I had to do was to click on the line button which appeared in the toolbar on the left and draw 2 simple lines which represented the string on the balloons and then had oval shapes attached to each string which represented the actual balloon.
Saving Work
In order to keep my work safe and away from any type of danger or harm I continuously made saves to the work. In order to do this I had to click on the file button which appeared on the top tool bar and then clicked on the save button.
Also to make sure that in case of a hard disk break down I saved my work in various different locations one of which was a floppy disk. In order to save my work on a floppy disk I first had to copy the file from its original location and the paste it onto the floppy disk.
Evaluation
My finished stencil was more or less similar to how I had designed it towards the beginning of the coursework. Although I had added more images then I said I would have, but this was done to make the stencil look more attractive, appealing and eye catching for the user. As I have done every thing which was required and done some bits extra there is no way to improve my work other than inserting more images. As I was developing the stencil I came to face a few difficulties firstly I had problems in order to find the images which I needed on the internet, as there weren’t many sites which offered images in that format (.wmf).