Stop Clock - to time how long it takes for the yeast cells to denature
Thermometer - to check the temperature of the water bath
1x 1.0ml Syringe - to insert the methylene blue
5x 10ml Syringe - to insert the yeast and sugar solution
1x 250ml Beaker - to keep the boiling tubes warm
Stirring Rod - to stir the solution making sure all the sugar has dissolved
Goggles - must be worn the protect the eyes from methylene blue
1% Methylene Blue - solution to check whether the yeast cells are active
Yeast - suspension to calculate the amount of respiration
0.2M Glucose - is the sugar solution which you are checking the respiration rate
0.2M Fructose - the sugar solution which you are checking the respiration rate
0.2M Sucrose - the sugar solution which you are checking the respiration rate
0.2M Maltose - the sugar solution which you are checking the respiration rate
Method
- Collect all the equipment and put on goggles
-
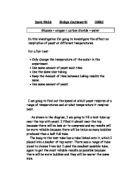
Set the water bath at 45oC
- Use a 10ml syringe insert 10ml of glucose into a boiling tube
- Use another 10ml syringe and insert 10ml of yeast into another boiling tube
- Place the beakers into the water bath
- Leave for 5 minutes
- Put the sugar into the boiling tube containing the yeast
- Add 0.1ml of Methylene Blue using a 1ml syringe into the solution
- Shake the boiling tube (to mix the 2 solutions together)
- Start the stop clock
- Time how long it takes for the solution to go colourless. This is to show whether the solution is active or not.
- Stop the clock after 10 minutes and record the results, even if the solution remains blue.
- If the solution remains blue after 10 minutes stop the clock and record that no respiration has occurred
- Repeat the experiment 2 more times using glucose.
- Repeat the above steps 3 times for fructose, sucrose and maltose
Results
Analysis of Methylene Blue experiment
From the results above, you can see that the rate of respiration was quickest in Glucose. This is shown with an average of 177 seconds, followed by Fructose taking 186 seconds, then Maltose with 189 seconds and lastly Sucrose with 213 seconds. This shows that in general monosaccharides have a tendency to increase the respiration rate of yeast; on the other hand, sucrose being a disaccharide caused the rate of respiration on the yeast to be very slow.
From the first attempt the graph shows that sucrose was the slowest, taking 283 seconds; followed by glucose with 223 seconds, then fructose with 181, leaving maltose to be the quickest with 180 seconds. However, this does not resemble the following three attempts.
The second attempt illustrates that maltose was the slowest; taking 254 seconds however in the first attempt is seen to be the quickest. Shortly sucrose followed with 194 seconds then glucose with 175 seconds and finally fructose was the quickest with 159 seconds. From the second set of results it can be distinguished that the 254 seconds taken by maltose was the most time taken in which the yeast cells turned active.
The third attempt demonstrates that fructose was the slowest taking 230 second to turn the yeast cells active; however, from the second attempt the results represent that fructose was the quickest. Sucrose took the second longest with 201 seconds, then glucose with 159 seconds and finally maltose was the quickest by turning active within 131 seconds. .
The final attempt indicates that maltose was the slowest with 195 seconds; even though from the third attempt it proved to be the quickest; shortly followed by fructose and sucrose, both taking 175 seconds to activate the yeast cells, leaving glucose to be the quickest with 152 seconds.
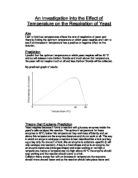
Once taken an average from the four set of results, the final column of both the table and bar chart suggests that glucose is the quickest; with an overall average of 177 second. This was the time taken for the yeast cells to be active and remain active. By taking an average suggests the set of results are more accurate and fewer errors were likely to occur.
From analysing the table and graph above, the results prove that my prediction was correct. As of the averages taken, it is proven that glucose made the yeast cells to respire the most and in the quickest time.
Respiration- Burette Test
Equipment
1x 50ml Burette – to measure the rate of respiration
Clamp – to hold the burette on the stand
Stand – to hold the burette
1x 100ml Beaker – to fill the burette with water
Stop clock - to time how long it takes for the yeast cells to denature
Water bath set at 55oC - to heat the yeast cells and activate them
4x 1.0ml Syringes - to insert the methylene blue
Water bowl – to contain water whilst using the burette
Stopper attached to a rubber tube – this is to collect CO2 in the burette
Boiling tubes - to make the sugar and yeast solution
Boiling tube rack - to hold the boiling tubes
Yeast suspension - to calculate the amount of respiration
0.2M Glucose - the sugar solution which you are checking the respiration rate
0.2M Fructose - the sugar solution which you are checking the respiration rate
0.2M Sucrose - the sugar solution which you are checking the respiration rate
Method
- Collect all the equipment
-
Set the water bath at 55oC
- Fill the burette with water to the top making sure the tap is closed
- Place the index finger on top of the burette and invert it
- Place the inverted burette into the water bowl
- Run the tap down so that 50ml of water is in the burette making sure the water lies under the meniscus
- Make sure you close the tap
- Clamp the burette onto the stand
- Using a beaker fill it with ¾ water from the water bath
- In a boiling tube add 10ml of yeast using a 10ml syringe
- In the same boiling tube add 10ml glucose into the yeast using a syringe
- Place the boiling tube into the beaker to warm up the solution and activate the yeast
- Place the stopper on top of boiling tube
- Using the rubber tube put the end of it into the inverted burette
- From the time you see the first bubble appear start the stop clock
-
After every minute record the amount of CO2 that has been produced via respiration
- After 10 minutes stop the clock and record all the results
- Repeat the experiment 2 more times for glucose
- Repeat the above steps 3 times for fructose and sucrose
Glucose results
Analysis of Glucose
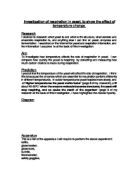
From analysing the table and graph above, I can come to the conclusion that by using the burette it showed that the amount of CO2 produced increased during the time of 1 to 10 minutes. However, there was a rapid increase in the amount of CO2 produced from the 8th minute to the 10th minute. This is shown as from the 8th minute 2.7ml of CO2 was produced which increased from 3.1ml to 3.8ml in the 10th minute.
Sucrose results
Analysis of Sucrose
The above graph shows the average amount of gas produced within 10 minutes using sucrose. It also suggest that on the whole sucrose was quite slow in producing CO2 as there was no rapid increase in the amount of CO2 produced, unlike the use of glucose.
Fructose results
Analysis of Fructose
The table above shows that amount of CO2 produced when the yeast cells are mixed with the sugar solution of fructose. It also shows that on average not much CO2 was produced over the 10 minutes. There was a gradual increase in the amount of CO2 produced.
However, from analysing the three graphs, I have come to the conclusion that glucose help make the yeast to respire more, followed by fructose and finally sucrose was the slowest in producing the respiration.
Evaluation
Overall from the two experiments conducted with the aid of specific equipments, I can conclude that I have proven my prediction correct. This is because from the experiments performed all the results prove that glucose affected the yeast cells the most. This can be demonstrated from the methylene blue experiment; where clearly glucose was the quickest in activating the yeast cell. By activating the yeast cells, shows that respiration has occurred in which has effect the rate of respiration accomplished by the unicellular organisms.
Making the Sugar Solution
Equipment
Distilled water – to make the sugar solution and to rinse the funnel and beaker of any excess sugar
Funnel – to help transfer the sugar into the volumetric flask
Stirring rod – to stir the sugar solution
1x 3mm Pipette – to ensure that the exact amount of water is used
1x 50mlVolumetric flask – to make up the full 50ml of sugar solution
Electronic weighing scales – to weigh the exact amount of sugar needed
1x 250ml Beaker – to make the sugar solution
Method
- Weigh 18g of glucose and fructose and weigh 36g of sucrose and maltose
2) Add enough water to dissolve the sugar
3) Dissolve the sugar fully using a stirring rod
4) Using a funnel transfer the sugar solution into the volumetric flask
5) Rinse the beaker using distilled water making sure all the solution has been transferred
6) Rinse the funnel using distilled water of any excess solution
7) Add enough water to make up 500ml in the volumetric flask
8) Pour the distilled water into the beaker
9) Using a pipette make sure that the solution has reached the 500ml level on the meniscus of the volumetric flask
10) Invert the volumetric flask 3 times, to ensure that all the solid particles have dissolved.
Calculating the mass of the amount of sugar needed to make 500ml of 0.2M sugar solution
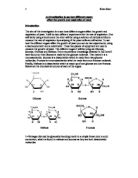
Glucose C6H12O6
Fructose C6H12O6
Sucrose C12H24O12
Maltose C12H24O12
Working out the molecular mass for each sugar
Glucose and Fructose 6 x 12 =72 6 carbon atoms each having a mass of 12
1 x 12 =12 12 hydrogen atoms each having a mass of 1 16 x 6 =96 6 oxygen atoms each having a mass of 16
180
Sucrose and Maltose 1 x 24 =24 24 hydrogen atoms each having a mass of 1
12 x 12 =144 12 carbon atoms each having a mass of 12
16 x 12 =192 16 oxygen atoms each having a mass of 16
360
0.2M is 1 of the concentration of 1 molar solution of sugar
5
To work out the amount of sugar needed
Glucose and Fructose 180 = 36 = 18g
- 2
Sucrose and Maltose 360 = 72 =36g
- 2
The above calculations show that 18g of glucose and fructose is needed to make 0.2 moles of sugar solution in 500ml of water. Therefore 36g of sucrose and maltose is needed to make 0.2 moles of the sugar solution in 500ml of water.