Building a hovercraft with household objects.
Abstract
The coefficient of static and kinetic friction between a board and the ground is very high. Therefore trying to slide this board across the ground would be quite difficult. It is thought that if there is a pocket of air between the board and the ground, the coefficient of friction will go down, therefore the force due to friction also will, and the board will be moved easier.
Although the force of friction is essentially impossible to completely get rid of, it can be minimized substantially. With this pocket of air between the board and the ground, the board will glide above the floor with very little friction. This device would be known as a hovercraft, because it is “hovering” above the ground.
Purpose
To build a functioning hovercraft, efficient enough to carry the weight of a person using household objects.
Design
The hovercraft will be built using only materials that can be found in the typical Muskokan home. A leaf blower will be used to supply the airflow, a piece of plywood will serve as the base, and a tarp will be used to bladder the air, and to pressurize limit the airflow. Duct tape, industrial staples, and spray adhesive will be used to hold the tarp to the plywood.
Materials
- 16 square foot sheet of 3/8 inch thick plywood
- Large industrial tarp
- Leaf Blower
- Frisbee
- 2 inch, 1/4-20 Bolt
- 1/4-20 Nut
- 1 Large washer, 2 small washers
- Electric saber saw
- Razor knife
- Staple gun
- Spray Adhesive
- Silicon Caulking
- Marker
- 2 Foot string
- Hammer
- Extension Cords
- Stool
- Measuring tape
- Wrench
- Ratchet
- Drill
Procedure
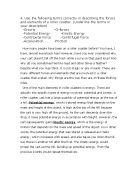
- Tie a permanent marker to the end of a 2’ long string, with a loop at the opposite end of the string.
- Measure the exact center of the board, and drive a nail into it.
- Loop the end of the string opposite of the marker around the nail. Pull the string tight and use this string to guide your marker in drawing a perfect circle. This will be much like using a compass (be careful not to tilt the marker, this will throw off your circle).
- Use a saber saw to cut the out the circle you have drawn.
- Drill a hole in the exact center of the circle. The bolt you have should snugly but easily fit through this hole.
- Use the end of the leaf blower to trace a circle the exact size of the nozzle on the leaf blower onto the surface of your hovercraft. This circle should be halfway between the center and the perimeter, a foot from the center, and a foot from the perimeter.
- Use a hammer and a chisel to make a hole in the board where the circle you traced is.
- From this hole you punched, start using the saber saw again to cut out this hole.
- Place the circular piece of plywood onto the tarp, and cut the tarp with a razor so that the edges of the tarp will fold up onto the top of your plywood about 6 inches.
- Spray the tarp with adhesive as you fold it up onto the top, then use the staple gun to staple it down securely. Once the plywood is covered, flip it upside down, to apply pressure to the overlapped tarp to help it dry nicely.
- Cut your Frisbee so that it is flat, and the lips are gone. Then drill a hole in it the same size as the one you drilled in the plywood.
- While the plywood is upside down, place the contoured Frisbee in the exact center of the plywood, so that if not for the tarp in-between, you would be able to see clearly through the hole in the Frisbee and the hole in the plywood.
- Place the large washer over the hole in the Frisbee, and one of the smaller ones on-top of that washer. Drill your bolt through the washers, the hole in the Frisbee, the tarp, and finally through the hole in the plywood. Flip the plywood over, put the other small washer on the screw on the other end, and using a ratchet and wrench, tighten the nut onto the bolt securely.
- Again, flip the hovercraft so it is upside down. Using a razor cut six evenly spaced circles about an inch in diameter into the tarp. These circles, or holes should encircle the Frisbee you have secured to the plywood. Use duct tape to reinforce the areas of tarp around the holes, to prevent ripping.
- Flip the soon-to-be hovercraft back over, so that the side where the wood is visible. Detach the extension pipe, or nozzle from the leaf blower, and place it into the hole you have cut for it. The pipe should fit snugly into the hole; use silicon caulking to fill in any space between the pipe and the edge of the hole in the wood. After this use duct tape to completely seal the space around the pipe.
- Duct tape the edges of the tarp that are folded over onto the plywood down so that they are airtight. Then cover the entire top of the board with duct tape as to prevent air leaks.
- Place the leaf blower on top of the pipe attachment. Turn the leaf blower on, let the bladder (tarp) fill up, look, listen and feel for any air leaks, if there is any, patch them up with some duct tape.