Apparatus:
- PH buffer solution; the pH which will be used in this experiment are 1, 3, 5, 7, 8, 10, 12, 14 and the control. These values are appropriate to use as they cover a range of pH values of 1-14 as 1 is the lowest pH value and 14 is the highest pH value.
- Protease solution: This is the enzyme which will be needed to react with the substrate. 3cm³ of this solution will be used, this measurement is not to large it is the appropriate amount to for a good reaction to occur.
- Exposed photographic film: this is the substrate which will bind to the enzymes active site for reaction to occur the same amount of 2cm³ of this will be used as protease, the two volumes will add up to 6cm³ this is more than enough for the cuvette, so it an appropriate measure to use.
- Test tubes: 9 test tubes will be needed as there are 9 different pH to be measured. Test tube is suitable to hold all contents together as it is not too big or small a boiling tube would be a bit too large, more solution would be needed.
- Beaker: a large beaker will be needed to hold 100ml of water and to act as a water bath, also smaller beaker for warm and cold water will be needed to add to the water bath if temperature falls or rises. Another way of placing in a water bath is by placing the test tubes in a beaker and the beaker in an incubator water bath which already set to required temp.
- Ice and warm water: these will be needed to maintain the temperature of the water bath at 30°C
- Thermometer: to keep and eye on the temperature of the water bath.
- Water bath: should be kept at 30°C this is suitable as most enzymes denature at 40°C So enzyme is working the best at 30°C or incubation.
- Bunsen burner: to denature the enzyme for the control solution.
- Colorimeter and cuvettes: these are used to measure the absorbency to see how the pH has affected the activity of the enzyme.
- Ruler: to measure the exposed photographic strip accurately
- Measuring cylinder: to measure the exact amount of solutions accurately.
Diagram:
Method.
- Using the measuring cylinder measure exactly 3cm³ of pH buffer solution and carefully pour into a test tube without spilling any solution.
- Rinse out measuring cylinder and measure out 3cm³ of protease enzyme solution and add this to the test tube with the buffer solution.
- Prepare a water bath at 30°C in a beaker with the use of a thermometer.
- Using a ruler measure 5cm of exposed photographic film and place in the test tube also at the same time place this in the water bath and start the stop watch.
- Leave the test tubes in water bath of 30°C for 10minutes.
- When 10 minutes is over remove the photographic film as this will top the reaction as no substrate is present anymore.
- Shake the solution and record observations of colour change.
- Measure out 2cm³ of this solution using a clean measuring cylinder and pour into a cuvette and place in the colorimeter.
- Set the reading to absorption as this is being tested.
- Check that the filter is in the correct position all the time.
- Using the same type and clean cuvette each time, pour 2cm³ of the test solution.
- Make sure that no liquid is on the outside of the cuvette and shake it slightly to mix the solution.
- Place this in the colorimeter, making sure that the cuvette is inserted in the correct way each time.
- Do not spill the liquid in the colorimeter.
- Make sure that after each cuvette the colorimeter is zeroed.
- Transfer some of the pH solution and enzyme (blank solution) into a cuvette without the photographic film into the same type and clean cuvette.
- Place the cuvette in the colorimeter and press the zero button to adjust the absorbency to 0.00.
- Measuring the absorbency.
- Shake the test solution gently making sure that any precipitate is evenly suspended.
- Transfer some solution to a clean cuvette.
- Remove the blank cuvette.
- Carefully place the cuvette containing the test solution and record the absorbency reading.
- Rezero the colorimeter before measuring the next test solution.
- Repeat this method for all the test solutions, which are all the different pH values these are 1, 3, 5, 7, 8, 10, 12, 14 and the control.
Control solution
To carry out the control the enzyme will be denatured using a Bunsen burner and then placed in a test tube with the pH buffer solution and photographic film to see if any reaction occurs. The above method will still be used. The control will test if the pH has an effect on the activity of the enzyme. This control test solution will be tested in the colorimeter.
Safety.
Safety precautions which must be carried out are:
- Safety goggles must be worn at all times throughout the experiment to protect the eyes from pH solution which mite be highly acidic or alkaline. Also when using the Bunsen burner to denature the enzyme goggles must be worn.
- Lab coats must be worn in case of any spillages which may cause damage to clothes or skin. If spillages do occur on the rinse of immediately.
Results.
The results will be presented in two ways; the first will be a table of results with the observation of the colour change. The table will have the following headings:
- PH
- Colour change
- Absorbency
The table will be set out as below:
There will be 2 more set of results also presented in a table like the above, these results will be the repeat to ensure that experiment is fair and the results will show this if they are similar. The absorbency for each pH in all 3 experiments will be averaged out and the average results will be plotted on the graph. The average will be worked out for each pH by adding the absorbency of that specific pH from all 3 tables and dividing it by 3, as there are three set of results.
The table of averages will look like this:
A graph will be plotted so that it will be easier to distinguish and describe the relation ship between the absorbency and pH. It will also be easier to see anomalous results, these are results that don’t fit in with the others when a line of best fit is drawn, the x-axis will be the value of the pH and the y-axis will be the absorbency.
The graph will be set like this:
Implementation
The method used in order to obtain accurate results is:
- Draw a results table with appropriate headings, as shown after the method.
- For safety reasons the first thing to get was a lab coat to protect clothing from the acidic and alkaline pH levels and goggles to protect eyes.
- Collect all the apparatus needed: test tubes (6), test tube rack, photographic film, pH buffer solutions of pH 2,3,4,6,8, protease solution, colorimeter and cuvettes, measuring cylinder and pipette.
- Rinse out all apparatus to reduce inaccurate results and contamination. Film is already prepared and cut to size.
- Now start the experiment by measuring 2.5cm³ of each buffer solution using a measuring cylinder, and place in test tubes, one buffer per test tube. When using a pipette to pour pH use separate pipettes for each buffer or alternatively work way up from lowest pH to highest pH.
- To each of the buffer solution measure out 2.5cm³ of protease and place this in each test tube.
- Place these test tubes in a water bath at 37ºC until they are all at the same temperature. The water bath is already pre-heated to the right temperature in the incubator water bath.
- Now place the photographic film in the test tubes using tweezers. The tweezers are used instead of using fingers as this could cause contamination and start reaction before time. At the same time as placing the film in solution start a stop watch and incubate for 20 min.
- When test tubes have been incubated for 20 min remove the photographic film as this stops the reaction.
- Whilst waiting for this reaction to occur carry out the control.
- To prepare the control pour 2.5cm³ of a buffer pH of your own choice into a test tube and place 2.5cm³ protease and place in a water bath of 70-80ºC
- Remove this test tube from water bath once the test tube has reached the temperature of water bath.
- The purpose of this control is to see if there is and activity without photographic film.
- So when all test tubes are out of there water bath lave them to cool for 10 min before measuring the absorbency in the colorimeter.
- Check that each cuvette is of same type and shake substance in test tube and pour equal amounts of the test solution in a cuvette.
- Before placing the test solution in the colorimeter check that the colorimeter reading is set to absorbency.
- Before testing a solution the colorimeter must be zeroed this done by using a small amount of buffer and protease mixed together which has not been place in a water bath.
- Test solutions by placing the cuvette in the colorimeter and remove record reading and zero the colorimeter before next cuvette is inserted. Repeat this for all 6 cuvettes.
- If at any time during the experiment something spills or breaks immediately clean it up as it could cause others to have accidents as well as your self.
- Repeat the whole experiment twice more so in total there are 3 sets of results. Use the same colorimeter for repeated experiments.
- Draw another table with the average of the 3sets of results.
Results table
These averages will be plotted on a graph.
Analysis
Results 1
Results 2
Results 3
Results 1, 2 and 3 will be plotted on a graph but will not be considered in my analysis separately instead the averages of them totalled will be used as this is a better method.
Average of results.
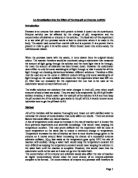
The averages will be plotted on a graph and analysed.
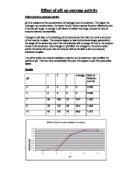
The results will be plotted on a graph and the points will be joined this is so that the data will be easier to analyse and to see trends between the absorbency and pH.
By looking at the result of averages on the graph it shows that it is a smooth curve without any anomalous results so this means that the results must be reliable. Therefore this means that as pH goes from more acidic to more alkaline the absorbency decreases, thus the pH does have an effect on the activity of protease on the exposed photographic film.
The optimum pH is 2 this is where the reaction is at its highest after that the reaction decreases. Every enzyme has its own optimum pH as it is active only over a restricted pH range. The enzyme protease has a low optimum usually the optimum is about Ph 7 for most enzymes. The optimum temperature occurs when the substrate and active site bind together to form an enzyme substrate complex and therefore they are in the correct state of ionisation so reaction takes place.
There is a sudden decrease from pH 2 to pH 3 this is caused by altering the state of ionisation of the amino acid in protease, if this is altered then the ionic bonds that determine the shape of protease change shape and the active site is denatured so the substrate can no longer bind to the active site so the reaction is decreased.
From pH 3 to 8 there is a steady decrease as the enzyme is denatured causing the reaction to come to an end.
My overall conclusion of these results is that the pH does affect the activity of protease on the photographic film as there is a decrease in the absorbency. The most suitable state for protease to react is under very acidic condition such as pH 2, protease will not react if the acidity weakens from a weak acid to a strong alkaline or pH’s 3-14.
Evaluation
The prediction I made in my plan was:-
I predict that as the pH increases the activity of enzyme increases until the optimum pH is reached. This is around pH 6-8 after this point as pH increases the activity of enzyme will decrease this is because the enzyme will become denatured and will not work efficiently as the active site will change shape and substrate will no longer be able to bind to the enzymes active site to form enzyme substrate complex. When no substrate complex is formed no reaction occurs and the activity of enzyme will slow down.
From my analysis I can say that this prediction was correct up to certain point. The prediction was incorrect as I said that the enzyme would denature at around pH 6-8 even though this is the case for most enzymes, this does not apply to pepsin (protease) as I was not aware of the optimum pH for pepsin, thus caused my prediction to be slightly inaccurate. Although in my prediction I had identified that once it had reached optimum pH the enzyme would become denatured and the effect of pH on the activity of the enzyme on photographic film would decrease.
In order to obtain accurate results I had to make sure that the accuracy was maintained throughout the experiment to the best of my ability, I did this by carrying out the following steps:
- The first step I carried out was to prevent cross-contamination with other solutions that have been measured in the same apparatus before. I did this by rinsing out all the equipment so that when measuring my solutions other solutions would not affect the accuracy instead it will reduce any sources of error.
- When measuring 2.5cm³ of each of the buffer solutions, I measured from the lowest pH to the highest pH as they would cancel each other out.
- Also when using the measuring cylinder in order to maintain accuracy it is better to use same measurement techniques such as reading of at eye level.
- The thermometer is quite a hard apparatus to read measurements of and it cannot be removed from solutions as temperature might drop so reading at eye level is important.
- The length of photographic film would affect accuracy so I measured each of the strips using a ruler.
- These strips were placed on the white tile to reduce the amount of handling and cross contamination that could occur, and tweezers were used to put them into the test tubes.
- When adding the film to test tubes it was done quickly because as soon as film is put into solution the reaction begins, and all reactions had to begin at the same time.
- The temperature of test tubes had to be at 37c before adding film and this was checked by using a thermometer.
- Solution was shaken before removing photographic film, the film was removed and once again the tube was shaken so that the mixture was mixed together properly, then poured equal amount of solution into each cuvette which were of the same type.
- Making sure the settings of colorimeter was correct the cuvettes were inserted correctly with the arrow facing the right way. In between each cuvette the zero solution as used to zero the colorimeter.
When carrying out my experiment for the first time I faced certain problems, but I corrected these errors before repeating my experiment.
The problems that I faced are:
- Due to the difference in some of the equipment and the method from my plan to the equipment and method given on the method sheet confused me slightly as how the experiment was going to be carried out. My main error that I realised was the control as I was not quite sure of how to set this up or carry this out, in my first experiment I left this in a separate water bath of 80ºC denaturing the enzyme in the buffer solution then I added the photographic film to this, once the temperature of the test tube was the same as the water bath I left this for 20 minutes. Eventually when realising my mistake which was about 10 minutes into the experiment I was supposed to put the denatured control solution without the photographic film in the same water bath as the other test tubes, when this reached the temperature of 37°C then I was to add the photographic film and time for 20minutes with the other test tubes. As soon as I realised my error I transferred the control test tube even though it had photographic film in it to the other water bath of 37°C for the remaining of the time. But when carrying out the repeated experiment the control was set up correctly.
- When placing film in the test tube it had a tendency to get stuck to the side of the test tube but by giving it a swirl a couple of times it finally went into the solution. When swirling the test tubes some of the solution may have come out of the test tube therefore leading to inaccuracy.
- When taking film out of the reaction it took longer as the tweezers were not thin enough to fit through the narrow headed test tube, but we were given this equipment for each of the experiment so instead of using the tweezers I used the thermometer to get it out it took a lot longer and the reaction was not stopped at the specific time.
- The labels that I had stuck to the test tubes one or two of them had come of due to the steam of the water bath so a permanent marker would have been best to use, but by using my mind to think where they had been placed I managed to get the right ones.
- The temperature of the water bath may have fallen or increased at any point during the experiment due to drafts from windows and doors being opened and closed.
- As the experiment was repeated over different number of days the change in temperature of the room would affect the results.
-
As we only had 1 lesson to complete the experiment there were limitations as to how long we could leave the experiment to react the maximum time was 25min and we were told that a reaction doesn’t occur until the 20th minute so we might have taken film out during the reaction so the reaction had not been completed, nothing could be done to sort out this problem.
- Water baths which were used as the whole class was doing the same experiment they usually got quite full with beakers and test tubes which made it hard to find mine.
- Also as experiments were done on different days there was the fact that we wouldn’t get the same equipment that we had used previously so the number of colorimeter had to be noted so we get the same one as different colorimeters have different absorbency readings as the light that goes through may have been used more or less.
In order to improve my experiment the problems I was faced with have to be reduced this can be done by:
- The problem about the control was not partially my fault as we were not told that we wouldn’t be using our own methods but a provided method sheet. But at least I had realised before completing the entire experiment. To correct this error I could have asked teacher before starting experiment if I was right about the way I was going to carry out the control.
- To prevent the film sticking to the side it would have been best to use smaller tweezers which make it easier to place it into the solution.
- Also smaller tweezers would be a lot easier to remove the film from the test tube, or instead of using a test tube a boiling tube could be used but this way more solution will be needed.
- Instead of using sticky labels a marker pen should be used to label the test tubes, as this will not be affected by the heat, preventing any mix ups taking place.
- Also to prevent labels from falling off because of the steam a permanent marker would have been better to use.
- To reduce the water bath temperature from decreasing due to drafts from windows and doors they should be kept closed through the experiment.
- The experiments should have been repeated in the same day as conditions were more likely to be the same.
- The amount of reaction should be increased to about the 30 min as it gives it more time for reaction to occur.
- Making sure the number of colorimeter was recorded in order to obtain accurate results.
Overall even though I encountered various problems I always found a way to improve them, and ensure that the experiment was carried out as accurately as possible. I followed all the steps of accuracy as above and my results were reliable as I had no anomalous results so therefore my experiment must have been precise and accurate up to a certain extent. Also according to my analysis the graph is also a smooth curve. Also my analysis said that the optimum pH is 2 this is correct as I have supported this with scientific knowledge, this must be true because another example of where pH effects the activity of an enzyme is in the stomach during digestion when proteins have to be broken down by pepsin but it is turned into its active form under high acidic conditions as it can only work under these conditions, for the reason that after pH 2 pepsin becomes denatured and inactive. The apparatus did have its limitations but most of these limitations could not be prevented.
The majority of the mistakes were made whilst doing the experiment the first time but this cannot be helped as I have not done this experiment before, so the mistakes I made during the first time were corrected when carrying out the repeats.
The techniques which were used in this experiment were of high quality especially in the repeats everything was carried out with care although sometimes thing had to be rushed slightly in order to get the experiment finished, but this was not too bad it just meant working at a faster speed but also taking care. In my experiment I did not encounter any breakages or spillages. So this did not hold me back or stop me from working.