4. Reasons for the choice of apparatus-
- Yeast culture; Pre trials (shown later) indicate that a 1% yeast culture diluted to 0.1% suspension allowed for ease of counting (details of serial dilution shown later).
- Compound microscope; yeast cells are too small to be counted with the naked eye. A microscope is the obvious choice.
- Water bath; Room temperature is too cold for the yeast cells to multiply efficiently; a constant temperature of 37º shall be required. This temperature will need to be checked on a regular basis (every 12 hours in this instance).The temperature dial on the water bath will prove advantageous to control the temperature throughout the experiment.
- Haemocytometer; the grid patterns of the improved Neubauer ruled haemocytometer will allow for ease of counting of yeast cells (method on ‘how to use the Haemocytometer’ to follow) and ultimately aid in the calculation of population growth.
- 1 cm³ pipette and filler; to ensure the accuracy needed in the experiment is sustained throughout.
- Boiling tubes and test tube racks; obvious choice of serial dilutions required (tubes must be cleaned thoroughly if being used again).
- Capillary tubes; to limit the amount of yeast suspension uptake form the dilution to ensure that there is little waste.
- Timer; set to hours as the experiment will be over a 120 hour period with a window of 15 minuets between each sample collation.
- Thermometer; to ensure the temperature is set at constant 37º (explained earlier).
- Lens cloth; the Haemocytometer needs to be cleaned by an anti-static lens cleaning cloth; the same applies for the cover slip.
- Spatulas, top pan balance, filter paper or beakers; to weigh the correct amount of substance when creating the yeast culture. The weights are given in the step by step procedure. Filter paper or beakers can be used (as long as scales are set at zero when referring to the later) to transfer substances from balance to tubes to mixed.
5. Procedure; N.B-A window of 15 minuets per suspension is allowed in this experiment, this time should be used in creating the dilutions and obtaining the results. This figure can be adjusted to window which is more comfortable. Pre trials for this particular experiment showed that 15 minuets were more than adequate for the setup and observations each day.
1; for a 1% yeast solution
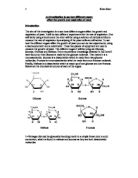
1g dried active bakers yeast (saccharomyces cerevisae),
1g of chosen carbohydrate substrate,
100ml of distilled water.
Procedure;
1. Add yeast to sugar and pour together into water. Stir and leave to incubate in a 37º water bath for 1 hour.
2. Repeat for every suspension required leaving a window of 15 minuets per culture.
REMEMBER: check temperature of water bath regularly and adjust if necessary.
2. After 1 hour (the incubation period) a serial dilution is required for the first result to be recorded.
Serial Dilution for A 1% Yeast Solution to A 0.1% Dilution
To conduct serial dilutions firstly make up the culture stated above. Then via a pipette add 1cm³ of the yeast culture to 9cm³ of distilled water. This gives a 0.1% dilution, more than adequate for the counting of cells but further dilutions can be made if deemed necessary.
I.E for a 0.1% dilution to a 0.01% suspension, take 1cm³ of the yeast culture and add to a further 9cm³ of distilled water (the amount of yeast culture will be ample for the experiment as long as procedure is followed to prevent wastage)
HINT: try measuring the distilled water before hand and transfer the water to the tubes before the yeast is ready to be harvested- this leaves more time for the counting and recording of the sample.
5b. To use the Haemocytometer, And to count yeast cells
- Place the cleaned cove slip over the cleaned haemocytometer.
- Move the cover slip over the haemocytometer backwards and forwards with some pressure, until coloured interference rings (Newton’s Rings) at the sides of the covers slip.
- The cover slip and the haemocytometer are very close together and there is a uniform depth in the central chamber.
- Examine the grid microscopically using a *10 eyepiece with a *10 objective lens for initial focus. The central squared area fills the field of view at this magnification. Observe that the central squared area is subdivided into 5*5= 25 smaller squares.
- Now switch the objective lens to *40 magnification. You will observe that 25 smaller squares are divided into 4*4= 16 of the smallest squares.
- Remove the haemocytometer from the microscope stage and, by means of capillary tubes draw up a small amount of the solution, and place on the corner of the cover slip where it meets the haemocytometer and the resultant vacuum produced by it, draws up a uniform depth of liquid into the chamber.
- Return the haemocytometer to the microscope stage.
- Sharp focus on the cells on the cells in the smallest squares.
- Count the number of cells in 1 square only.
- Make sure the same square is repeated each day (making sure that a separate result is achieved for each repeat on the same day i.e. if three sample repeats are required make sure that three separate squares are counted.)
- Taking the number of cells counted/observed as X;
Average cell count = X* 16* 25
- Clean the haemocytometer and cover slip prior to use using lens cleaner cloth. It may be necessary to clean the microscope’s objective lens (look through the eyepiece with nothing on the stage as a check.
- Do not remove stock solution from the water bath, use pipettes to transfer solution.
- The procedure is complete. Repeat the required number of times based on amount of substrates used.
6. Risk assessment
Having consulted Hazcards these conclusions have been drawn;
- As long as the sample is pathogen free and good laboratory practise is used the risks are minimal.
- The working area must be kept as clean as possible and in an organised manner then the samples have a reduced risk of contamination. This must be maintained throughout the investigation.
- Reusable items must be washed thoroughly after every work session; they can then be used next time without fear of contamination.
- Disposable items must be disposed of in the correct fashion, and all sharps must be disposed of in specialist sharps boxes/bins.
Implementation and Data Presentation
The counting chamber of the Haemocytometer is 0.1 mm deep. The central squared area is divided into 25 main squares, each of which is subdivided into 16 smaller squares. The volume of suspension above the smallest squares is a uniform 0.00025 mm³. So the the number of cells in the culture suspension is given by:
D*N
S*C
Where D= dilution of original culture
N= total number of cells counted
S= number of squares counted
C= volume of 1square
The experiment is taken over 5 days, and every 24 hours a reading is taken. Raw results will be tabulated first, with headings of sample time and cell count. This shall be done for all 6 samples. The findings will then be processed to find an average cell count per day. A graph will be drawn of cell count against time in hope that a growth curve will be achieved