Titrations are most commonly recorded in curves; is the independent volume of the titrant, while the dependent is the ph of the solutions. The curve is sigmoid and presents a significant variation of pH at the equivalence point, which allows an easy determination of the latter.
The progress of a titration is usually monitored with an indicator. Frequently, during a titration it is also useful to monitor the progress of the titration with a graph. This graph is known as a titration curve. Such a curve reflects the changes in pH that occur as material is added from a burette to the solution in the beaker below the burette.
A burette is a vertical cylindrical piece of laboratory glassware with a volumetric graduation on its full length and a precision tap, or stopcock, on the bottom. It is used to dispense known amounts of a liquid reagent. Burettes are extremely precise: class A burettes are accurate to ±0.05 ml and this is the reason why it is most commonly used in titration experiments.
The way to use a burette to make precise readings is fairly simple. Clamp the burette vertically in a stand. Fill the burette carefully using a beaker and a filter funnel. Open the tap briefly to fill the burette below the tap making sure there are no trapped air bubbles. Read the burette scale by observing the position of the bottom of the liquid meniscus, making sure your eyes are level with the graduation mark. To get an accurate reading on the meniscus more clearly, hold a white card behind the burette and record the volume reading to the nearest 0.05 cm3
A pipette is a laboratory instrument used to transfer a measured volume of liquid to another medium. During this experiment careful consideration must be taken when filling in the pipette. First of all the pipette must be cleaned with distilled water to make sure that there is no unwanted materials inside the pipette, which will affect my results. Then before filling the pipette you must make sure that the pipette is perfectly steady and perfectly fit to the end to the pipette filler other wise the pipette will fell out of the grip and the solution will be lost. The pipette is filled by dipping the tip in the volume to be measured, and drawing up the liquid with pipette filler past the inscribed mark. The volume is then set by releasing the vacuum using the pipette filler or a damp finger. While moving the pipette to the receiving vessel, care must be taken not to shake the pipette because the column of fluid may "bounce". I also ensured that there are no air bubbles left in tube as the measurement was taken. To ensure the volume inside the tube, I let the solution settle down to the bottom of meniscus to the point when it just touches the collaboration mark.
A funnel is a pipe with a wide open, often conical mouth and a narrow stem. It is used to channel liquids and solution in to containers with small openings. The reason why I used this equipment is because, with out these a lot of the solution will spill out when transferring it to the burette.
It is a widely used laboratory instrument with a conical base and a cylindrical neck. They are usually marked on the side (graduated) to indicate the approximate volume of their contents. The conical shape allows the contents to be swirled or stirred during an experiment, as it is required in this experiment (titration), because as the acid fills in to the alkali solution; the conical flask needs to be swirled around to make sure that all the acid is mixed in the alkali solution.
A weighing scale is a device for measuring the mass of an object. I have used this instrument in this investigation as I was asked to weight out correctly 2.65gm of anhydrous sodium carbonate.
A spatula is used to take small quantities of solid chemicals. It serves like a spoon. I used this to pick up the solid chemical anhydrous sodium carbonate.
A glass stirring rod can be used to stir liquids in beakers and flasks. I had to use this equipment in order to mix the solid anhydrous sodium carbonate.
Sodium carbonate is a sodium salt of carbonic acid. It is synthetically produced in large quantities from table salt in a process known as the Solvay process. There are many hazards that can be caused by inhaling or if accidentally swallowed because inhalation of this could cause eye burns and swallowing it could cause irritation to the skin and the respiratory tract.
Sulphuric acid is a strong mineral acid. It is soluble in water at any concentration. Dense, viscous, colourless liquid that is extremely corrosive. It gives out heat when added to water and can cause severe burns. Sulphuric acid is used extensively in the chemical industry, in the refining of petrol, and in the manufacture of fertilizers, detergents, explosives, and dyes. It forms the acid component of car batteries.
Methyl orange is an indicator frequently used in titrations. It is often chosen to be used in titrations because of its clear colour change. Because it changes colour at the pH of a mid-strength acid, it is usually used in titrations for acids. Unlike a universal indicator, methyl orange does not have a full spectrum of colour change, but has a sharper end point.
In a solution becoming less acidic, methyl orange moves from red to orange and finally to yellow with the reverse occurring for a solution increasing in acidity. It should be noted that the entire colour change occurs in acidic conditions
Plan: - Experimental Procedure
Here I will be showing the apparatus I used, the amount of solutions which I need and the way in which I measured the accurate reading and also the method of carrying out this experiment.
-
Weighing Scale: - 0.005cm-3
-
Burette: - 0.05cm-3
-
Pipette: - 0.06cm-3
- Pipette filler
- Plastic bottle
- Conical flask
- Volumetric graduated flask
- Stirring road
- Funnel
- Spatula
- Cork
- Beaker (with different measurement scales)
- Distilled water
- Iron stand with clamp attached
- Indicator
-
Sulphuric acid: - Sulphuric acid, H2SO4 is a strong mineral acid. Its main uses include ore processing, fertilizer manufacturing, oil refining, wastewater processing, and chemical synthesis. The sulphuric acid used in this investigation was produced from sulphur dioxide; this is because sulphur dioxide was formed when a metal is extracted from its ore.
-
Anhydrous sodium carbonate: - (Na2CO3) is a weak alkali or it is a sodium salt of carbonic acid. It is mainly produced from sodium chloride or table salt.
There are a number of safety precautions which we must consider when conducting this experiment. These are illustrated below:
-
Safety goggles must be worn at all times while doing the experiment. If you don’t use safety goggles, chemicals such sulphuric acid can cause serious damage to the skin or it can burn your skin and if it happens to get in to the eyes it will cause damage to eyes, which could result in loss of vision.
- Contact lenses are not allowed. Even when worn under safety goggles, various fumes may accumulate under the lens and cause serious injuries or blindness.
-
Closed toe shoes and long pants must be worn in the lab. Sandals and shorts are not allowed. This is also due to the fact that certain chemicals can burn your skin, for example H2SO4.
- Long hair must be tied back when using open flames.
-
Excess reagents are never to be returned to stock bottles. If you take too much, dispose of the excess, otherwise it could cause serious damage to if it is mixed up with other acids or solutions.
-
If chemicals come into contact with your skin or eyes, flush immediately with copious amounts of water and consult with your instructor, as this can cause damage to the cells.
- Always wash your hands before leaving lab.
- Notify the instructor immediately in case of an accident.
- Do note taste or sniff chemicals; for many chemicals, if you can smell them then you are exposing yourself to a dose that can harm you.
- Do note casually dispose chemicals down the drain; some chemicals can be washed down the drain, while others require a different method of disposal. If a chemical can go in the sink, be sure to wash it away rather than risk an unexpected reaction between chemical 'leftovers' later.
- Taking notes in the lab, not after lab, on the assumption that it will be neater. Put data directly in your lab book rather than transcribing from another source (e.g., notebook or lab partner). There are lots of reasons for this, but the practical one is that it is much harder for the data to get lost in your lab book. For some experiments, it may be helpful to take data before lab. You should always read the experiment in advance.
-
Firstly, I made sure that I have chosen the right equipments which are essential to this experiment. The equipment which you need are Weighing Scale, Burette, Pipette, Pipette filler, Plastic bottle, Conical flask, Stirring road, Funnel, Spatula, Cock, Beaker (with different measurement scales) such as the 250cm3 beaker and 100 cm3 beaker, Distilled water, Iron or wooden stand with clamp attached and an Indicator.
- Next step is to make sure that you wash all the equipments with distilled water and then again with hydrochloric acid (HCl) to make sure that you remove all the unwanted substances form the all the equipment which includes the burette, pipette, conical flasks and the beakers. Distilled water is water that has been recondensed from steam. Water is heated to boiling and the water vapor (steam) is collected and condensed back into a pure liquid. Any impurities like minerals stay as a residue in the original liquid, separate from the distilled water. Distilled is probably considered the most pure. And this is the reason why we should use distilled water to wash out all the equipments. Normal water contains many impurities.
Also when washing out all the equipments make sure you wash out the equipments thoroughly as even a minor impurities could cause error in the readings, and when washing the burette make sure you wash it the stopcock both open and closed, as this will review if there is any blockages of damages to the tap, before you start the experiment.
- After doing all the work illustrated above, the next step is to take ensure that you are wearing all the safety equipments like the goggles, lab coat and make sure if you have long hair you tie it backward short, so that by any chance it wouldn’t come in contact with the acid, and also avoid wearing contact lenses. And also never sniff any chemicals; if you can smell any chemicals it means that you are exposing yourself to dangerous chemicals.
- Now the actual experiment starts, the first part of this experiment is to accurately weight 2.65gm of anhydrous sodium carbonate. For doing this you will need a plastic bottle and a weighing scale and the solid anhydrous sodium carbonate. The method of conducting this part of the experiment is shown as a step by step.
- First make sure that the weighing scale is to zero, this can be controlled by pressing the reset button.
- Then you measure the bottle itself with out the solid chemical.
- Record the measurement.
- Add the 2.65gm to the mass of the bottle to calculate the final mass which you should get.
- Now add the solid anhydrous sodium carbonate, with a spatula to the bottle until it reaches the calculated mass.
-
The next step is to transfer the solid anhydrous sodium carbonate to the 250cm3 beaker. After doing this add about 50cm3 of distilled water to the beaker and stir it well with a stirring rod and make sure that all the solid pieces of the anhydrous sodium carbonate are dissolved in the water.
-
Now you must transfer the dissolved alkali solution into the graduated flask, and close the flask with a bung. As this is done, the next step is to shake the alkali solution thoroughly and make sure the whole solid anhydrous solution is mixed well in that 50cm3 of water, while doing this I had to make sure that I don’t spill any and that the bung is a perfect fit to the circumference of the graduated flask, otherwise the bung would go in to flask and you wont be able to get the solution out.
Once you have made sure that the whole solution is well dissolved add more and more distilled water until it reaches the graduation mark. And shake the solution well, so that the alkali solution is in equal concentration in all areas, once you made sure that the whole solution is equally mixed, make sure that the solution is well accurate to the graduation mark, to make sure that if this is accurate I looked observed the meniscus in level with my eye.
- As I have prepared my alkali solution, the next step is to fill the burette with the acid solution (sulphuric acid). For this the equipments which I used are as follows:
- Burette (cleaned with distilled water and HCl), clamped to the iron stand.
- Funnel to pour the acid.
- Acid solution in a beaker.
First transfer the acid solution to a beaker, the next step is to make sure that the burette is completely empty. After this I poured the acid solution through the funnel to the burette until it reached the graduation mark, which is zero. Remove the funnel from the burette as there will be drops still left in the funnel. Care must be taken when measuring the reading, because the acid is always attracted to the glass and therefore make sure that the meniscus is accurate at zero (observe the bend).
-
The next step is to use a pipette and transfer 25cm3 of the alkali solution in the conical flask. For doing this I need pipette filler attached to the pipette and the alkali solution. To transfer 25cm3 of the alkali solution, I need to dip the tip of the pipette in to the graduated flask containing the alkali solution and then draw the water in to the pipette using the pipette filler. While doing this make sure that you don’t let any air bubbles in, and then control the amount of the solution using your thumb and make sure by observing carefully that the solution is right on the graduation mask.
- The next step is to move the alkali solution in to the conical flask, while moving the pipette to the flask; care must be taken not to shake the pipette because the column of fluid may bounce. To transfer the liquid press the vaccum in the filler and make sure that the whole of the liquid had left the fillet by slightly touching it tip to the conical flask, this ensures that all every single drop of the alkali solution is dropped to the flask.
- Place the conical flask underneath the burette, with a while tile underneath the conical flask.
- Test the indicator methyl orange. This can be done by adding a putting a little drop of acid in to the tile and a single drop of the indicator. The colour you will see is the colour which you will find at the end of the reaction.
- Next step is to add 3 to 4 drops of the indicator methyl orange to the solution and shake the solution with out spilling any alkali, as this would affect your results.
- Then next step is to add the acid solution to the conical flask until the indicator changes colour. This will allow me to find the approximate value for the volume of the acid needed to react with the sodium carbonate solution. This can be controlled by carefully turning the stopcock of the burette, and by shaking the alkali solution as the acid falls on to it. While doing this we must take it into careful consideration that even a single drop of the acid could change the colour of the indicator. Also make sure that as to get a precise measurement; you could control the tap to make the acid come out drop by drop, as we know that a single drip could change the colour of the indicator.
-
The next procedure that we must carry out is taking the reading from the burette. Read the burette scale by observing the position of the bottom of the liquid meniscus, making sure your eyes are level with the graduation mark. To get an accurate reading on the meniscus more clearly, hold a white card behind the burette and record the volume reading to the nearest 0.05 cm3.
- We must repeat the experiment a number of times until we get precise burette readings. As this will help in the calculation as we will be bale to find the percentage error using all the burette readings. Also make sure before repeating the experiment to wash out the conical flask with distilled water and HCl, otherwise replace it with a new one, this is important because even the slightest drop of acid left in the conical flask could affect the results or the endpoint.
The plan which I have provided has more chances of getting reliable results. This is mainly because I have devised a successful plan by actually working out the amount of chemicals which I am using and the equipment which I need to use in order to get more reliable results and also in my plan or method I have explained the risk factors that you should, mainly consider while doing the experiment. I have also talked about the way in which you use different instruments to produce an accurate result.
Results:
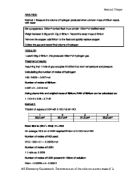
These are the results which I got as part from the investigation which I conducted on titrations; I repeated the experiment a number of times (5) to get precise number of results. And also this will allow me to calculate the concentration of sodium carbonate solution which I made up and the concentration of the acid solution. The calculations for this are shown below as step by step.
Calculations for the concentration of sulphuric acid:
The chemical equation for this solution is:
H2SO4 + Na2CO3 → Na2SO4 + H2O + CO2
To find the concentration of sodium carbonate the first thing which I need to do is to work out it mole; the formula for this is:
From this equation the amount of mass we used was 2.65g of anhydrous sodium carbonate and the molecular mass of this equation can be found with the help of the periodic table. This is shown below:
Na (mass number) = 23 x 2
C (mass number) = 12 x 1
O (mass number) = 16 x 3
————
106 (RMM)
= 0.025 mol
-
There are 0.025 moles in the weak solution of 250cm3 in the volumetric graduated flask.
-
So in 25cm3 of the solution; there are 0.025/ 10 = 0.0025cm3.
The nest step is to use the formula shown below to work out the concentration of sulphuric acid using the formula:
(This is re-arranged from the equation→ amount/mol= concentration x average titre)
To way of working out the average titre is shown below:
Put these data on to excel and the; and by using the average function formula the average of these data will come up to = 22.7.
To work out the concentration use the formula above:
= 1.10 x 10⁻⁴
-
The concentration of acid is 0.11 mol dm-3 (four significant figures) in 1000cm3 of sulphuric acid.
Analysis:
During this investigation I have taken in account all the variables that would affect my investigation, and I have completed my experiment successfully and the theory or my prediction has been proved right. Not only this but all the procedure that has been carried out was correct and therefore it gave be reliable source of information and precise results.
My results show that the concentration of sulphuric acid in the solution was 0.11moldm-3. This proved the prediction that was given to me earlier as a prediction that the concentration of the acid will be between 0.05 moldm-3 and 0.15 moldm-3.
My table of results shows that all the value that I got after taking all my readings are precise because all the burette readings which I have shown is close together or with in a difference of 0.1cm3. This proves that there are no anomalies in the data that I have shown, and therefore my final concentration of the acid is very accurate.
During my investigation I took great care to avoid spillage of the acid or the alkali solution, and I have made sure that when I was preparing the alkali solution I have mixed it thoroughly so that the whole of the solution is well mixed and therefore I won’t get high and low concentration at certain point during the investigation. Therefore the results in my table are not affected and that’s why they are said to be precise.
The calculations which I have done to prove my prediction shows that you need 0.11 moldm-3 of the alkali solution in 1000cm3 of the acid solution for the neutralisation reaction to happen, and this proves to be right as the average prediction that was given was between 0.05 and 0.15moldm-3.
Conclusion:
In conclusion to my investigation; I was able to find the concentration of sulphuric acid with in the given amount of the approximate which was between 0.05mol to 0.15mol. The result which I got towards the end of the investigation was 0.11moldm-3 and this is between the approximate results that were given to us. Also from my calculations I found the percentage error which I possibly could have, this is mainly due to the fault that can occur in the measuring equipments like burette and other vessels. This showed me how by how much amount that my result could possibly vary according to the total percentage error. Overall from the experiment I was able to find out the accurate concentration of sodium carbonate in the solution.
Further more to my conclusion, I have maintained or kept my variable constant other than the ones which I had to change all the time in order to get a reliable result, and I made sure that all the safety measurements are met as this helped me to find reasonable experiments with out any anomalies. Also the fact I have repeated my experiment a number of times helped me in finding an average titre from the burette reading. Also the fact that I took more results helps me in finding precise results that are needed for calculating the concentration of the mole. Overall, my experiment was successful as I was able to collect the results successfully with out any unusual accidents like dropping the burette or pipette.
Evaluation:
In my experiment there are many things that I must have taken care off before even starting the experiment and during the experiment. These include things like making sure that the burettes taps are not broken and is closed when pouring the acid in to the burette, the pipette is tightly fit in to the pipette filler, so that it won’t fall out when you are transferring your weak base in to the conical flask. So while I was doing the experiment I made sure that these things are thoroughly checked and made sure that it would not accept the endpoint or the result.
There are various other things that could cause error when doing the experiment these include things like not taking the funnel off from the top of the burette, this is as important as we know that a tiny drop of the acid could change the colour of the solution. So I made sure that the funnel is taken off from the top of the burette after filling in the burette with the acid. There are also many other things that could affect the result of the burette, these include the most common error or human error that ca be caused when taking the readings from the burette. This is so important that the entire calculations depend on this. So for taking the measurement I made sure that the I look at the equipment from my eyes level not directly from top of below the solution as we know that most of the acid gets attracted to the glass tube and so the position of the solution is bent and because of this we must take measurements from our eye level. This is illustrated by the picture shown, shows the possible outcome which you will get if u miss read the burette.
Also during the experiment I made sure that I am using the right amount of chemicals throughout, this is made sure by doubling checking the plan which I was supposed to follow in order to find the accurate result for the concentration of anhydrous sodium carbonate. Also I made sure that the entire weak base is mixed well in the graduated solutions to avoid getting any area of high and low concentrations as this would affect the results that I had taken, because it wouldn’t give me precise measurements from the burette, and there will be a huge difference in each of the readings.
One of the other things that I made sure is that I have washed out the inside of the conical flask as I was shaking the conical flask regularly and as we know that a single drop of acid could change the colour of the solution immediately depending on the indicator which I have used, and the use of white tile underneath the conical flask helped me to find if the colour change due to the indicator was correct or not. And also to test the indicator I dropped a little bit or a single drop of the indicator to the white tile and a single drop of the acid to see what colour change am I going to see as the acid is let out of the burette in to the weak base solution.
The next thing I have done is working out the percentage uncertainty of the result; these are mainly dues to the errors that could happen due to errors in the graduation mark of the instrument which I have been using. The percentage for all the instruments which I have used is shown below, including the formula which I need to use in order to find the percentage error of certain objects.
The formula for finding the percentage error is shown below:
Percentage error = error/value x 100
Percentage error for burette = 0.05 = 0.05/50 x 100 = 0.01
Percentage error for pipette = 0.06 = 0.06/25 x 100 = 0.24
Percentage error for the weighing scale = 0.005= 0.005/2.65 x 100 = 0.18
Total percentage error = 0.01 + 0.24+ 0.18 = 0.42
This shows that the maximum error that I could possibly have is a total of 0.42%, this shows that there weren’t any anomalies in my results and this proves that the concentration of the sulphuric acid will still remain the same, as there is no huge difference between the data or the result which I produced.