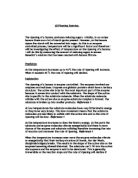
As shown in the diagram overleaf, the casein micelle is made up of sub micelles, which are these hydrophobic and hydrophilic clusters, which contain calcium, which holds them together.
Structure of a micelle and sub micelle
(http://www.foodsci.uoguelph.ca/deicon/casein.html)
Safety
General lab rules must be followed at all times, so safety goggles must be worn at all times, no eating or drinking and any glass breakages must be reported then cleaned up.
Rennin
Rennin is an enzyme protease; therefore safety goggles must be worn to prevent any from going into the eyes. Gloves should also be worn, in case of an allergic reaction, skin irritation can also result. If the enzyme is spilt on the skin, or into the eyes, rinse with a lot of water and seek medical aid.
Calcium Chloride
Calcium Chloride is an irritant, particularly on dry skin. Avoid contact with skin, if spilt on the skin, wash off with plenty of water. Do not ingest. Seek medical aid if solution is ingested or splashed into eyes.
Fair Test
In order to ensure that this experiment is a fair test I am going to keep the following factors constant:
- Temperature of each solution
- Volume of Milk that will be used
- Volume of Enzyme to be added to the milk
- Shake the beaker only once, after the enzyme is added.
- Make the end point where the globules of coagulated milk are clearly visible.
- Volume of calcium chloride added to solution each time.
Preliminary Experiment
Prior to devising this plan, I conducted a preliminary experiment in order to determine what volumes of liquids I should ideally use. I initially ran the test using just 10cm3 of milk, however the reaction was happening at too fast a rate to be able to get an accurate result on the time, and when the milk sample reached the end point. So after this, I decided to use 20cm3 of milk and an overall total max concentration of calcium chloride of 1 mol dm-3 and a minimum of zero, in order to get an accurate base of the none calcium assisted enzyme reaction.
Equipment List
Sodium Citrate Solution – Used to De-calcify the milk solution so the calcium content will not interfere with the experiment.
1 mol dm-3 Calcium Chloride Solution – Provides the calcium ions for the test.
500cm3 Beaker – Storing the milk
6x 50cm3 Beakers Labelled A-F – Made up as specified on the table on the next page
3x 1cm3 Syringe – Measuring out the Calcium Chloride and Enzyme
10cm3 Measuring Cylinder – Measuring out the Milk required
Microscope Slide – Used to determine the End point of the experiment (end point will be where flecks are large and clearly visible.
Stopwatch
Distilled water – Ions present in tap water may have an effect on the rate of reaction.
Calcium Chloride Concentrations
Prediction
I predict that as the concentration of the Calcium Chloride is increased, the overall rate of reaction will increase (the milk will coagulate faster). I believe this will be the case because the increase in the Ca2+ ion concentration will form more of the Casein Micelles, which will be able to collide with the enzyme more frequently and with energy greater than the required activation energy (Salter’s Chemistry, Heinemann, Page 221, Collision Theory), resulting in a faster rate at which the peptide bond within the protein will be hydrolyzed by the enzyme. The reaction will initially be first order; this is where the rate is proportional to the concentration of calcium chloride. However as the concentration increases, the rate becomes zero order, where the enzyme is the limiting factor, due to there being a limited number of active sites to process the protein.
Method
- Prepare the solutions of Calcium Chloride in their respective beakers.
-
Measure out 20cm3 of milk into a 50cm3 beaker.
-
Add 2cm3 of Sodium Citrate to the milk solution in order to remove the calcium that is already present in the milk solution, in order for it to not affect the result.
- Pour the Milk solution into beaker labelled A and shake to ensure that the milk and calcium chloride are fully
-
Place 1cm3 of the enzyme into the beaker, shake and then start the stopwatch.
- Dip the Microscope slide into the solution every 5 seconds and observe to see whether any coagulated milk flecks are clearly visible
- When the coagulated milk flecks are clearly visible on the microscope slide, stop the stopwatch and record the time
- Repeat the test 3 times for each of the Beakers labelled A-F and record the results in the table below
References
http://www.sciencebyjones.com/milk_notes.htm, protein percentages in milk
Salter’s Chemistry, Heinemann, Page 221, Collision Theory
http://www.foodsci.uoguelph.ca/deicon/casein.html, Micelle diagram
Word Count = 967