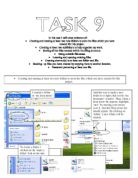
I then had to create the macro to be located in this new toolbar. To get this, I clicked on Tools>Macro>Record New Macro, which brought up this menu. This would allow me to choose where I wanted my macro to be activated. As it was to be located in a toolbar, I clicked on the Toolbars button. This brought up yet another sub-menu. I dragged and dropped the empty macro, entitled Normal.NewMacros.Macro1 to the My Macros toolbar. I then renamed his, by right clicking on it and typing the new name into the name box. I then closed down the sub-menu, by clicking close, which began the recording of the macro.
The macro I planned would automatically select all of the text in a document, copy it, open a new document, set up the new page, add the greetings and salutations, then paste the text from the first document into it. It would then automatically save.
In the document already open, I selected the entire document, by pressing Ctrl and A down simultaneously. I then copied this information into the clipboard, by pressing down Ctrl and C. A new document was then created, by clicking on the new icon in the Standard toolbar.
Whilst still recording, in the new document, I inserted the pre-made letterhead, in the form of a gif file. This was done by clicking on Insert>Picture>From File, and then browsing via the standard Microsoft Office file interface for the letterhead image file. As the letterhead had large areas of white to either side of the design, it meant that the image would automatically the central, whatever the justification. This was useful as during the recording of a macro, the Format Picture options are unavailable.
I could then enter the address. To begin with, I clicked on the Align Right button in the formatting toolbar. This would make all of the text align itself to the right hand side of the document. I then entered the text of the address, and the email address.
I then entered the date. Rather than manually entering it, I used the Built-in date and time function in Microsoft Word. After selecting it from the Insert menu, I chose the format of date I wanted, clicked on to Update Automatically which, when being used, will ensure the correct day is shown automatically, and then clicked on OK. The correct date was now located in the document.
After leaving a few lines gap, I selecting the Align left option, and then inserted a salutation. To save time, I used one from AutoText, located in the Insert Menu. After leaving a line gap, I pressed the paste button on the taskbar. In use, this will paste the text from the first document previously copied. After that, I left another line’s gap, and entered the closing phrase by typing it in.
A copy of Angela William’s signature, scanned into the computer with a scanner, was then inserted as an image file, in the same way as the letterhead was. On the next line, the title of Mrs Williams, and her position was added.
Next, the text was formatted. This needs to happen now to ensure the pasted text fits in with the rest of the document. I pressed Ctrl + A to select all of the text, and then selected Microsoft Sans Serif as the font, and 12 as the font size.
When this was done, I chose spelling and Grammar to spell checks the document. This would be recorded in the macro. After ensuring no text was incorrect, I finished spell checking, and then saved the file as letter001. When I had done this, I stopped the recording of the macro.