In order to see what I am doing, I have decided to use a VDU, as it is the best output device that directly interfaces with the keyboard and mouse. Having a speaker or plotter would be ridiculous. I shall also include a printer to print off data capture forms and other useful items. Again, both need to be used together for it work properly, as otherwise I would not be able to print my work or I would not know what I was printing. I will also need all of the equipment required for the PC to work properly, such as a CPU, motherboard etc, as none of this will work if the computer as a whole does not.
Data Collection, Capture and Input
In order to collect any information for the databases, data capture forms need to be made, such as the one below:
If you look at the data capture form, you can see that all of the sections that you fill in are related to the actual table. This means that the information is much easier to input, as the information is appropriately arranged so it is harder to make mistakes (see ‘Data Verification’).
This data capture form will be made as a form on the database, reachable from the customer section. By doing it like this it is easy to fill in either on the computer or on a print out of the form. The data can then be transferred from it to the necessary database by typing
Data Validation and Verification
Data validation is when the computer checks to see if the information being inserted into the program is correct or fits into what has already been determined. Verification is when you check you have entered the right thing into a cell.
One of the most useful ways that I used for validation was to select an appropriate data type. Below is a screen print of my program structure for one of my databases. It shows all the fields in the database and their data types.
This is an effective way of validation. For example, if I tried to enter ‘five litres’ for engine size, the computer would not accept this, as the field ‘Engine Size (Litres)’ has a data type of number, not text. The same would happen if I tried to use text in any of the measurement fields. Below is what happens if you try this.
Another useful method of validation checking is to set field lengths. These restrict the amount of characters that can be typed into a field. This prevents the wrong things being inserted into a field. An example of this type of validation check is the ‘Drive’ field. There are only three entries here, and they are all three letter long abbreviations (FWD, RWD and AWD). Because no correct entry exceeds three characters, I placed a limit of three letters on the field. Now, if anyone tried to enter ‘front wheel drive’, ‘rear wheel drive’ or ‘all wheel drive’, it would not work, as below.
The program prevented me from entering more than three characters into the field. Another validation check that I used was the ‘required option’. If a field is required, then something MUST be placed into it. It cannot be left blank. The most important fields, such as ‘make’ and ‘model’, I made required. If the field is left blank, the program stops you, as below.
Another effective way to validate what is written is to limit what can be written, as in the shot below.
When you try to enter something different from these options, this message comes up:
Another useful validation rule is adding an input mask. This allows only certain characters to be entered, such as in a postcode, which is made up of two letters, two numbers and then two letters, you could apply an input mask of LL0 0LL, disallowing any other length or combination of characters.
For data verification, it is important to note that my data capture forms are laid out so the information given is in a logical order and is easy to distinguish from the field names. By not including lots of irrelevant information and arranging the form properly, it is easier for the information to be imputed into the program and easier to check. The only way we can verify any work is to re-read all of the systems printouts.
Data Structure
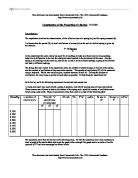
A data structure shows how a database is set and what data types and restrictions are set on a field. I have included a printout of one of my file structure tables.
Blue Square:
This shows all of the field names. Each field must have a different name so it is easy to select correct information. However, the title must both be appropriate and useful. For example, ‘Engine Size’ has an extra part to its name, meaning the entry doesn’t have to have ‘litre’ in it each time. This is the same as the measurement fields.
Red Square:
This shows all the data types for the fields used. These limit the amount of false information that can be inserted into a field. ‘Text’ is when anything can be put in the field, ‘Number’ is when only number characters can be inserted into the field, and ‘AutoNumber’ is when a unique number is put in the record automatically by the computer.
Yellow Square:
This shows the first main field types. The main thing about these fields is that they use data type, field length and required fields as validation checks. A good example of this is the ‘Drive’ field. This is limited to three characters and has a text data type. This prevents things like ‘front wheel drive’ when the only correct entries are FWD, AWD and RWD.
Green Square:
This shows the measurement fields. It includes ‘Length’, ‘Width’, ‘Height’, ‘Wheelbase’, ‘Front Wheel Track’ and ‘Back Wheel Track’. These are limited to four characters, as all entries are of this length. Also, and most fundamentally, all of these fields have a ‘number’ data type. This means no words can be put in.
Purple Square:
This section is where extra field properties can be selected, such as whether or not the field is required, whether or not the field will be allowed to be left blank, the amount of characters in a field, and whether the field is indexed. This if a field is indexed, then it may not allow two entries the same, like in an ‘AutoNumber’ field.
Below is a series of tables showing my table structures:
Output Formats
For the output formats, I have decided to make a form shaped with the most significant information at the top, with two columns of remaining information sorted into groups of similar information, such as all of the measurement fields together, such as in the example below:
By setting the output format in this way, it is easier to extract information that someone would require, thus it is more convenient for the person who is attempting to extract data. When I produce printed forms, they will be in the same form.