Using criteria’s ([Enter], <>, Yes):
In the criteria column use the brackets [ ] to make sure that when you ‘run’ the query the databases should only search the records that match the information between the brackets. <> are used to make sure that the database finds everything besides this particular field.
Creating Forms:
To create forms click Forms from the left-hand column, click create forms by using wizard. Select the fields you want to include in your forms. Click the single arrow (>) to select each field or the double arrow (>>) to select all fields, and then click Next. Choose the layout you want for your form by clicking on it, and then click next. Choose the style or background you would like for your form and then click next. Type the title you want for your form, and then click Finish.
Creating Switchboard:
To create the switchboard, click forms from the left column, and then click create form in design view. Click the command button from the toolbox. Make a rectangle or any other shape using the command button. Click Cancel when this window appears. Type the name for the command button. Right click on the command button, and click build event. Click Macro builder, and then click OK. Type the name for the Macro and then click OK. Select the action you want the command button to take when it is clicked, from the Action drop down menu. Select the form you want the command button to open when it is clicked from the Form Name column and, select the other fields you want the command button to open when it is clicked e.g. View, Filter Name etc.
Saving:
To save the work, click File, and then click Save As. Type the name for the document, and what you want to save it as e.g. Macro and then click OK to save the document.
Printing:
To print the database you will have to print in different sections. First you select what you want to print e.g. table. Click Print from the File menu. Select which pages you want to print, how you want it to be printed out, which printer you want to print it out from and then click Print.
Open word:
On the Start menu click Programs, click Microsoft Office, and then click Microsoft Word.
Create letterhead:
To create the letterhead click Header and Footer on the View menu. Click Format, and then click Tabs. Click Clear All, and then click OK. Clearing the default tabs set for the header and footer allows you to insert your letterhead information at any .5" interval. On the Header and Footer tool bar click Close.
Create template letter:
After you have typed the letter click on File and then save As. Select Document Template from the scroll down menu in the Save as type column and then click Save.
Adding details:
Select the details you want from the database for your letters and right click on it. Click Copy to copy the details. Open the letter document and right click in it. Click Paste to paste the details on the letter.
Saving:
To save the letter click File, and then click Save As. Select where you want to save the letter in from the drop down menu in the Save in column, type the File name, and then click on Save.
Printing:
To print the letter click File menu, and then click Print.
Select the printer you want to print it out from, the number of copies/ pages you want to print out, and then click Print.
Testing my user guide:
Improving User guide:
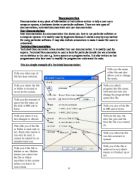
The way to improve my User guide is by adding screenshots to it. I will also direct arrows to the main fields of the screenshot and give a brief explanation to make it easier for the user to understand because it will show him/her exactly what to do.
This is my User guide 2:
Open Paint:
On the Start menu, click Programs, click Accessories, and then click Paint.
Create logo:
When creating the logo use tools that you think are best for your logo. For example, use the ellipse tool to make a circle.
Use the pencil to draw odd shapes.
Use the fill with colour tool to choose the colours you need to paint the logo with.
Use the text tool to type text with the logo.
Saving:
To save the logo click File, and then click Save As.
Select where you want to save the logo in from the drop down menu in the Save in column, type the File name, and then click on Save.
Instead of going on Save As again and again, simply click on Save from the File menu if you want to save the same document again.
Printing:
Click the File menu, and then click Print
Select the printer you want to print it out from, the number of copies/ pages you want to print out, and then click Print.
Open Access:
On the Start menu click Programs/ All Programs, click Microsoft office, and then click Microsoft Access.
On the File menu, click New.
Click on Blank database from the menu on the right hand side.
Choose where you want to save your database in, and then click Create.
Create table:
Click Create table in design view to create a table by specified field names, data types, and field properties.
Type the Field name and then choose the Data type e.g. Number. You can also choose other things like the Field size, etc.
Using formats in dates:
The Format is the display layout for a field. Choose the Format you want for your dates, e.g. Short date, from the drop down menu in the Format column or enter a custom format.
Using Input mask (post code etc):
Input mask is the pattern for the data needed to be entered for a field. Type the
Input mask by looking at the pattern of the data you need to enter. Capital (L) stands for letter and the number (0) for number.
Using Validation rules and Validation text (gender):
Validation rule limits the information that can be entered for a field. Use inverted comas (‘’) to specify the values for the Validation rule of Gender. Validation text is the error that pops up when you enter value that is different to the Validation rule. Type in the Validation text column the message you want the user to see if he/she presses the wrong value, in this case it is ENTER ONLY MALE OR FEMALE.
Creating queries:
To create a query, click queries from the left hand column, and then click create query in design view.
Click the table you want to make queries for, from the menu that says Show Table, click Add, and then click Close to close the menu.
Double click all the fields you want for your query, and then make sure that the box has been ticked.
Using Criteria [ENTER] <>YES:
In the criteria column use the brackets [ ] to make sure that when the query is ‘run’ the databases should only search the records that match the information between the brackets.
<> are used to make sure that the database finds everything besides this particular field
Creating Forms:
To create forms click Forms from the left-hand column, click create forms by using wizard.
Select the fields you want to include in your forms click the single arrow (>) to select each field or the double arrow (>>) to select all fields, and then click Next.
Choose the layout you want for your form by clicking on it, and then click next.
Choose the style or background you would like for your form, by clicking on it, and then click next.
Type the title you want for your form, and then click Finish.
Creating Switchboard:
To create the switchboard, click forms from the left column, and then click create form in design view.
Click the command button from the toolbox.
Make a rectangle or any other shape using the command button.
Click Cancel when this window appears.
Type the name for the command button.
Right click on the command button, and click build event.
Click Macro builder, and then click OK.
Type the name for the Macro and then click OK.
Select the action you want the command button to take when it is clicked, from the Action drop down menu.
Select the form you want the command button to open, when it is clicked, from the Form Name column and, select the other fields you want the command button to open when it is clicked e.g. View, Filter Name etc.
Saving:
To save the work, click File, and then click Save As.
Type the name for the document, and what you want to save it as e.g. Macro, and then click OK to save the document.
Printing:
To print the database you will have to print in different sections. First you select what you want to print e.g. table and then click Print from the File menu.
Select which pages you want to print, how you want it to be printed out, which printer you want to print it out from and then click Print/OK.
Open word:
On the Start menu click Programs, click Microsoft Office, and then click Microsoft Word.
Create letterhead:
To create the letterhead click Header and Footer on the View menu.
Click Format, and then click Tabs.
Click Clear All, and then click OK. Clearing the default tabs set for the header and footer allows you to insert your letterhead information at any .5" interval.
On the Header and Footer tool bar click Close.
Create template letter:
To create a template letter click on File and then save as.
Select Document Template from the scroll down menu in the Save as type column
and then click save.
Adding details:
Select the details you want from the database for your letters and right click on it. Click Copy to copy the details.
Open the letter document and right click in it. Click Paste to paste the details on the letter.
Saving:
To save the letter click File, and then click Save As.
Select where you want to save the letter in from the drop down menu in the Save in column, type the File name, and then click on Save.
Printing:
To print the letter click File menu, and then click Print.
Select the printer you want to print it out from, the number of copies/ pages you want to print out, and then click Print/OK.
Training Staff
How would I teach my staff?
To teach my staff about the computer system I will first look at the number of staff I have and then I will decide what method to use to teach them. If there are only a few staff members e.g. two or four, I will send them on a special course for a year or more to make them familiar with the new computer system. If there are between four to seven members then I will call a lecturer who will come twice a week to give a lecture about the computer system for two hours. If there are a lot of staff members and I know that each year a number of employees come then I will make a special training department for newcomers. The new employee will have to stay in the training department for two months and if the employee passes the training session then employee will be given a permanent job.
Documentation-User guide for produced system = 3
Test and evaluation = 2
Training and new working practices needed = 2