Once I had created a new presentation in Microsoft PowerPoint, I then decided how the overall presentation was to look before adding any text onto the slide show, so that I didn’t have to go back later and redo all of my text, because I had discovered that it did not fit into the slide design. To make sure my presentation looked professional and consistent, which was necessary for a sophisticated target audience; I decided to use a design template. I did this by following these specific steps:
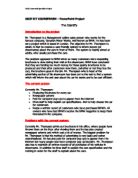
1) I clicked on “format” on the toolbar, and then I scrolled down to “slide design.” Then a design template information box appeared, on the right hand side of the screen.
2) After the box had appeared showing previews of different design templates, I examined the different selection of templates, to try to find a professional, sophisticated design, which incorporated the theme of the presentation (the workplace.)Unfortunately, I was unable to find an appropriate design template, so I decided to explore for a template on Microsoft office, to do this I did the following:
3) I scrolled down to the bottom of the design template box, and found “design templates on Microsoft office online.” Once I clicked on this hyperlink, I was directed to Microsoft Office Online, where I found two templates which I thought would adapt to my presentation perfectly:
The reason why I thought both these templates would be appropriate for my Presentation, was because they both show employers and employees’ working together, and this was a main issue in my PowerPoint, as it is vital that both employees and employers work as a team, to provide the best working conditions and to help support one another, so there are no health and environmental risks. The first template implies this connection between employees and employers, as it shows work colleagues working together, and it also integrates the use of ICT through the keyboard image. Additionally, the second template also includes the message of employers and employees; the image of connecting hands and two colleagues communicating implies this. I decided to choose the second template, as I believed it looked more sophisticated, and the colour scheme was easier on the eye, and could blend more with different colour tones also. Additionally, I believe that it puts the message of employers and employees across better than the first template.
Step 4
Fortunately, design templates come accompanied with master slides; which make the presentation look professional and aimed at an older audience. This keeps a consistent theme through-out the PowerPoint, instead of having a mixture of colours on each slide, which makes the presentation look unprofessional and inconsistent. If I had not included a design template, I would have completed the following steps to incorporate master slides into my PowerPoint:
-
Firstly, click on “view” on the toolbar above.
- Then scroll down to where it says “Master.”
- After this click on “slide master.”
-
4) Once in Slide Master View, add the appropriate data, which is required.
- Since a master slide was already integrated into my PowerPoint due to the design template, I just followed the steps above to enter slide master view, to put a footer on my presentation, so that my name ran through all of the slides, so that it was easily recognisable who had created the presentation. Once my footer was in place I clicked on “Close Master View,” to return back to my original screen, so that I could work on my slides, to create my slide show.
Step 5
After I had inserted a footer in slide master view, I then decided to impose a fixed font size/colour, images, and hyperlinks to the slide show, so that it looked consistent and ran smoothly; for if the PowerPoint didn’t have a consistency, it may look less professional and aimed more at a child, which is not the aim of this particular assignment. Firstly, I set a persistent colour/text size to the PowerPoint, so that all my text was the same style all the way through, so that when I added my text it kept the same size and colour; this prevented me from returning to the beginning of the presentation, once I had produced all my information, to change each particular slide to make sure that the slides looked constant; this saved time, and if I was to produce a PowerPoint for an actual company, this time wasted costs money. To set the font size/colour I did the following:
-
I high-lighted the text I wanted to modify, then I scrolled up to the top toolbar and clicked on the scroll bar, which displayed “font size” when hovered over, and clicked on the specific font size I wanted. I decided to make my information size 16, as it will be big enough for workers to see without much strain; as if the font size was too small, it could possibly force the reader to strain their eyes in order to read the text, which can cause numerous health risks. However if the font size is too large, then it may prevent the presentation from looking professional. Additionally, I chose to make titles size 28, as it makes them stand out from the other text, which makes it easier for the reader to recognise what that particular slide is about. Furthermore, I chose to make all menu listings size 24, as it separates that particular text from the text on previous slides, therefore showing the viewer that they are going to learn, about something different from what they have just read about, and emphasising/high-lighting the key areas they are about to read about, and also emphasising that it is a menu page rather than a normal information page, and a bigger font size implies this.
- After that, I chose the colour I was going to make my text; I high-lighted my text once again, but instead I clicked on the “A” symbol in the top right hand corner of the toolbar. I decided to make my text white, so that it will stand off the page and won’t strain the readers eyes in order to the read the text, for if the text colour and background colour are similar shades or don’t work well together, then often it can be harsh on the reader’s eyes, leading to eye strain. I decided to colour the subheadings red, as it emphasis certain areas which the reader ought to take notice to, and also it is a good colour to use, as although the red emphasises certain points, it also works well with the blue background, not making the reader strain their eyes in order to read it. However, I did choose the sub-heading to be green, but I soon change my mind due to the fact that the green did not contrast well with the background.
- Once I had included all the relevant information required to inform employers and employees, I added hyperlinks so that my slide-show ran smoothly and efficiently so that the PowerPoint was suitable for professional working people. The hyperlinks allowed me to link all the slides together, allowing the viewer to choose their own way around the presentation clicking on the slides they want to look at, rather than having to watch a slide show, which may include information which may not be relevant to them. In order to make sure my presentation was to a high quality for a professional audience, I did quality checks. One of my quality checks was to make sure and monitor the efficiency of the hyperlinks, and to make sure they located the reader to the specific place. This was very important, for if the hyperlinks did not work properly, then it would make the audience think that the presentation was unprofessional, and maybe they would possible think that my information displayed was unreliable too, as they may believe that if I can not get the menu system working properly, then maybe I did not gather the information correctly.
At first, I used action buttons (located under auto shapes,) as a form of hyperlink placing them next to the specific slide title on the menu listing, but later decided that it would look more sophisticated to hyperlink the slide titles on the menu listing instead, as it made the slide look neat and tidy, giving the presentation a pristine look, which was correct for my target audience. To do this, I did the following:
- I high-lighted the text I wanted to hyperlink and right clicked. A drop down menu appeared, allowing me to scroll down and select “hyperlink.
-
Then a grey box appeared asking me where I would like the hyperlink to take me; because I wanted the hyperlink to take me to another slide in my presentation, I clicked on “place in this document” located on the left hand side. After this, a list of slide title names will appear under the title “select a place in this document,” located at the centre of the grey box. I then chose which slide I wanted my hyperlink to take me and then pressed “ok.”
Once I had joined all my slides together and checked that all my hyperlinks worked perfectly, I then added images. I decided just to add images on slides which told employees/employers about different products/ health risks, instead of inserting them onto each slide, as I believe that it adds contrast to the slides, making the slides more interesting to look at, rather than having each slide exactly the same. On the specific slides, which I decided to include photographs, I made sure that the pictures where exactly the same size and in the same positions so that the presentation looked professional and had a mature look; correct for my target audience. In some cases, I needed to crop images; to do this I did the following:
-
I right clicked the picture I wanted to crop causing the picture toolbar to appear. I then selected the picture of the two right angles interlocking; this caused a black dotted line to appear on my screen, allowing me to crop my image to the correct size.
Additionally, so that I did not just locate all my images from the internet, I decided to take photographs of my own, to show/prove I know how to import my own images, and to add different types of images to the slides, to ensure that the slides do not look exactly the same, so that it is more interesting to look at for the reader. To do this I did the following steps:
-
In order to insert the pictures I took on the camera onto the computer, I used a camera which allowed me to insert a floppy disk inside it, so that I could save the images onto it, and later take the floppy disk out and upload them onto my computer.
-
I took numerous pictures, each relating to a different area of health and safety in a workplace e.g. correct working posture, correct working environment etc.
Once I had took all the
pictures I required, I then uploaded them into the presentation by clicking on “insert”, then scrolling down to “picture” and then selecting “from file”. A box will appear on the screen asking where you would like to import your picture from. In the “look in” title box located at the top of the grey box, I scrolled down to “31/2 floppy” where I inserted the specific images I required.
Whilst taking my photographs I decided to use the same model throughout, as I believe it would make the slide show more formal and sophisticated, for if I kept changing the model, it may have made my presentation look unprofessional, as most companies when advertising, doing promotional packages, always use the same models for this reason.
Once this was completed I decided to put a voice over on all my slides, as if this presentation was actually going to be used to train employers/employees then certain individuals may not be able to read the text on the screen and may rely on the facility of a voice over, or maybe employers/employees may not have time to sit and read through the presentation, and may prefer to listen to the presentation whilst working on something else. To do this I did the following:
-
I selected “slide show” from the top toolbar and then clicked on “voice narration.” This allowed me to put a voice over on my slides. In order to keep my PowerPoint professional, I asked my mum to do my voice over, as she has mature vocals and has better pronunciation, which is vital in order for the listener to understand and hear every word. I made sure the voice narration was done in a quiet environment, to ensure no interference occurred, which may make it difficult for the listener to hear what is being said. However, during school hours when I first attempted to include a voice over, lots of interference occurred due to the type of microphone used. In order to prevent this from happening, I decided to use the microphone built into my home computer, as that it purposely built for this kind of activity,
Furthermore, so that I didn’t smother my PowerPoint in animation and slide transitions, which may have made my presentation, seem to be aimed at a younger age group, I decided to just have a slide transition whenever the viewer clicked on the page they required so that it made the PowerPoint look interesting to read, but I didn’t put animation on text or images as that may have got on the viewers nerves through having to wait until all the information had presented itself onto the screen, I did this by:
1)Clicking on “slide show” in the tool bar above.
- Then I scrolled down to where it says “slide transition . ”
- After that I chose the transition I particularly liked.
- I did this to every slide, until I was happy with the result.
Finally, to split all the text up I decided to include videos. I included these into my PowerPoint by doing the following:
-
I inserted an action button through auto shapes and right clicked. A menu bar appeared and I scrolled down to where it said “hyperlink.” When the grey box appeared, I clicked on the drop down menu next to where it said, “Hyperlink to...” I scrolled down to where it said URL and then typed in the website address which the video was located on. The videos explained the effect computer related ill-health could cost your business organisation and stretches you can do to prevent computer related ill-health. I thought they were very important for both employers and employees to know, and also it added interest to the slide show, as it was different from the slides of text presented on previous slides.
To receive feed back on my PowerPoint to see how I could improve it, I decided to create a questionnaire for my peers to complete, so that I could improve certain areas of my presentation. Here is a copy of my questionnaire.
From doing this questionnaire, I decided to include more pictures to break up the text, to make it more interesting for the viewer to read. I believe that questionnaires are a good way to evaluate you presentation and understand how you can improve it also.
In conclusion, I thought my presentation was appropriate for my target audience and was good all round. If I was to improve my presentation I would add more images and do my voice over in a better environment, so there is no interference.