5, Secondly, you need to select your own childminder ID from the respective box.
6, Next, you need to select what day the child came.
7, After that, you can write in what time the child arrived, and what time they left:
8, After you have done that, you can either go back to the main menu or save without quitting.
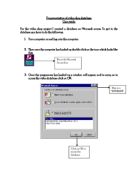
1, You need to open up the database, type in the password, open the main menu, and click on ‘Registered Childminding Contract.’
2, This screen will then appear:
3, On this form, you have to enter all your details in. As before, you can click the macros on the right hand side of the page to either save and go back to the menu, or save and not go back to the menu.
4, If you click on ‘Back to Menu’, you will appear back at this screen:
How to change the colour of the forms
1, As an example, we are going to use the main menu. First of all, you need to go to the main menu. We are going to change this blue colour.
2, After you have got to the Main Menu, you need to click on the design button in the top left hand corner of the page.
3, This screen will appear:
4, To change the colour of the background, you need to right click anywhere on the background, and a selection menu will come up:
You need to scroll down onto Fill/Back Color, and a selection of colours will come up, and you choose from whatever colour you want.
5, On this demonstration, we are going to use purple. Click on the colour that you want, and the form will change colour, and the box will disappear.
6, The screen will change colour.
7, To see the form properly, you need to click on the Form button on the top left hand corner.
8, You will then see this screen:
9, Now that you have changed the background, you may now want to change the colour of the text on the macros. To do this, you need to click on the design button again.
10, You will then appear back at the design screen:
11, To change the colour of the text, you need to right-click on the button that you want to change. If you want all of the buttons the same colour, you will need to repeat these steps with all the buttons. When you have right-clicked on the button you will see this box:
You need to click on ‘Font/Fore Color’. It will then come up with a selection of colours that you can choose from. On this demonstration, we are going to choose pink.
12, After you have done that, you will see this screen:
13, You may now want to change all of the buttons to pink so that it matches. After you have done that, it will look like this:
14, In order to see this properly, you need to click on the form button in the top left hand corner:
15, This screen will then appear:
How to change the layout of the forms
1, First of all, I am going to show you how to move a macro.
You need to go to the Main Menu and select a form. For this demonstration, I am going to use the Weekly Attendance Record. As you can see from the printscreen below, the macros are next to other by the side of the form. I am going to move them so that they are below the form.
2, You need to click the design button on the top left hand corner of the screen:
3, That will take you to this screen:
4, To move the macro, you need to click it and drag it to wherever to want it to go.
You can then click the other one and move wherever you want it to go:
5, To see the form properly, you need the click the Form button on the top left hand corner of the screen:
6, You will now be able to see the screen below which is something of what your form should look like when you have moved the macros.
How to change the colour of the fields on the forms
1, Go into the Main menu. For this demonstration, I will be using the Weekly Attendance Form, but you can apply this to any three of the forms. As you can see below, there is a printscreen of the Weekly Attendance Form, which is in Form View. The text on the fields is dark blue, but I will show you how to make them a different colour, should you ever want to.
2, The first thing you need to do is click on the design button on the top left hand corner of the screen:
3, Clicking that will take you to this screen:
4, To change the colour of the text of the fields, you need to select one of them e.g. Child ID. (just the left hand bit)
5, You then need to right click on it, and the box below will appear:
You will then need to click on ‘Font/Fore Color.’ This will bring up a range of colours like below: In this demonstration, I am going to use green.
6, It will then change the colour of the field:
7, I will now change the rest of the fields so that they are all the same colour
8, In order for you to see the form properly, you need to click the Form button on the top left hand corner of the screen:
9, This screen will appear, and the fields will be in green
There are a number of problems you could encounter whilst using the database. In this section, I tried to cover as many of them as possible.
1, You encounter this message:
This may mean that you have accidentally deleted a form, in this case, the Child Record Form. In order to correct this mistake, you need to click ‘OK’. The message below will then come up:
You will need to click ‘Halt’. It will then just go back to the main menu.
2, After this, you will need to close the Main Menu down by clicking the macro that says ‘Close’. You will then appear at this screen:
As you can see, ‘Child Record Form’ is nowhere on this list. However, unless you have also deleted the Child Record Form table from the tables list, you will still be able to retrieve the form.
3, In order to do this, you need to click on ‘Tables’ on the menu
4, The screen will then change, displaying this:
As you can see, Child Record Form is on the menu.
3etgx2`\zg1 cv”3563q