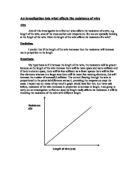
Ohm’s law: The current flowing through the wire is proportional to the potential difference across it. It means, if I double the potential difference, the current is doubled too.
Resistors can be used to reduce the current in a circuit and slow down the force of the current. A variable resistor is used to vary the current in the circuit. You can choose the resistance in a variable resistor, weather you high resistance or lower resistance. As the sliding contact moves, it varies the length of wire in the circuit. Some of the factors which affect the resistance:
-
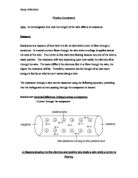
Wire width: If the wire width is increased, the resistance will decrease. This is because of the increase in the space for the electrons to travel through. Due to this increased space between the atoms there will be fewer collisions.
-
Temperature: If the wire is heated up the atoms in the wire will start to vibrate because of their increase in energy. This causes more collisions between the electrons and the atoms, as the atoms moves into the path of the electrons. This increase in collisions means that there will be an increase in resistance.
-
Material: The type of material of the wire will affect the amount of free electrons, which flow through that wire. This is because the number of electrons depends on the amount of electrons in the outer energy shell of the atoms, so if there are more or larger atoms then there must be more electrons available. If the material has a high number of atoms there will be high numbers of electrons causing a lower resistance because of the increase in the number of electrons. Also if the atoms in the material are closely packed then the electrons will have more frequent collisions and the resistance will increase.
-
Length of wire: if the wire length increased, the resistance will increase. This is because of the increase in the space for free electron to collide. Due to this more amount of free electron will make successful collisions. Greater collision means more energy transfer which leads to higher resistance.
Apparatus:
-
Voltmeter: This was used to measure the voltage across the constantan wire. This shows us the voltage of the wire in volts
-
Ammeter: This was used to measure the current flowing through the components. This showed how much current was flowing through each component in amperes or amps.
-
Powers supply: This was used to power the circuit. We had to use the crocodile clips to connect the wires.
-
Meter ruler: It is 100cm long ruler which was used to measure the length of the wire. Wire was connected on the ruler with the help of crocodile clip and bit of sellotape.
-
Crocodile clip: This was used to hold the wire to the ruler so that we can measure and place connect the crocodile clip where we need. Also at the end of wires to hold them together.
-
Constantan wire: This is 24SWG wire, a bit longer that 100cm. This was used to carry the current, to test the resistance in order to do the experiment. We used constantan wire because its resistance does not vary with temperature.
-
Sellotape: This was used to held the wire in possition. This made it easy for us to do the experiment smoothly and quickly.
-
Variable resistor: This was used to control the resistance of the current flowing through the circuit.
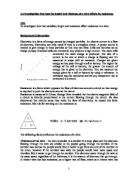
Diagram:
Fair test:
Through out this whole experiment, I am keeping some of the factor same during the experiment:
-
The temperature: I am keeping this fair because according to the scientific background, if the wire get hot by the surrounding or any others thing, there will be more collision with the free moving electron in the wire and there will be a slight increase in the resistance.
-
Thickness of the wire: If I change the thickness of the wire, I will get different result each time. According to the scientific background if the wire is wide there will be more space, which means fewer collision, however if the wire is narrower, there will be less space which mean more collision. So each time if I change the wide, there will be different resistance each time.
-
The amount of current flowing in the circuit: We are trying to find out the resistance of the wire in different the measurements. We have to keep the power in D.C same. So that we can find out the resistance in different measurements. If we change the current, then we will different result with different measurements of wire.
-
Repeat the experiment 3 times: If we repeat the experiment three time. Then we get more accurate and fair results. So you can compare the results with the others results to make sure is everything is fine and accurate. Also we then are able to find the average of the repeats which then make sure our results are reliable.
Safety:
- Do not carry out the experiment near or in wet areas because water is a very good conductor of electricity, so this could be very dangerous.
- Do not touch the wire when the powers supply is switched on because the current would heat up the wire and it will burn the fingers.
- Never leave the powers supply on for a long time because will heat up the wire and it will burn.
Variable and Factors:
- Length of the wire is variable as I will be changing several times throughout the experiment because to find out the resistance affected by the length, I will be testing the resistance in many different lengths. I will have 10 different kind of length and I will be repeating the same length 3 times to get accurate results.
-
Resistance is variable because I will be repeating the experiment three times with different resistance. 1st time lower resistance, 2nd time medium resistance and 3rd and final time higher resistance. I will be using a variable resistor.
- Mistakes we human make are factors because it can affect the experiment if anyone makes any mistakes.
Procedure:
- First off all collect all the apparatus mentioned before.
- Then set up the circuit according to the diagram.
- Then switch on the power supply, while it is on record the reading on ammeter and voltmeter.
- Then switch off the power supply.
- Repeat the last step until you get the reading for different length of wire used. 20cm, 40cm, 60cm, 80cm, and 100cm. Slide the crocodile clip along for each lengths of the wire.
- Now repeat step 3, 4 and 5 three time to fair results.
- Then make a table for the results and record the result.
- Calculate the resistance using the formula R = V/I
Preliminary results:
Procedure:
- First off all collect all the apparatus as mentioned before.
- Then set up the circuit according to the diagram shown above.
- Then switch on the power supply, while it is on record the reading on ammeter and voltmeter.
- Then switch off the power supply. If you leave the power supply on for a long time, it will get hot and it will not work properly.
- Repeat the last step until you get the reading for different length of wire used. 10cm, 20cm, 30cm, 40cm, 50cm, 60cm, 70cm, 80cm, 90cm and 100cm. Slide the crocodile clip along for each lengths of the wire.
- Once you got first set of results, change the setting of the resistor.
- Now repeat step 3, 4, 5 and 6 three time to fair answers.
- Then make a table for the results and record the result neatly.
- Calculate the resistance using the formula R = V/I.
Final results:
Analysis:
As I mentioned before in the hypothesis, if the length of the wire increase, the resistance of the wire will increase too. This have been proven in my results and my graph as you can see at 10cm of the wire, average resistance of the wire is 0.18 ohms and at 100cm of the wire, average resistance is 2.3 ohms. You can see the big different between them. Also when the length was 40cm, the resistance was 0.93 ohms and at 80cm, the resistance was nearly twice as the 40cm’s resistance, it was 1.83 ohms. This has clearly support my prediction. As the length of the wire increase, the numbers of free electrons increase as well. More free electrons mean more successful collision, this will produce more energy transfer and this will increase the resistance. My predication has proven by my results. Also the graph has come out how expected it to be. The resistance of the wire is increasing in proportion to increase in length in wire. I did not get many anomalous results. This is because we did fair and more accurate results. We made sure we used the same wire and more accurate in the length of the wire, only one person was in charge of the stop watch because the finger speed could change between peoples. We tried our best to make sure we got accurate and fair results. The results have proven what I said in my prediction and the graph turned out as how I predicted. .
Evaluation and Conclusion:
I have achieved most of my results just as how I predicted, according to the scientific background longer the wire greater the resistance. As I increased the length of the wire, the resistance of the wire increased in proportion to the length of the wire. The length of the wire does affect the resistance of the wire because if it a shorter wire, the electrons only have to travel a short distance. If the wire is long, then there will be more electrons colliding successfully with each other, this will produce heat and more energy transfer. This will increase the resistance of the wire. If the distance is short then there will be less electrons and less collision than the long distance
Even though I repeated the experiment three times, I did get few anomalous results. But in the preliminary result I had quite a lot more anomalous than my final results. This must be a mistake from one of the variable or factors as I mentioned it before in ‘Variable and factor’. So if I am doing this experiment again, I will make sure:
- I will try not to make any mistakes. Also I will make sure the wire is attached to the ruler accurately because when I held the wire and ruler together, it must have been slightly moved or not accurately straight.
- The crocodile clip must not have slightly moved or must hold the wire and ruler together strongly.
- I have the same current all the way through the whole experiment.
I got my results as I predicted. It has supported my prediction. My final results much accurate and better than the preliminary because in the final results, I changed the resistance to low, medium and high also I had three sets of results. This helped me to get more accurate and fair results.
As you can see from my graph that it has come out just as I predicted also the results. A typical example from my evidence, at 30cm the resistance of the wire is 0.35 ohms where is at 60cm, double the length of the wire, the resistance is also the nearly twice as before, it is 1.25 ohms. This clearly supports my predication that as the length increase, the resistance of the wire increase as well.
I still thing I did not get 100% accurate correct results because as the cross fade away, it is really hard to tell is it disappeared or not, also the fast of toggling through the buttons in stop watch will vary. But we did try to make sure we got accurate results by just keeping one person for these jobs. I would make sure the wire wasn’t getting hot because of the wire gets hot, then there will be different results as temperature is different. I would make sure that I let the wire cool down before I use it again.
To further my investigation on resistance of the wire I could change the material of the wire, may be copper wire or any other wire to make sure it still support my prediction or I would carry out the experiments in different temperatures, which will take more time. I would have change the number scales into even more accurate.
Overall as my conclusion, I conclude that if we increase or decrease the length of the wire, it will increase or decrease the resistance of the wire in proportion to the length of the wire. The length, temperature, cross section and wide of the wire do affect the resistance of the wire. My results were not 100% accurate because I got two anomalous somehow. However the results supported my hypothesis and my prediction because I referred my prediction according to the scientific background.