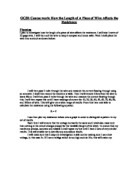
R = V
I can then plot my resistance values onto a graph in-order to distinguish a pattern in my set of results.
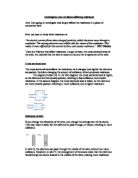
Each time I will ensure that the voltage is exactly the same and I shall also make sure that nothing in the circuit changes except for the variable (length of the wire). To ensure that my results are precise, accurate and reliable I shall repeat my test until I have 3 sets of very similar results. This will enable me to identify any anomalous results.
I will make sure that I keep my investigation a safe one by making sure I use a low voltage, in this case 5v. If I use a voltage which is too high such as 10v, this will make my investigation very unsafe as at short length of wire the wire will get extremely hot and may even melt. As many people will be in the classroom it would be likely that if someone were to touch the wire, it would seriously injure them. Also I have tried to use relatively thick wire. Otherwise if the wire was very thin it would become very hot, even at very low voltages.
I have also made sure that I turn off the power pack and leave the wire for a while before I touch the wire In-case it is hot. Only then will I touch the wire to remove it from the circuit.
Prediction
I predict that the longer the piece of wire the more resistance it will have. From previous research I have found that this is because the wire has obstacles which the flow of electrons have to overcome. So the smaller the cross-section of the wire the more resistance it has because it will be much harder for the electrons to flow freely down the wire. If I double the length of this wire the twice the resistance will be because the electrons will have twice as many obstacles to overcome.
Results
Test 1:
Test 2:
Test 3:
Average values:
Conclusion
From my results I can see that my results back up my prediction very well in that when doubling the length of wire you double the resistance. I can see that the resistance stays at a constant rate because the line of best fit on my graph is straight. I can also use the graph to calculate the resistance per cm by using: resistance/length = 6.8 /100cm = 0.068 per cm of wire. Now I can work out the resistance of any length of this wire. For example I know that 156 cm of this wire will have a resistance of: 0.068 x 156 = 10.6 .
Evaluation
Overall I think that my investigation went very well and believe I carried it out to the best of my abilities in the conditions provided. My range of lengths10-100 cm were sufficient to plot a graph and provide enough evidence to support my prediction. I have a very good set of results with no anomalous results.
Sources of Error
Although my results were very accurate there were some areas of error. They are the fact that:
- I was unable to measure the length of wire as accurately as I would have liked to as the wire was very bendy and was unable to be straightened perfectly.
- I was unable to measure accurately with a ruler.
- I was often unable to get the voltage exactly to 5v as the reading often flickered.
- The ammeter only measured to two decimal places.
Possible Improvements
- Having more time to repeat the investigation to get even more accurate and reliable results.
- Use a more accurate way of measuring current and voltage.