Temperature of wire:
When the temperature of a metal increases the resistance of that metal increases. This is because when the temperature increases the atoms of the metal vibrate more vigorously because of the increase in energy. This means that the electrons have more difficulty getting through the wire as they collide with the atoms that are in their pathway. This increases the amount of collisions therefore there is more resistance. However it is hard to keep the temperature exactly the same as the room temperature might change from day to day. It is essential to use a low voltage because it means a low current that will not heat up the wires. If a high voltage is used the energy would be in form of heat which would make the experiment unfair. The investigation will be done at room temperature. The temperature cannot be investigated because it is hard to control the range of temperature needed without the correct apparatus.
Material of wire:
The material of a wire would affect it resistance because different materials have different resistivity because the have different nets. Some of the nets may have smaller holes that others and this would increase the resistance because there would be a larger chance of the atoms colliding. Similarly some materials may have larger nets, which would mean that there would be a lesser chance of the atoms colliding.
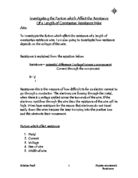
The variable that I am going to change is going to be the resistance because I think it will be the easiest to change with the apparatus I have available to me and I think it will give fair results.
Preliminary Method
In this preliminary experiment, I will use different lengths of wires to measure their resistance. The main idea of doing the preliminary experiment was to find a suitable current number to put the power supply on. I also wanted to do this experiment to familiarize myself further with the method; if I had any problems I could correct them there and then. This would mean I would obtain precise and reliable results in my main experiment when investigating the connection between the length of the wire and the resistance of the wire.
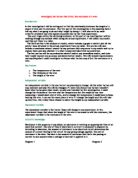
First, the circuit was set up as shown below. I had to be careful in connecting circuit, because the Voltmeter had to be placed in parallel and the ammeter, which had to be placed in series. Draw up a rough table onto a piece of paper with the appropriate headings. The wire was cut to just over 100cm so the crocodile clips could attach to the board onto each end of the wire, making the results more accurate. The power supply was put on 2V and the gradually increased the 4V, to find a suitable current for my main method. The slider on the resistor was moved to allow me to do three repeats. I decided to go from 10 centimeter to 50 centimeters and then to 90 centimeters, as it would allow me to lot a graph of resistance against length with a range of readings.
Safety:
Handle the power supply carefully.
I am going to only use a voltage of four volts so the wire will not burn.
Be careful when touching the wire, as it may be hot.
Start on the lowest current, so the wire then will not melt or burn instantly.
Be careful when the wire is connected, as it will get hot.
Be careful when cutting the wire.
Make sure the main to the power supply is switched off when removing the wire from the circuit to be measured.
Equipment:
Power Supply,
Ammeter,
Voltmeter,
Just over 100cm
Meter Rule,
Crocodile Clips,
Connecting Wires
Fair test:
In this experiment we are only changing one factor - the length of the wire, the factors that we are going to keep the same are as follows:
We must keep the surrounding room temperature the same or the particles in the wire will move faster (if the temperature is increased) and this will therefore have an effect on the resistance.
The material of the wire must also be kept the same as different materials have different conductivity. The last two factors will be kept the same by using the same wire all of the way through the experiment.
The current that we pass through the wire is to be kept the same, also. If this is changed the temperature of the wire might change in a way that is not constant making the results more confusing.
Prediction:
I predict that the longer the piece of wire, the greater the resistance will be. This is due to the idea of the free moving electrons being resisted by the atoms in the wire. In a longer piece of wire, there would be more atoms for the electrons to collide with and so the resistance would be greater. The relationship between the wire length and the resistance should be directly proportional. This is because in a wire twice the length of another wire there would be double the amount of atoms causing the resistance to double. This was proved in my pilot study; however we want to confirm our results by carrying out the experiment with just a wire and longer lengths. The resistance in the circuit the electrons had to travel double the distance to go through the resistors. This would in turn double the amount of atoms that the electrons would collide with and then resistance would double.
Preliminary test:
During the preliminary test I have found:
· Find out what kind of figures the resistance are for different diameters.
· Find out what length of wire should be used throughout the experiment.
· Find the appropriate apparatus and use them.
· Investigate ways of making the experiment fairer and more reliable.
· Think about what materials (two: to make sure my conclusion works for all materials) should be used.
· Investigate the range of results, which will be appropriate and can be plotted in a graph to show some sort of connection.
· The verification of techniques is important whilst doing preliminary work and to decide adjustments, which will have to be made whilst having precision and reliability in mind.
· Think about the appropriate length of the wire whilst doing the investigation. This can be found whilst doing preliminary work. The appropriate length will be one, which is easy to work with and has more precision.
Result table
For the preliminary test I measured 5 cm, 50cm, 95cm at 1 volt and 1.5 volts and 2 volts
At 1 volt
At 1.5 volts
At 2 volts
These preliminary test show that moving the length of the wire up 45 cm each time will not give me a good guide of results so I am going to take my results every 5cm also. I found in these test that when you move to check the resistance of the wire the voltage will go up so to make it a fair test before every mark I make I will check the voltage is at 1.
Graphs
Results
To calculate the resistance of the wire, I shall use the equation below.
RESISTANCE = VOLTS/AMPS
Below is a results table with the results that I collected from my main experiment
Graph
Analysis
Evaluation/conclusion
In the Analysis and the graph I have shown two main anomalous points, this means that there must have been a slight error in my experiment. As the wire, length is bigger at these points I found it harder to stretch it out and consequently, measure it accurately. Although the graph is overall accurate and the results precise it is easy to see, the anomalous averages plotted because they do not all lie along the same best-fit line. The graph shows that my results are reliable as there is only one main anomalous points, (which are easily accounted for) to improve the reliability of my results, I could do more repeats in doing this my average would be more reliable.
As I increased the wire length, the wire became hotter and gave off heat. This could explain why the anomalous results are at the top end of my graph, 70cm and 75cm. I think one of the reasons why my experiment is quite accurate is because I tried to measure the wire as accurately as possible. The wire was stretched until it was nearly in a straight line so a bit was overlapping at each end. Finally, the inside edge of the crocodile clips were placed at the appropriate point. I still however would like to make the measuring more accurate
during my experiment; I have noticed several modifications I could make to improve on the Investigation if I was to repeat it.
The first of these modifications would be the circuit that I would use. To be more accurate with my results Instead of connecting the voltmeter to the main circuit, I would connect it to the wire that is being tested. I would do this so that the voltmeter is measuring the voltage of just the wire being tested and not the wires of the main circuit as well.
To also improve on my results I could use a new or higher quality digital voltmeter. I could also have repeated the same lengths of wire more times. the thickness of the wire may vary by a small amount and maybe helping to cause the anomalous results. Sometimes the ammeters flicked between a decimal point, I maybe could have thought it was the wrong number and therefore would have ended up with the wrong average resistance. In the experiment, I did not control the room temperature but instead just assumed it was keep constant throughout my experiment; this could have made the wire get hotter and therefore making my experiment not as accurate. In future experiments I would control this variable factor and make it a constant factor. I would do this, as it would be an unfair test if there were two known variables.
As well as making these modifications, I could also expand on my investigation by testing the same wire but different widths of that wire.
I think the circuit and method used was quite suitable although I would make the modifications above to improve my results. If I did this experiment again I would defiantly use top quality equipment, I would probably control the temperature. After changing those few things, there is not really much difference to how I would do the experiment again.