How do I keep it a fair test?
To ensure my investigation is fair I will use Constantan wire throughout the experiment and keep the length of it to 30cm. I will also use the same voltage of the cell and use the same resistor and wires, and the other equipment throughout the experiment. The only variable I will change is the thickness of the wire.
How do I keep the experiment precise?
To increase the accuracy of the experiment I will repeat the experiment three times, so when the mean is taken, an accurate table is drawn up and if a result is anomalous the other two results would contrast the anomalous result. I will also measure the exact thickness of a wire to the nearest hundredth of a millimeter using a micrometer screw - gauge. I will also measure the length of the wire using a 30cm ruler which is the length required.
Accuracy
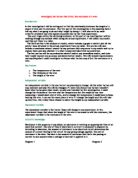
I decided to measure the diameter of the wire at 3 various points on the wire using a micrometer screw - gauge, as shown in the diagram below. I did not pick any particular points on each wire, the diagram is an example. I then calculated the average diameter from the 3 measurements taken to enable me to measure the diameter of the wire as accurately as possible.
Results
Knowledge that I already have is Ohms law and how to measure resistance using a voltmeter and an ammeter. Ohm’s law states that the amount of current flowing in a circuit made up of pure resistances is directly proportional to the electromotive force impressed on the circuit and inversely proportional to the total resistance of the circuit. The law is usually expressed by the formula I = E/R, where I is the current in amperes, E is the electromotive force in volts, and R is the resistance in ohms. This enables me to work out the resistance using the current and voltage.
Resistance (Ώ) = PD across conductor (V)
Current through conductor (A)
Preliminary Experiment
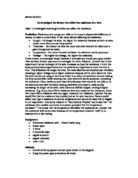
It is important to carry out a preliminary experiment because it tests you method and gives you an opportunity to adjust your method to increase the accuracy of it. I took results from the thickness of two wires (0.71mm, 0.27mm). These are the thickest and thinnest wires I’m going to be experimenting with in my main experiment. A diagram of what apparatus is to be used is shown in fig. 1.
Method
- Set up circuit as shown in fig.1
- Measure one 30cm length of each thickness of wire using the ruler (0.27mm, 0.71mm)
- Connect the wire to the circuit by the crocodile clips
- Complete the circuit by connecting the wire to the 1.5 volts slot on the power pack.
- Measure the voltage and current for each thickness of wire
- Record results in a suitable table
- Deconnect circuit
- Repeat experiment a further two times
Premilinary Results
The results above made me realise that I wasn’t making good use of the number of decimal places available. In some of my results I would only have one useful number. I will therefore increase my voltage on the power pack to 4.5V. I also noticed that there wasn’t a particular point during each experiment where you should take the results. Therefore for the main experiment I will turn the power on for 5 seconds and then take readings from the ammeter and voltmeter. These changes should enable me to produce more useful and therefore more reliable results. I have noticed that the results for the 0.27mm wire the difference between the resistance results are quite wide. I think this may be due to the various timings in which I took the results. I think using three repeats, the temperature control worked well and will continue these methods fro the main experiment.
Fig.1
Main Method
Apparatus
- A battery pack with four D batteries
- Voltmeter
- Ammeter
- 2 crocodile clips
- 6 wires
- 30cm ruler
- 1 set of 30cm constantan wire in 6 thickness’ (0.71mm, 0.56mm, 0.46mm, 0.44mm, 0.31mm, 0.27mm)
- 10 Ώ resistor
Instructions
- Set up a circuit as shown in fig.1
- Measure one 30cm length of each thickness of wire using the ruler
- Connect the wire to the circuit by the crocodile clips
- Complete the circuit by connecting a wire to the 4.5 volts slot on the power pack.
- Measure the voltage and current for each thickness of wire using the circuit after 5 seconds of turning the power on
- Record results in a suitable table
- Repeat experiment a further two times
Note
Do not do all three repeats for one thickness of wire in a row. Change the thickness of the wire every time you carry out the experiment. This is an extra precaution to ensure the temperature of the wire is kept constant and it does not affect the voltmeter and ammeter readings.
Safety precautions
- Make sure that the circuit is properly connected before turning the power supply on
- Do not touch the apparatus, especially the tested naked wires until the power is switched off
- The changing of the tested wires should only occur when the power is off
- Do not carry out the experiment in wet areas, as water is a very good conductor
- Do not switch on the power pack when there is no resistance wire in place
Obtaining
Fig. 3
Analysis
Graph 1 shows me a steep steady downward curve which does not go through the origin. I can come to a conclusion that as the thickness of a wire increases, the resistance decreases. This shows me that as the space between the atoms increases, there are fewer collisions, and the resistance increases. The data produces an obvious curve which also proves the results are reliable as they are not scattered randomly. Graph 1 supports my prediction well, I have a few anomalous results but I have described possible reasons for this error, such as the lack in reliability of my measuring of the wire. Also when I used the ‘5 second rule,’ I did not use a stopwatch to time 5 seconds, therefore my timing would have been inaccurate and the results could have changed over the period where the time was different.
Graph 2 show a directly proportional straight line which goes through the
origin. This shows that 1/resistance and the cross sectional area of the wire
increase at the same rate. Below are the calculations I made to produce my
second graph: -
From both my graphs I have proved that the thinner the wire, the higher the resistance. The thicker the wire, the lower the resistance. This is because as electrons pass through a circuit, they give off heat. The surrounding atoms use this heat as energy, which causes them to vibrate. As the electrons give off more energy, the atoms vibrate more, making it harder to allow the electrons to get through the wire. Therefore, a thinner piece of wire will create more resistance because there are more electrons trying to get through and having more collisions. Ohms law states that if the cross section of the wire is uniform then the resistance is proportional to the length and inversely proportional to the area of the cross section. The diameter of the wire will have an affect on the resistance of a wire. This is because the electrons have to squeeze together more to pass through a thin wire than they do to pass through a thick wire. Therefore if the diameter of the wire increases the resistance decreases.
Evaluation
I think overall my experiment worked well as I got reasonable results and my prediction was proved right. I found during the experiment that it was hard to measure the length of the wire accurately. If I repeated the experiment I would sellotape the wire onto the ruler to make it easier to measure, and to enable the wire is straight and the correct length. An aspect of the experiment that I thought worked particularly well was the 5 second rule. I measured the current and voltage of a wire when the power had been on for 5 seconds only; this meant that the temperature wasn’t likely to affect the resistance, as the wire did not have time to heat up during the experiment. I also thought keeping the wire as straight as possible meant there was no chance of any crossovers in the circuit. I believe I have two anomalous results which are clearly stated on each graph with a circle. I also stated the possible results that may have caused these anomalous results. I think these may have come about because of the inaccurate measuring of the wire. Also when I used the ‘5 second rule,’ I did not use a stopwatch to time 5 seconds, therefore my timing would have been inaccurate and the results could have changed over the period where the time was different. If I did the experiment again I would use an electronic timer. I think the quality of my results was good enough to prove my prediction right, plus I used precise methods of measuring for example the micrometer screw – gauge. To extend my investigation I would keep the diameter of the wire the same and change to various different materials. I would see if the resistance is affected by this change. This kind of investigation can help to decide what metals are better for different appliances. I know that from knowledge that I already have that the type of material will affect the amount of free electrons which are able to flow through a wire. The number of electrons depends on the number of electrons in the outer energy shell of atoms, so if there are more or larger atoms then there must be more electrons available. If the material has a high number of atoms there will be a high number of electrons, causing a lower resistance. If the atoms in a material are closely packed then the electrons will have more frequent collisions and the resistance will increase.