Power Pack – For power supply
Voltmeter – To measure the voltage in the circuit
Ammeter – To measure the current of the circuit
A nicrome wire of length more than 50 cm
Six wires with crocodile clips – To complete the circuit
Micrometer – To record the diameter of the wire
Wheat stone bridge – To measure and connect the wire
Variable resistor- To change voltage
Firstly I would measure the diameter of the wire using a micrometer then I would make a complete circuit by using the wires provided to connect my apparatus to each other and then to the power pack. I would put the ammeter in series in the circuit and the variable resistor in parallel with the component, which I’m testing – the wire (Dependent variable). The next thing I would then do would be to connect a flying lead to the ammeter hence I could complete the circuit and vary the length of the wire, which is my dependent variable. As soon as I’m ready to start the experiment I would switch the power pack on.
After I have connected my circuit as I have stated above, I would then repeat the test three times and collect a range of nine readings at points of wire lengths- 5cm, 10cm, 15cm, 20cm, 25cm, 30cm, 35cm, 40cm, and 45cm each time to make my result precisely accurate and reliable. I would record the current by reading the ammeter and the voltage by reading the voltmeter. Afterwards I would use the readings which I collect for the different lengths of the wire to calculate the resistance of the wire by firstly finding the average voltage and the average current from the three readings on each wire length and then finding the average resistance using the formula – R = V/I – where V= average voltage, I = average current and R= resistance.
Safety
I plan to be very safe while conducting this experiment in other to avoid any hazard. I would accomplish this by -
- Making sure that the circuit is correctly connected before turning the power supply on at all times.
- Not touching the equipment, especially the tested, naked wires until I switch of the power.
- Switching off the power supply while connecting and disconnecting my apparatus.
- Making sure that the place where I do my experiment and my hands are dry in order to avoid an electric shock as water is a very good conductor of electricity
- Not turning the power supply up too high to avoid the melting of my nicrome wire.
Prediction: I predict that there would be a positive co-relation between the length of a wire and the resistance in the wire. This means that when the length of the wire is increased there would be a relative increase in the resistance of the wire.
Hypothesis: I forecast this due to the scientific theory that electricity is the flow of electrons through a conductor (which in this experiment is a nicrome wire) while resistance is caused by friction and the slow down of the flow of electrons due to the collision of electrons with the nucleus of the atoms in a wire as they flow from the negative cell to the positive cell of a circuit. Subsequently if the length of the wire increases the distance which electrons would have to flow would increase and so would the resistance since there would be more collisions causing more friction and slow down of the flow of electrons.
The nicrome wire is a conductor because like other metals, it has free electrons, which carry negative charge by jumping alongside the atoms that are arranged as a lattice structure in the wire.
Thus if the length of the nicrome wire were increased the distance that the electrons would have to travel as well as the collision would be greater since the electrons would have to jump along more atoms while they flow to the positive cell of the circuit therefore causing the resistance to increase due to the boost of friction and slowdown caused by the collision between the electrons and atoms.
Apparatus:
Power Pack – (2.2V DC) For power supply
Voltmeter – To measure the voltage in the circuit
Ammeter – To measure the current of the circuit
A nicrome wire of length more than 50 cm
Six wires with crocodile clips – To complete the circuit
Micrometer – To record the diameter of the wire
Wheat stone bridge – To measure and connect the wire
Variable resistor – To allow me change voltage if I need to
Method:
- Firstly I measured different parts of the wire using a micrometer. Then I recorded the different diameters that I got and calculated the average diameter, which was 0.56mm.
- Then I positioned my nicrome wire on the wheat stone bridge.
- I connected the power pack as shown in the diagram then I plugged in the power pack the fuse of the power pack and turned the power on
- I clipped the flying lead to five different lengths of the wire (5,10,15,20,25,30,35,40 and 45cm) using the centimetre measurements on my wheat stone board and recorded the current readings from the ammeter and the voltage from the voltmeter.
- I repeated the test three times.
- I made sure my experiment was safe.
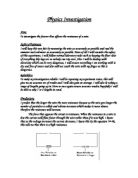
Diagram
A diagram showing how I set up my apparatus in a complete circuit.
Variable resistor Power supply
Ammeter
Voltmeter
Wire
Analysis of my result
I calculated my average current by adding my three currents that I read from my ammeter in the three tests together and dividing the sum by three. I also found my average voltage the by dividing the sum of the three voltmeter readings from my three tests and divided the sum by three.
Then I calculated my resistance, which is the measure of how difficult it is for the electrons to flow through the wire by using the formula - R = V/I
Where R = resistance
V = Voltage and
I = Current
The formula worked because the temperature was kept constant during the experiment.
I used the average voltage and average current in this calculation.
My results confirm my prediction because it shows a positive relation between the length of the wire and the resistance. For example when the length of my wire was 10cm the average resistance was 0.57 Ω (ohms) and when I increased the length to 20cm the average resistance became 0.97Ω (ohms).
I can also see this on my graph because the line of best fit on my graph shows a positive co-relation between the length of the wire and its average resistance and the line of best fit goes through the point 0.00.
Conclusion
My results show that the resistance of a wire increases as its length increases. This happens because as electrons flow in a wire they collide with atoms in the wire therefore causing resistance due to friction and the slow down of the electrons. Consequently when the length of a wire was increased the resistance of the wire was greater because the electrons had to flow through a longer distance and had a higher amount of collisions and friction causing the resistance of the wire to be higher.
My conclusion supports my prediction since it shows that the resistance of wire increases as its length increases. Evidence for this can be seen on my graph, which has a line of best fit that shows a positive correlation meaning that the length of wire is directly proportional to its resistance.
Evaluation
I observed that the temperature of the wire was increasing during my experiment. I think this happened because of the friction between the nucleus and the moving electrons.
My experiment had some analogous results and this could have been prevented if the wheat stone board had clearer measurement then I could have used an exact length for each point of my reading.
I could also have had a more accurate result if both my voltmeter and ammeter were digital through out the experiment. Having an analogue voltmeter and ammeter meant that I had to estimate most of my readings which meant they were not very accurate.
The wire had different diameters at different lengths this could be because it had been used previously and stretched. Different diameters meant that the I could not keep the diameter of the wire constant therefore this made my test unfair since more than one variable changed during the experiment thus affecting the accuracy of my results. I think that my results would have been more accurate if I used a new wire.
A lot of points on my graph did not fit into my line of best fit and my line of best fit did not go through the point 0.0 as I had expected this could have been because I did not read either my ammeter and voltmeter properly, I did not use the exact length of wire or due to the temperature changes that occurred during the experiment.
I think that repeating my experiment more times. Doing this would have given me a wider range of readings, which would have made my average more accurate.
If I could repeat this experiment I would try and correct all of the above circumstances, which made my some of my results strange. I would also use a very much longer length of wire because I would like to see if the resistance of a wire would increase dramatically with a longer length of wire.
I would also like to change my dependent variable to the type of wire in order to see how it would affect the resistance of the wire. Expect that the resistance would differ according to the type of wire depending on the number of atoms the wire has and how good a conductor the wire is.
I think a think a thicker type of wire would have more resistance than a thinner one because a thicker wire would have more atoms and therefore more neutrons to collide with the electrons consequently obstruct and slow down the free flow of electrons.