From the first of the above experiments, we found that the resistance was the same at each measurement stage. Although we noticed that we had different voltage and current readings each time. This would indicate that we do not need to change the voltage for each stage of the experiment, as it does not affect the resistance. In our main experiment we kept the voltage as a constant, i.e. the same throughout. When using a bulb instead of a wire, resistance increased as the bulb heated up. When any material begins to heat up, the atoms in that material begin to vibrate. Increased vibration of atoms means more movement and therefore greater collisions with electrons trying to move through that material. It is important therefore to keep the temperature constant throughout each stage of the experiment in order to ensure fairness. Thus, we let the bulb cool down before each experiment.
Other preliminary work was use of the school textbook. We used Modular Science for AQA, author: Kieth Hurst to look up certain words and ideas. I also used the BBC website to research electrical resistance in wire. I found this to be a helpful and clear way of understanding what I was actually investigating.
Apparatus Used: - Our main experiment involved the measurement of voltage and current at different lengths of the same wire. Measurements were taken at 5cm and increased multiples of 5 up to 50cm. We used, crocodile clips (to attach the leads to the wire), an ammeter (to measure the amps), a voltmeter (to measure the volts), power pack (power supply), 5 leads (to connect the circuit together), a meter rule to measure fixed lengths at a time, and a length of wire (the resistor).
How to make it a fair test: - the same voltage was used at each stage and length of the wire, and the experiment was repeated exactly the same each time but only changing the length of the wire. By keeping all other variables constant, this helped ensure a fair test. The whole experiment was repeated four times for each length of wire in order to avoid any anomalous results. As noted from our preliminary experiment with the bulb, we tried to keep the temperature the same at all times during the experiment by switching the power off to let the wire cool down while we changed wire lengths. We also straightened out the wire on the meter ruler when we changed the length so as to ensure as accurate a measurement as possible. This was done at each stage and both my partner and I checked to make ensure accuracy. When reading the ammeter and voltmeter we both checked it to make sure that we agreed on the ammeter and voltmeter readings.
What we will be measuring: -We measured the current with an ammeter and the voltage with a voltmeter. From the power supply we attached a lead to the ammeter and from the ammeter we attached it to one end of the meter rule with the crocodile clip and with another crocodile clip we attached it to the wire on the meter rule to the measurement we wanted. From there we attached it to the voltmeter with leads and from the voltmeter it was attached back to the meter stick and from there it was attached back to the power supply. To achieve the various lengths of wire for the experiment, we adjusted the position of the crocodile clips attached to the wire on the meter rule.
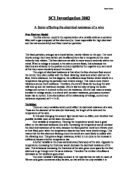
Below is a diagram of the circuit with which we conducted our main experiment. It consists of an ammeter connected in series and a voltmeter connected in parallel to the wire.
Circuit Diagram of Experiement
Table of Results for each experiment
1st Set
2nd Set
3rd Set
4th Set
Table showing the averages of length Resistances
Conclusion
The above results show that resistance in a wire increases with its length. In other words, the greater the length of wire, the greater the resistance.
By dividing the total resistance for each length of wire by 4, we can get the average resistance for each length of wire. The graph is showing the average resistance measurements plotted. The points along the graph lie in an almost perfectly straight line. The line of best-fit shows that, resistance is directly proportional to the length of wire. In other words if we double the length of the wire, we get double the resistance.
The explanation for this is that electrons moving through the wire collide with atoms in that wire. This collision causes resistance. A longer piece of wire will contain more atoms. Electrons moving through wire with more atoms will mean more collisions and hence more resistance.
I also found out that as the length of the wire increased, the current decreased and both the voltage and resistance increased. This is in line with Ohms Law.
I can conclude that this experiment proves my prediction that the longer the piece of wire, the greater the resistance in that wire. The resistance of a wire depends on the number of collisions the electrons have with the atoms in the wire, so a larger number of collisions will increase the resistance of the wire.
I can conclude that this experiment proves my prediction that the longer the piece of wire, the greater the resistance in that wire. The resistance of a wire depends on the number of collisions the electrons have with the atoms in the wire, so a larger number of collisions will increase the resistance of the wire.
Accuracy of Results: - I feel that the results of our experiment are accurate because of the care taken at each stage of the experiment. In the section “How to make it a fair test”, I have described the care my partner and I took when reading results and measuring the wire lengths. Naturally there is always the possibility for error, but I feel that we have reduced the chances of this to a minimum.
It would seem from our table of results that there are no anomalous results.
Further Considerations
By taking 4 sets of readings for each length of wire, we tried to avoid any anomalous results. We could have taken additional sets of results and this would have helped ensure greater accuracy but we felt that 4 sets were a sufficient number to ensure a reasonable level of accuracy, even though we were advised to take 3 sets of results. Also, if we were to repeat the experiment, we could try to improve the accuracy and reliability of our results by using a greater number of varied wire lengths. Making sure the wire was dead straight when measuring could also have helped.
Our results can be compared with others in the class in order to notice any errors, which may have appeared in our own results.
For further experiments I could investigate how the different types of the metals used as the wire can affect the prediction.