PLAN
APPARATUS
- Bunsen burner
- Heat proof mat
- Matches
- Safety spectacles
- Gloves
- Lab coat
- Clamp stands
- Tripod
- Gauge
- Conical flask
- Reflux apparatus
- Distillation apparatus
- Titration equipment
- Titration pipette
- Thermometer
-
100cm3 of ethanol solution
- anti bumping granules
- measuring cylinder(s)
- two containers for samples
- Sodium dichromate
-
10cm3 of 1 M Sulphuric acid
-
2cm3 of Concentrated sulphuric acid
(The above are all the apparatus that will be needed in the practicals below)
In this assignment I will be aiming to obtain pure samples of Ethanol (CH3CH2OH) and Ethanoic acid (CH3COOH). To do this I will first need to extract the ethanol from the ethanol solution (or yeast solution) which is made up of yeast, ethanol, water and glucose, using certain apparatus and techniques. In order to obtain the final result five stages/practicals will need to be carried out;
.
PRACTICAL 1 Preparation of Ethanol from glucose using yeast to carry out a fermentation in a bioreactor
This will be carried out as a class demonstration. A bioreactor will be used to show how fermentation takes place in ‘traditional fermenter’. The bioreactor will contain the ethanol solution, from which 100cm3 will be collected in a beaker. This solution will be between 5-15% from which the ethanol will be separated. The ethanol solution will first be filtered to remove any large lumps in the liquid.
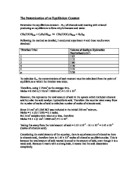
Before practical 2 the volume and mass of the ethanol solution will be recorded. The reaction taking place at this stage will be:
C6H12O6 2CH3CH2OH + 2CO2 + ENERGY
Glucose Ethanol + Carbon dioxide + Energy
PRACTICAL 2 Distillation of the ethanol solution
In this practical the ethanol solution will be distilled using the distillation apparatus (see method – practical 2- FIGURE 2). Distillation is used to separate a liquid from either a dissolved non-volatile solid or another liquid. However, the two liquids must have very different boiling points. This experiment should result in 100% ethanol, which will be confirmed by checking the boiling point on the thermometer. Once ethanol is prepared, a small sample of the ethanol will be placed into a suitable container that will be fully labelled for proof.
PRACTICAL 3 Oxidation of the Ethanol to Ethanoic acid
In this experiment the Ethanol will be oxidised to Ethanoic acid. This will be achieved by boiling gently under reflux with acidified Sodium dichromate (VI). Before refluxing, the starting volume of ethanol will be recorded. By this figure it’s mass will be worked out using the following equation:
Mass = Density x Volume (mass A)
Using the reflux apparatus (see diagram in method- practical 3) the ethanol with the Sodium Hydroxide (NaOH) and Sodium dichromate (VI) mixture will be refluxed for approximately 20 minutes. With the reflux apparatus, as the reaction mixture boils, vapour passes into the condenser where it cools (see diagram), changes into a liquid and falls back into the flask. No vapour is able to escape into the atmosphere.
The reaction taking place inside the reflux apparatus will be:
(Sodium dichromate VI)
CH3CH2OH + O2 CH3COOH + H2O
PRACTICAL 4 Distillation of the Ethanoic acid solution
This practical will be continuation of practical 3. The reflux apparatus will be re-arranged to be set up as the distillation apparatus.
The mixture will then need to be distilled by heating it up to around 120 degrees, which is the approximate b.p. for Ethanoic acid, until at least 2-3 cm3 of the acid is collected. 1cm3 of the Ethanoic acid will be placed into a suitable container whereas the rest will be used in the final practical.
PRACTICAL 5 TITRATION OF ETHANOIC ACID SOLUTION
This practical will determine the mass of Ethanoic acid by titration against 0.05M Sodium Hydroxide (NaOH). This will be done using a burette. The Ethanoic acid remaining from the previous practical will be used in this practical. The mass of the acid used in the titration will be calculated as MASS B.
Using MASS A from practical 3, the percentage yield of Ethanoic acid (CH3COOH) from ethanol will then be calculated using the following equation:
(MASS B / MASS A) x 100%
The overall reaction taking place will be:
CH3COOH + NaOH CH3COONa + H2O
RISK ASSESMENT
The substances used in the practicals will be very hazardous, so the correct precautions that will need to be taken are:
- LAB COATS must be worn to protect clothing
- SAFETY SPECTACLES must be worn whilst heating and working with hazardous substances
- LONG HAIR must be tied back to prevent it catching on fire
- GLOVES must be worn to protect the hands, especially when working with corrosive substances
- ONLY light Bunsen burner when it is needed, when it is not being used remember to turn it off
- Wait for any apparatus to cool down before dismantling it
- Work in a well ventilated area
- Where necessary carry practicals out in he fume cupboard as substances may release harmful fumes
- Keep FLAMMABLE liquid i.e. ethanol, away from flames
- Mop up any minor spillage’s with plenty of water, any major ones will need professional assistance (teacher/technician)
- Keep STOPPERS on flammable liquids
- Keep all glass equipment away from bench edges and work tops to prevent any breakages. If breakage does occur seek teachers help.
PRACTICAL 1- PREPARATION OF ETHANOL USING YEAST TO CARRY OUT A FERMENTAION IN A BIOREACTOR
This practical was carried out as a class demonstration. A traditional bioreactor was set up in which there was solution which was being fermented. The glucose in the yeast was being converted into ethanol whilst carbon dioxide was the by-product. This conversion was carried out by the respiratory enzymes in the yeast, catalysed by an enzyme called ZYMASE (an enzyme present in yeast).
C6H12O6 2CH3CH2OH + 2CO2 + ENERGY (210KJ)
Glucose Ethanol + Carbon dioxide + Energy
The fermenter that was used contained a little magnet which was ‘hopping’ around inside the yeast solution as a result of repelling to a big stronger magnet on which the fermenter was resting on. This prevented any of the solution accumulating anywhere inside the fermenter.
To illustrate the principle of a fermenter, below is a diagram of a simple fermenter, which is suitable for use in a student lab.
This fermenter can also be used to grow an organism such as yeast (Saccharomyces cerevisae) under controlled conditions. (This fermenter varies slightly to the one used in the class demonstration).
Before use, the syringes are removed and suitable broth medium added to the flask. These ends of the tubes are then covered with aluminium foil and the whole apparatus is sterilised by autoclaving. When in use, the fermenter is maintained at a constant temperature of 30oc by using a water bath. Filter sterilised air is then introduced by means of an aquarium pump, and the waste gases produced are vented through another filter. The small syringe at the top of the fermenter is used to inoculate the sterile medium with a culture of the organism to be grown and samples can be removed from time to time using the syringe at the side also known as the sample tap.
FIGURE 1
AUTOMATION this is an automatic process, which in industry detects any wrong measurements, conditions etc. in the bioreactor and corrects them (see evaluation for examples).
PRACTICAL 2 – DISTILLATION OF THE ETHANOL SOLUTION
AIM: In this practical the main aim is to separate the alcohol from the yeast/ethanol solution from the fermented yeast.
APPARATUS:
- Matches
- Heat proof mat
- Tripod
- Gauge
- Conical flask
- Distillation apparatus (see diagram)
-
100cm3 of ethanol solution
- Anti – bumping granules
- Measuring cylinder
- Suitable container for sample
- Clamp stand
- Funnel
METHOD
For this experiment the distillation experiment was set up (see page 11-FIGURE 2).
Using a measuring cylinder, 100cm3 of ethanol solution was collected. The ethanol solution was between 5-15% so the ethanol was separated from the yeast by filtering it using the funnel. The filtered ethanol solution was then weighed on a scale before anything else was done to it. Once weighed, it was then poured into the pear shaped flask. This was attached to a piece that had the thermometer sitting at the top and the condenser tube attached to the side of it. Two rubber pipes were attached to the condenser, one at the top end of the condenser and one at the bottom. The pipe at the bottom end was also attached to a tap whereas the pipe at the top end was left hanging loose in the sink.
This part of the apparatus is vital to the experiment as once the heating begins the solution and the apparatus will need to be kept cool. This is where the condenser comes in. When the tap is turned on the water flows through the pipe at the bottom (water in) and travels through the condenser. Once it has been around the condenser this water then gets sucked out by the pipe connected at the top (water out) and out into the sink. This water does not come in contact with the actual ethanol solution being heated; its purpose is only to keep the apparatus cool. At the bottom of the condenser there is an opening to which a receiver adapter is connected which delivers the distilled ethanol into a conical flask.
The apparatus was held in place using two clamp stands.
Inside the ethanol solution some anti bumping granules were added in to keep the movement if liquid under control. Once all the apparatus was set up, the Bunsen burner was lit on the orange flame (hole fully opened). The Bunsen burner was resting on a heatproof mat, which protects the surface underneath. Extra car and precautions were taken whilst lighting the Bunsen. A lab coat was worn to protect clothing, all long hair was tied back to prevent it catching alight if it came in contact with the flames and most important of all, safety spectacles were worn to protect the eyes from getting damaged if anything was to go wrong.
The Bunsen flame changed to the blue flame but not roaring, as this would be too high. The ethanol solution was heated until the temperature reached 70oc. Care was taken that the temperature would not rise above this by keep taking the Bunsen away from underneath the experiment. This had to be repeated several times before enough ethanol was collected for the next stage.
At one time the temperature had risen above 70oc which ruined the experiment. The reason being that ethanol condenses at roughly 70oc and when the temperature went above this, other products also condensed therefor the ethanol obtained was not pure. To correct this mistake the liquid collected in the conical flask was poured back into the pear-shaped flask by lifting the tube above the flask
Once the temperature reached 70oc the Bunsen was moved away quickly. This was because at this temperature the ethanol condensed and dripped in to the conical flask. Once enough alcohol (CH3CH2OH) was collected the Bunsen was turned off. Liquid remaining in the pear-shaped flask was a mixture of glucose, yeast and water because these all condense at a different temperature compared to alcohol, hence using the method of distillation.
The collected alcohol was then weighed and had the mass of 7.8g. This was now 100% ethanol. A small sample was placed in a suitable labelled container as proof. The alcohol was now removed from the fermented yeast.
CALCULATIONS
Density (p) of distillate = m/v
= 7.8 / 8.5
= 0.92gcm-3
As p of Ethanol 0.79 + p of water = 1.00
∴Distillate is: (100 – 92) = (8 / 21) x 100
= 38% ethanol
Assuming that all the ethanol has been distilled and no water has evaporated:
Original solution was (8.5 / 100) x 38 = 3.23% of ethanol
PRACTICAL 2- DISTILLATION APPARATUS
FIGURE 2
SAFETY PRECAUTIONS
Ethanol is very flammable. Therefore you must:
- Keep the stopper on the bottle as much as possible;
- Keep the away from flames;
- Wear safety spectacles;
- Wear protective gloves
PRACTICAL 3 OXIDATION OF THE ETHANOL TO ETHANOIC ACID
Once the ethanol was obtained this now had to undergo the following reaction:
CH3CH2OH + O2 CH3COOH + H2O
In order to obtain the Ethanoic acid (CH3COOH) the refluxing apparatus was used (see fig.3 pg. 13). In refluxing, as the reaction mixture boils, vapour passes in to the condenser where it cools changes into a liquid and falls back into the flask. Therefore no vapour is able to escape into the atmosphere.
10cm3 of 1M Sulphuric acid, which was measured in a 10cm3 measuring cylinder, was poured into a pear shaped flask. Into this 5g of Sodium dichromate (VI), which was weighed on an electronic scale, was added in using a funnel. Extra care was taken with the sodium dichromate (VI) so safety spectacles and gloves had to be worn. The reason being that sodium dichromate (VI) is a powerful oxidant and can damage the skin. Carefully the flask was swirled around gently enabling the sodium dichromate (VI), which was in the from of powder, to dissolve completely. Once the powder had dissolved into the 1M sulphuric acid, 2 – 3 ‘anti – bumping’ granules were added in. these are small bits of porcelain which enable the reaction mixture to boil more evenly.
Using a special funnel with a tap, 2cm3 of concentrated sulphuric acid was poured into it, making sure that the tap was closed. Care was taken whilst handling concentrated sulphuric as it is a very corrosive substance which will burn the skin. For this reason, gloves and spectacles were worn for protection. As well as corrosive it also reacts violently with water. In case of any minor spillage’s it would have to be mopped up with plenty of water in order to prevent the violent reaction. Once all the acid was poured into the funnel, it was released into the flask drop by drop. Whilst the acid was being dripped in, the flask had to be kept cool as it began to heat up. So whilst the acid was dropped in, the flask was being held under the tap as well as being swirled in order to distribute the acid throughout the whole mixture.
After this stage time had run out so the mixture in the flask was covered with aluminium foil to prevent any contamination or releases of any vapours. In the next lesson the reflux apparatus was set up that was held in place by two clamp stands. One held the flask in place whilst the second one held the condenser on top in place. Then using a pipette, drop by drop 1cm3 of ethanol was added down the condenser. Using the blue flame (not roaring blue), the mixture was refluxed for 20 minutes. This process speeded the reaction up in order for it to be distilled in practical 4.
CALCULATIONS
Starting volume of (100 – 3.23) = 97% ethanol = 1.0cm3
∴Starting mass of pure ethanol = 1.0 x 0.789 x 0.97
= 0.76533
PRACTICAL 3 REFLUX APPARATUS
FIGURE 3
SAFETY PRECAUTIONS
Glacial Ethanoic acid has dangerous fumes and burn the skin. Therefore you must:
- Keep the stopper on the bottle as possible;
- Wear gloved when appropriate;
- Wear safety spectacles whilst heating and handling this substance.
Concentrated sulphuric acid is very corrosive and reacts violently with water. Therefore you must;
- Wear gloves when handling this acid;
- Wear safety spectacles;
- Mop up any minor spillage’s with plenty of water and consult the teacher;
- Dispose of any unwanted residues by cooling and pouring slowly into an excess of water
Sodium dichromate (VI) is a powerful oxidant and can damage the skin. Therefore you must:
PRACTICAL 4 DISTILLATION OF THE ETHANOIC ACID SOLUTION
Now that the ethanol had been oxidised to Ethanoic acid solution, it had to be distilled in order to obtain close to 100% pure Ethanoic acid.
Once the reflux apparatus had cooled down, it was re-arranged, so it was set up for distillation. The solution was again heated but now the temperature at which it dripped at was 120oc, as this is the approximate B.P for Ethanoic acid. As the Bunsen was set up on the blue flame, the mixture heated up quite quickly so the Bunsen had to be taken away and back several times until at least 2 – 3cm3 of pure Ethanoic acid (CH3COOH) was collected.
CARE was taken whilst handling the Bunsen burner as it became very hot, so instead it was held from its bottom end where it was a little cooler, the Bunsen burner was placed on top of a heat proof mat which prevents the work tops getting damaged. Once enough Ethanoic acid had been collected the Bunsen was turned off and the apparatus was left to cool. This practical was carried out in a well-ventilated lab as it produced an unpleasant smell whilst the Ethanoic acid solution was being distilled.
After this practical was completed the time had run out so 1cm3 of the Ethanoic acid was poured into a suitably labelled container whilst the rest was covered with foil.
CALCULATIONS
Boiling point of distillate = 120OC
Volume of distillate = 4.9cm3
Mass of distillate = 4.93
ρ of distillate = 4.93 / 4.90 = 1.006
As ρ of Ethanoic acid = 1.049
∴distillate is 0.006 / 0.049 x 100 = 12.2%
PRACTICAL 5 TITRATION OF ETHANOIC ACID SOLUTION
From the remaining Ethanoic acid a volumetric analysis had to be carried out.
Volumetric analysis is a common laboratory technique used to determine the number of moles of reactants involved in a reaction. In a titration, a volume of two solutions is mixed together until the numbers of moles of each reactant are at the equivalence point. This point is usually identified using an indicator, which changes colour at the instant the mole ratio of a balanced equation is achieved.
CH3COOH + NaOH → CH3COONa +H2O
Using a measuring cylinder, 100cm3 of distilled water and the remaining Ethanoic acid were poured into a volumetric flask. This flask had a marked line, which was where the mixture was poured up to. If this mixture did pass this line the experiment would be ruined so this was a very important stage. Once poured into the flask, the stopper was placed on top of the flask and the whole mixture was shaken to ensure that both liquids mixed properly. Once mixed thoroughly, this mixture was poured through a funnel and into a burette making sure that the tap was closed to prevent any leakage. This burette was held in place by a clamp. The burette was filled up to the 0cm3.
Then using the large pipette for titration, 25cm3 of NaOH (0.05M) was drawn up. This was read off at the meniscus. This was then poured into a conical flask. Using gloves, one drop of Phenothailein was added into the conical flask containing the sodium hydroxide. This flask was then placed just under the burette tap. A white tile was placed under the flask to help determine the colour change from clear to pink.
The tap was then opened to allow the mixture pour into the conical flask drop by drop. Whilst the mixture was dripped in the flask, the flask itself was swirled so that the sodium hydroxide would mix thoroughly with the mixture poured in. once the colour change took place the titration was complete from which the percentage yield of the Ethanoic acid could be worked out.
CALCULATONS
4.8cm3 of distillate was diluted with distilled water to a total volume of 100cm3
Titration against 0.05M NaOH
CH3COOH + NaOH CH3COONa +H2O
Using 25cm3 of NaOH; this contains 0.05M mol.dm-3 and a total of
0.05 x 0.025 = 1.25 x 10⁻³ mol
average volume of diluted Ethanoic acid used to neutralise 25cm3 of NaOH = 11cm3
∴11cm3 of diluted acid contains 1.25 x 10⁻³ mol
∴total amount of Ethanoic acid = 1.25 x 10-3 x 100 / 11
= 1.1 x 10 –2 mol
mass of Ethanoic acid = 1.1 x 10 –2 x 60
= 0.66g (actual yeild)
strting with 1cm3 of ethanol (0.76533g)
C2H5OH CH3COOH
46g 60g
0.76533g 0.988g (max. yeild)
∴% yield = 0.66 / 0.988 x 100 = 67%
INTERPRETATION OF RESULTS
The results of practical 2 show that 38% of ethanol was obtained.
This means that the distillate obtained contained impurities in it as the original solution was 3.23% ethanol. This result is not really good enough as we needed a higher % of ethanol.
The purity of this ethanol was not very good even tough it distilled at 70oc. However there was not a lot of the ethanol which shows that the yeat solution practical 1 may not have been fermented for long enough. One improvemnet could be that if more glucose was added in the fermenter then more alcohol would have been obtained.
In practical 3, having the starting volume of ethanol of 97% we obtained 0.76533g of pure ethanol. However, there was not a lot of ethanol but we made use of what we already had. An error could have been made as a result of this which is that whilst collecting the yeast sloution maybe that the measurement was not accurate of the solution. Also whilst distilling the solution I did mention that in the first attempt, some water managed to get distilled along with the alcohol. Maybe that in our second attempt, again a little water may have got distilled but enough for us to notice but enough to affect the experiment.
The boiling point of Ethanoic acid was approx. 120oc therefore the density came to 1.006 which shows that the Ethanoic acid was purer compared to the ethanol we had. However, we only did obtain 12.2% of the acid the reason being that we did not have enough alcohol to begin with hence a lower % of Ethanoic acid.
The actual yield of Ethanoic acid we obtained was 0.66g which is not a lot however, our % yield was calculated to be 67% which shows that the Ethanoic acid was not pure as it it may have contained impurities. Because we had a low volume of alchol to begin with we ended up with a lower percentage yield.
EVALUATION
As a boiling point of ethanol we found that at 70oc, the alcohol began to distill. Also for Ethanoic acid we found that it distilled at 120 however, the data shows the boiling point of ethanol is 351.6 – 273 = 78oc. 351.6 is written in degrees Kelvins therefore to convert to degrees celcius it has to be minused from 273.
In my opinion, I think that the methods we used were not very precise as very easily eye errors could have been made. In a lab we can make many mistakes but in the industry a process called automation takes place. This is when the computers detect anything in the process which is not normal i.e. temperatures and then correct them in order to continue the process effectively. Conditions that maybe detected that can go wrong are such as the level of PH may not be right; the temperatures my become too high or too low; the amount of chemicals that need to be added and at what stage of the process etc. We never had any special equipment to be more accurate so obviuosly we would get a lower yield. Also as we never had a lot of time to carry the methods out the whole experiment was rushed so we could not obtain the real products.
Even though we checked the boling points of the alcohol and the Ethanoic acid, errors could have been made whilst reading off the thermometer hence not obtaining pure eniugh products.
If in practical 1, more gluicose was added in then more alcohol would have been obtained hence a higher yield of the Ethanoic acid. Also if we had controlled the PH we again would have obtained more alcohol.
Automation repalces activities such as the activities of workers, as they do not need to check the condition themselves instead computers do this which are more precise. Te benefits of automation are;
- the computer is more precise so the end product is just right
- labour is less no workers have to carry this process out
- saves time
- is quicker so product is made effectively.
In industry vinegar is made in large quantities for use in sauces, pickles and condiment. Vinegar – the name comes from ‘vin aigre’ the french for sour wine – is made using two microbial processes. Firstly sucrose, derived from fruit or grain, is fermented to ethanol in the absence of air, using a yeast called saccharomyces cerevisae. Then the ethanol is exposed to air in the precence of acetobacter, an aerobic bactria, and vinegar is obtained as an aqeous solution containing from 4-10% by volume of Ethanoic acid. The vinegar’s flavour depends on the source of the ethanol, for example from wine or malt, and it is sometimes falvured with herbs or fruit extracts.
In beer production to get different types of them, different yeasts are used compared to vinegar production. These yeast can also tolerate higher temperatures compared to the yeasts used for vinegar production.
The reaction conditions used in beer and vinegar productions are different. In beer manufacturing a number of stages have to be carried out. These are malting, milling, mashing, sparging, boiling, cooling fermentation and conditioning of the end result, beer. The temperatures used are very high and on the whole the manufacturing of beer is a lengthy process. Recently, there have been developments to produce both wine and beer by continous fermentation methods.
In these processes, the yeast is kept in its exponential growth phase, so the product is made much more quickly. This process is particularly popular for making lager, which can be made in about four hours instead of several days. However, although this process is more economical, the flavour and alcohol content are reduced.
Vinegar is produced by the oxidation of ethanol. Traces of other compounds such as esters, alcohols and organic acids give variations in the flavour. The source of material used for the initial alcoholic fermentation reflects materially locally available i.e. cider vinegar comes from the fermentation of apple jiuce, wine vinegar comes from grape juice, malt vinegar from barley or other cereal that has undergone the malting process and rice vinegar from rice.
Traditional methods developed for the commercial production of vinegar encourage the aerobic activity of bacteria such as ACETOBACTER and GLUCONOBACTER. The slow methods produce a high quality vinegar, whereas that produced by the quicker methods tends to have poorer flavour. The quality can be improved by allowing the vinegar to undergo a maturation process, standing in barrels. The vinegar is generously pasteurised by heating for a few seconds at 60 – 66 degrees.
What we carried out was much simple compared to industrial processes i.e. in industry, different yeasts and enzymes are used to get the required product.
BIBLIOGRAPHY
- UNDERSTANDING BIOLOGY FOR ADVANCED LEVEL THIRD EDITION by Glenn and Susan Toole
- CHEMISTRY IN FOCUS – John Andrew, Paul Rispoli
- Worksheets provided in class
- Book of data