Resistivity is a measure of the ability of a material to resist the flow of an electric current. Resistivity is represented by the Greek letter rho, , and is measured in Ohm-metres (Ω m) .
Resistivity is equal to the resistance R of a material such as a wire, multiplied by its cross-sectional area A, and divided by its length l.
This is given in the formula:
= RA/ l
Usually, a material's resistance increases with increases in temperature.
The metal we are using as our insulator is constantan, an alloy of 55 percent copper and 45 percent nickel. It has high electrical resistance, which remains almost constant over a wide temperature range.
Therefore I hypothesize that the results I obtain will relate to the formula R = l/A
We can use this to predict the resistance (R) values of the experiment ahead, by substituting values for , l and A.
-
The resistivity () of constantan is 4.9 x 10⁻⁷ Ωm at 20oC.
-
The radius of the constantan wire we are using is 0.000225m, therefore the cross-sectional area (A) for the constantan wire is (π x 0.0002252) = 1.590431281 x 10⁻⁷ m2.
-
The values for l are the independent variables for this experiment and can be substituted easily as we progress.
I will predict some of the resistance (R) values for the forthcoming experiment using the formula R = l/A . These predictions will be useful for testing the reliability of the results I obtain in the experiments.
To clarify the reliability of my experiment I will draw a graph to illustrate the resistivity of constantan. The graph will have the Restance results (R) on the y-axis, and the length divided by the cross-sectional area (l/A) on the x-axis. I will then plot the graph with the results I obtain, and connect the results with an appropriate line. The gradient of this line will be equal to the resistivity ().
The gradient of this line should be equal to the resistivity of constantan - () – Ωm. I will use the gradient of this line to test the reliability of my results
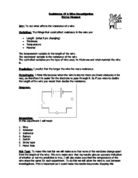
Method
Equipment
- Voltmeter
- Ammeter
- Constantan wire
- Copper wire – to connect up the circuit
- Power pack
- Set up the apparatus as displayed in the diagram
- Turn on the power pack (2V)
- Connect the crocodile clips to the desired length of constantan wire
- Record the Current and Voltage readings
- Turn off power pack
- Calculate Resistance using Ohms law (R = V / I)
- Move the crocodile clips the increase the length of constantan wire
- Repeat from step 4
Range
The voltage and current will be measured with the wire at lengths
0.1m, 0.2m, 0.3m, 0.4m, 0.5m, 0.6m, 0.7m, 0.8m, 0.9m, 1.0m
Repeats
We will repeat this test 2 times, with further repeats to clarify anomalies
Fair Test
To ensure this is a fair test we will have only one independent variable
Variables:
-
Resistance: this value will be a result of the length of the constantan wire, and therefore in a dependant variable
-
Voltage: this is what we are measuring. Dependant variable
-
Current: this is also what we are measuring. Dependant variable
-
Power pack setting: This has to be kept a constant to ensure this test is fair, if it is not then it would disrupt the results for the dependant variables. The power pack will be set on 2V throughout each experiment because a higher voltage would heat the wire and alter the resistance. This is a controlled variable
-
Cross-section of constantan wire. As demonstrated in the formula R = l/A, the cross-section of the wire has a direct effect on the resistance and therefore the current and voltage. Consequently we will keep this constant as a controlled variable
-
Temperature. This will also be kept constant at room temperature, so is a controlled variable
-
Length of constantan wire. This is what I am changing as my independent variable
Preliminary Experiment
To ensure this experiment will work, the method is suitable and the range of readings is appropriate, I will conduct a preliminary experiment.
Results
From the preliminary experiment I noticed that the ammeter used had too small a limit (0-2 Amps) and hence the current result for 1m of wire was off the ammeter’s scale.