Table 2
Constantine-SWG 26
3V
Table 3
Constantine-SWG 32
1V
Table 4
Constantine-SWG 26
1V
Analysis of Preliminary Testing
For my first preliminary experiment I decided to test Constantine SWG 32 and SWG 26 with 3V(See Table 1). I used a voltmeter and an ammeter to work out the resistance at regular intervals of 5cm along the wire. I then worked out the resistance from the voltage and the current. I was pleased with the results that I received as they showed an obvious trend evolving. The results show that when the length of the wire is increased so does the resistance and the current.
Within my preliminary testing I noticed an anomalous result in my table for Constantine SWG 26 (See Table 1) where an obvious pattern can be seen emerging in the voltage passing through each wire. There is a continuous increase with each measurement until it reaches 50cm where it decreases. I believe the cause for this may well have been due to a change in temperature or some damage may have been caused to the wire. This is a problem I may have to consider for later testing.
I then decided to test both wires with a voltage of 5 but this constantly burnt and snapped my wires. To stop this from happening I decided to test each wire with 1V (See Table 3+4) but the readings were too low. My voltmeter gave me a constant reading of 0 for each wire and my ammeter gave me 0 until the last five readings which were all 0.01 amps.
I decided to use a power supply of 3V using both Constantine SWG 32 and SWG 26 measuring the voltage and current at intervals of 5cm up to 50cm. My preliminary testing has shown me that the wires must be changed constantly if they get to hot as it may affect its resistance. Heat causes the atoms in the wire to vibrate increasing the amount of collisions occurring.
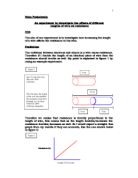
Methodology
Apparatus
Power Supply
Voltmeter
Ammeter
Wire (1m)
Crocodile clips
Meter rule
Step 1
Set up Circuit as below:
Step 2
Sellotape the wire along the meter rule. Place the positive crocodile clip at 0 and the negative at 5cm. Measure the volt and the current by taking the readings on the voltmeter and ammeter.
Step 3
To work out its resistance use this simple formula:
Resistance = Voltage ÷ Current
R = V / I
Step 4
Work out the resistance for the other following lengths]
10cm
15cm
20cm
25cm
30cm
35cm
40cm
45cm
50cm
Obtaining Evidence
Results
Note: The following results are from an initial output of 3V from the power box
1st Test
SWG 26
SWG 32
2nd Test
SWG 26
SWG 32
Averages
SWG 26
SWG 32
Graph 1+3: Shows the relationship between average current and length of wire
Graph 2+4: Shows the relationship between average resistance and length of wire
Analysis and Conclusion
From my results I have come to the conclusion that when the length of the wire increases so the resistance. When the wire is longer there is an increase in the number of collisions occurring as there is a greater number of electrons flowing through the wire therefore slowing them down and making them use more energy to get through. This force is known as Resistance. The longer the wire means that there is a higher build up of resistance as it goes through. The current (flow of electrons) decreases as the length increases because as the length is increased the electrons lose energy and build up a high resistance only allowing a small flow of electrons to pass through.
Scrutiny of my results shows that the current of Constantine SWG 32 has steeper increase than that of SWG 26 meaning that the thickness of a wire is also a major factor concerning the conductivity and resistance of a wire. My graph of SWG 32 clearly shows a steeper slope whereas my graph of SWG 26 shows a steadier decline.
This shows that when the wire is thicker there is a higher current and resistance because there is more space for the electrons to move freely about and there is an increase in the number of possible routes they can travel hence decreasing the number of collisions occurring and allowing a higher number of electrons to flow through because there is not as much energy being lost.
Evaluation
The main aim of my experiment was to find out what affect the length of a wire had in the resistance of a voltage
I believe my experiment went extremely well and it has provided me with clear and concise results that do not undermine my initial prediction and have me to construct reliable graphs.
Accuracy
To increase the accuracy of my experimentations I could do further testing on other factors that affect the resistance of a wire such as diameter or thickness to see when a piece of wiring is thick or thin how does this relate to its resistance. I could also use different wiring made from other materials e.g. copper to see if the number of free electrons and the number of electrons on its outer shell of the atom promote resistance. I can also investigate the affect temperature has on its conductivity of electricity in a wire and to see why when there’s in increase in temperature there is also increase in the resistance.