Ohms law:
Current, Potential difference (voltage), and resistance are linked by a simple formula used to work out the resistance.
RESISTANCE (in ohms) = VOLTAGE (in volts)
CURRENT (in amps)
OR
R ( ) = V
I
Graphs for Scientific Knowledge:
Factors I will keep the same:
- I will keep the same wire I am using, all through out the experiment, so that it will be a fair test.
- I will keep the same thickness of wire so that the results are not affected and inaccurate because I have changed the thickness of the wire. If I change the wire into a thicker wire, it might show results of less resistance.
- I will keep the same voltage using the variable resistor, so that the test will be fair and even.
- I will keep the same temperature. For this I will use a beaker containing water which will allow the wire to cool down and keep a constant temperature incase it gets hot.
The only factor I will change:
- I will change the length of the wire from 10cm, 20cm, 30 cm and so on until 100cm, to test whether the length of the wire affects its resistance.
Apparatus/ Equipment:
-
Power pack- where the electricity will come from (d.c.)
-
Connecting wire – to connect the voltmeter, power pack and ammeter to each other.
-
Crocodile clips – used to connect the voltmeter and the ammeter to the nichrome wire. This connected at the top of the connecting wires.
-
Ammeter - this is used to measure the current (in amps).
-
Voltmeter - this is used to measure the voltage (in volts).
-
Variable resistor – This has a sliding contact which measures along a coil of nichrome wire. By moving the contact I can keep the voltage constant.
-
Meter ruler – to measure how long the nichrome wire is.
- Nichrome wire
-
Selotape – to make sure the length is accurate.
-
Beaker of water – to keep the temperature of the nichrome wire constant and cool.
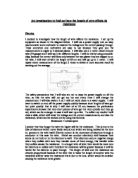
Diagram:
INFO:
The voltmeter measures the voltage across the wire. The ammeter measures the current flowing through. The water keeps the wire at a steady temperature. To keep the voltage the same across the wire, you move the sliding contact on the variable resistor.
Method:
- Set up the equipment as shown on the labelled diagram above.
- When the equipment is all set up, get the piece of nichrome wire. Using a meter ruler, measure the wires length starting from 10cm.
- Place crocodile clips at the end of the connecting wires, so that you can connect the connecting wires to the nichrome wire, at the 10cm measurement.
- When ready, make sure that the power pack is set at direct current (d.c.), and at the power of only 2.
- Turn on the switch and the power pack.
- When the voltmeter is not constantly flickering, record the voltage. Remember, this voltage has to be kept the same all through out the experiment, using the variable resistor.
- Record the current, which is shown in the ammeter.
- Turn off the switch and the power pack.
- Repeat steps 1-8, using the measurements 20cm, 30cm, 40cm, 50cm, 60cm, 70cm, 80cm, 90cm and finally 100cm.
- Repeat the whole experiments again from the beginning, for reliability and accuracy of your results.
Fair Test:
To keep my experiment as fair as I can, I will try to do the following things:
- I will keep the same wire I will use all through out the experiment. This is because using a different wire can affect the results.
- I will keep the same thickness of the wire. This is because if the thickness is changes, the resistance can be affected. The resistance maybe harder to adjust using the variable resistor.
- I will use the same measure of voltage, not keeping the voltage the same can lead to inaccurate results
- I will keep the temperature constant using a beaker of water to cool it down when it warms up, so that the resistance will not be affected. This is because as the wire warms up the resistance goes up.
Safety Precautions:
These rules are needed to be followed to avoid anyone getting hurt and injured:
- Tie long hair back – To allow the person to be aware of his/her surroundings. Hair can cause a distraction.
- Low voltage.
- Make wire long enough when testing, so that there is not a lot of current. This will cause the current to burn the nichrome wire, which is dangerous and is a hazard.
- Do not touch the nichrome wire while the switch and power pack is switched on, as there may be a chance you can get electrocuted.
Accuracy:
This is how I could make my results accurate:
- Pull nichrome wire to straighten it, before measuring the nichrome wire. This way it is stretched and can be measured more accurately.
- Selotape the nichrome wire to a ruler when measuring. This way the wire will not move as you measure it and can be measured more accurately.
- Using tips of the nails or fingers move it along the wire to straighten out the kinks that might prevent it from being accurately measured and giving me accurate results.
Prediction:
I predict that as the length of the wire increases, the greater the resistance that will be present in the circuit. This is because in my scientific knowledge, it states that as the length and resistance is directly proportional to each other. Therefore, if the of the wire increases or doubles, so will the resistance increase or double. This is why I hypothesis this.
Predicted Graph:
Preliminary results:
I predicted that the longer the wire, the more resistance there is. This is backed up by my preliminary results.
Table of results:
Analysing Evidence
From table of results and graph, I have found that as the length of the wire gets longer, the resistance increases. For example, from my table of results, at length 10cm of the wire, the resistance is 1.45 ohms. At length 50cm of the wire, the resistance is 3.10 ohms. And finally, at length 100cm of the wire, the resistance is 10.03 ohms. As you can see, the resistance increases as the length gets longer. The pattern I have noticed is that every 10cm that the length of the wire increases, the resistance also increases gradually and never stays the same resistance.
My results back-up my scientific knowledge. I know that as the length of the wire gets longer, the resistance also increases. This is because long wires have more resistance than short wires. Long wires have more resistance because, the electrons have to go through many obstacles and further travel in the longer wire. Therefore the longer the distance to travel, the more chances that the electrons will collide with the positive ions; this causes them to slow down and lose some energy due to the fact that some of the energy will be picked up by the ions. As the length doubles, there will be as twice as many collisions.
My original prediction was that, the longer the wire, the greater the resistance and vice versa. My table of results and graph show that my prediction was correct. My results show that the resistance will always increasing if the length increases, and that the resistance will never be the same is the length gets longer. This is because the longer the wire, the more chances of collisions with ions, atoms and other electrons causing them to slow down, decreasing the current and increasing the resistance.
Evaluation:
I think the method I used was clear enough to follow. There were no difficult instructions and the language I used was not hard to understand. For example…
“Place crocodile clips at the end of the connecting wires, so that you can connect the connecting wires to the nichrome wire, at the 10cm measurement.” (Instruction 3)
This was clear and gave the person precise instructions on how to put the crocodile clip on and where, which is the end of the connecting wires.
However, there were some methods/ instructions I did not include, which might have made the method better. For example…
- Selotape the nichrome wire to a meter ruler, so that the wire will be measured accurately.
- Using your fingers, straighten the kinks in the wire for accuracy.
I think my results were accurate, as I managed to keep the voltage (1.61 volts) the same, all through out the experiment, both for experiment 1 and 2 (for reliability). The results show that as the length of the wire gets longer, the resistance increases. This is what is exactly stated in my scientific knowledge.
I had about 4 anomalous results (circled on the graph). The line of best fit showed that were many accurate results, because they were near the line of best fit. However, the anomalous results were far away from the line. This reveals them to be the odd results because the line of best fit shows the best results in the graph depending on the patter of the results.
These anomalous and experimental errors could be due to:
- Flickering of the voltmeter and ammeter
- Kinks developed in the wire when they are coiled.
- Problems getting the voltage the same using the variable resistor.
- Difficulties putting all the wire in the beaker of water, causing the temperature to go up in different parts of the wire.
Accuracy 2:
This is how I could make my results accurate:
- Pull nichrome wire to straighten it, before measuring the nichrome wire. This way it is stretched and can be measured more accurately.
- Selotape the nichrome wire to a ruler when measuring. This way the wire will not move as you measure it and can be measured more accurately.
- Using tips of the nails or fingers move it along the wire to straighten out the kinks that might prevent it from being accurately measured and giving me accurate results.
- Use sensitive voltmeters and ammeters so there is no continues flickering, and that the results could be more accurate.
This is another accuracy I have added because the experimental errors I have got were due to the fact that the voltmeter and ammeters continuous flickering.
Conclusion:
In conclusion, I think that my results were good but not perfect and accurate enough. Due to the problems, some results became anomalous and errors appeared during the experiment. Therefore, I go not think my results are reliable but still prove that resistance is affected by the length of the wire. It is affected because as length gets longer the resistance increases.