Figure 3
Inhibition:
Certain substances (Inhibitors) compete with the substrate for the active sites of the enzyme (competitive inhibitors). Alternatively, other inhibitors attach themselves to the enzyme, altering the shape of the active site so that the substrate is unable to occupy it, and the enzyme cannot function (non-competitive inhibitors). Inhibitors therefore slow down the rate of the reaction. There were no Inhibitors that affected this investigation, however, as none were added.
Enzyme Cofactors:
Enzyme Cofactors are non-protein substances, which influence the functioning of enzymes, as some enzymes only work in the presence of these chemical 'helpers' - co-factors. They include activators that are essential for the activation of some enzymes. Co-factors also influence the functioning of enzymes, although they are not bonded to the enzyme. Unless enzyme cofactors are present in the potato tissue containing the catalase, they will not be included in this investigation and therefore will not affect the rate of reaction and the results of this experiment.
Surface area of tissue containing catalase:
Increasing the surface area of the potato tissue containing the catalase will ensure that more catalase molecules are exposed to the hydrogen peroxide solution. The rate of reaction will therefore increase, due to the increase in successful collisions.
Therefore, in order to achieve the maximum reaction rate within this experiment, I assumed that an optimal pH, salt environment and temperature were established.
Which variables did I allow to vary:
In this investigation, I wished to only allow one aspect to vary, so that this could be viewed in isolation of any other changes to the experiment environment. Specifically, I varied the number of pieces of Potato, whilst maintaining the same mass of potato, to permit an evaluation of the affect of increased surface area.
Which Variable did I hold constant:
To ensure that increased surface area was viewed in isolation of any other changes, I did not alter: Temperature; pH; volume of Hydrogen Peroxide (substrate); size of boiling tube and concentration of Hydrogen Peroxide.
Which Variables did I take account of
Although I would like to have maintained a constant approach to the experiment in the following areas, these aspects were out of my control, for a variety of different reasons. These areas were as follows: age of the potato; type of potato; exactly the same time for commencement of cutting the potatoes; not having commenced the experiment at exactly the same time for all samples.
I will discuss these areas at a later stage, in the Evaluation of the Experiment, to discuss the impact that these variables may have had on the experiment.
PRELIMINARY WORK
Although I have outlined the variables of the experiment, further preliminary work was conducted prior to the commencement of the experiment.
Prior to undertaking the methodology outlined below, I firstly conducted a Pilot Study, to examine the rate of the reaction of the experiment, and to see if any adjustments were required before the Final Experiment was conducted, to make sure that the best results were achieved. This necessitated some changes to be made to the Methodology below.
Specifically, I had to modify some of the apparatus, I had initially set up. I found that I needed to use a clamp and clampstand, to hold both the manometer and the boiling tubes, and also to maintain a constant temperature.
Secondly, I tested the concentration of Hydrogen Peroxide, with 1 x 5cm piece of potato, over a 10-second time period, to gauge the appropriateness of this concentration. The manometer fluid appeared to move very quickly, and so, I decided to proceed with the experiment, with this concentration of Hydrogen Peroxide.
Thirdly, it was also important that the surface area of the varying potato pieces were calculated. I utilised the mathematical equation of:
the surface area of a cylinder= πr2 + (2πrxh) to calculate the surface area of the potato pieces and these are outlined below (Figure 4). It was important that this information was firstly calculated, so that a graph could be drawn and gradient of the activity of the reaction could be assessed.
Figure 4
FAIR TESTING
To ensure that the experiment was conducted fairly and accurately the apparatus was kept the same throughout the experiment. Also, the stopwatch was started as soon as the last drop of Hydrogen Peroxide was added via the pipette filler, to the boiling tube. The results taken were the amount of oxygen measured in the manometer every 30 seconds. The potatoes were sliced with a scalpel and measured accurately with the ruler, to ensure an accurate surface area. Furthermore, the Hydrogen Peroxide was not measured out until the apparatus was set up to ensure that it did not start to break down once it was exposed to sunlight. The boiling tubes were washed out with distilled water after each experiment and each experiment was conducted twice to ensure accurate results.
APPARATUS
- 1 Potato
- 1 M Hydrogen Peroxide Solution
- Cork Borer
- Manometer with coloured fluid in the tube
- Sidearm Boiling Tube
- Scalpel
- Delivery Tube and Bung
- Tile
- Stop Watch
- Clampstand
- 2 x Clampstand Clamps
- 2 x Pens
- 1 Clipboard and blank paper
- 10 already-prepared and printed blank tables, to insert timings and readings.
METHOD
To study the effect of increased surface area of potato (catalase) in Hydrogen Peroxide, it was important to follow the course of the enzyme controlled under a controlled reaction in the laboratory. This was accomplished by measuring the rate at which the 'product' (Oxygen) accumulated, at different times after the start of the experiment. I will outline the methodology I used to conduct the experiment, for measuring the rate of this reaction.
-
RISK ASSESSMENT: Having previously prepared a 'Risk Assessment' of the experiment, I followed the safety procedures, as identified in Annex A, so that I was able to conduct the experiment safely. I firstly tied back my long hair back. Then, I put on the Laboratory Coat and safety goggles, and wore these during the investigation to prevent chemicals spoiling my clothes and skin. I also took care whilst handling the chemicals, as Hydrogen Peroxide is corrosive and the manometer fluid is permanently staining. Whilst using the scalpel, I also took care to hold this by the handle and not the blade, to prevent any accidents. I also ensured that any spillage on the surface was removed immediately by wiping up with paper towel and washing away with cold water. I should also stood up throughout the experiment, to ensure that all actions were conducted in a balanced and co-ordinated manner.
-
SET UP: I then set up the apparatus, as demonstrated in Figure 5, but did not insert the potatoes or the Hydrogen Peroxide. I also placed my two pens, table of timings, and clipboard with blank paper, ready to record the readings.
Figure 5
-
MANOMETER: I then filled the manometer with the manometer fluid and holding the manometer level by the bung to ensure that the fluid is at its lowest level, a mark was then drawn to indicate this point using a marker pen. As the manometer was marked at 1 cm intervals above the original measurement, there was no need to mark up further measurements along the manometer. I then attached the two-way valve.
-
HYDROGEN PEROXIDE: I then measured out 200 mls of Hydrogen Peroxide into the glass beaker.
-
POTATO: Using the cork corer, I then took the first sample of potato. I then placed this first sample of potato on the tile and cut this first sample into a 5 cm sample, using the scalpel and plastic ruler. I then washed off the potato cylinder with distilled water.
-
POTATO/HYDROGEN PEROXIDE SAMPLE: I then placed this sample immediately into the sidearm boiling tube. Utilising the pipette filler, I then measured out 10 cm3 of Hydrogen Peroxide. I took Care to view the pipette from the side, to ensure that the bottom of the meniscus was lined up properly with the gradations and that there were no air bubbles in the syringe. I then inserted this into the Boiling Tube, ensuring that the potato was covered, and placed the bung over the boiling tube and released the clamp on the manometer tubing.
-
MEASUREMENT OF OXYGEN: I then immediately started the StopWatch, to record the timings. I also ensured that the reaction mixture was agitated, so that the contents were evenly distributed. Furthermore, the equipment and processes were managed carefully and with precision to ensure that the final results were reliable and accurate.
-
MEAUREMENT OF TIMINGS: Every 30 seconds, I then measured the volume of oxygen that had been released in the experiment, by taking the manometer reading and recording this in the table, for 5 minutes.
-
DISCARD: After each experiment, all contents of the boiling tube were discarded in a central beaker, for use by all students.
-
REPEAT OF EXPERIMENT: In order to enable an average result to be taken, the same experiment was conducted for the same sized potato sample, and accordant results were then inserted into a secondary table.
-
FURTHER SAMPLE SIZES OF POTATO: I then took a secondary sample of potato, utilising the cork borer and cleaned with the distilled water. Utilising the scalpel and tile, I then completed the experiment, as outlined in steps 5 - 10, for pieces of potato as follows: 4 cm x 1 cm; 3 cm and 2 cm; 3 cm and 2 x 1 cm; 5 x 1 cm.
-
RECORDING OF OXYGEN PRODUCTION: When the previous steps has been achieved, the timings and total volume of oxygen collected (cm3), should be noted in a result table, as outlined in 'Results'. If bubbles are still being produced, then oxygen is also still being produced. The clamp was then opened to allow the gas to be released. The manometer fluid was then return to its original level, thus ensuring accurate readings.
-
CLEARING UP: Following the completion of all the experiments, as outlined above, I then disposed of all of the potato and fluids utilised in the experiment, and cleared all the apparatus away and cleaned up the experiment surfaces.
RESULTS
This experiment provided the volume and rate (in cm3) of oxygen produced at varying times, by identifying the levels of oxygen gas which are given off in the space of 5 minutes for the various concentrations of potato samples, as outlined in the 'Table of Results' (Below).
Table of Results - Experiment 1
Table of Results - Experiment 2
The average of the above results, equates to the following readings, as identified in Table of Results - Average of Experiments 1 and 2:
Table of Results - Average of Experiments 1 and 2
Table of Results - Experiment 3
Table of Results - Experiment 4
The average of the above results, equates to the following readings, as identified in Table of Results - Average of Experiments 3 and 4:
Table of Results - Average of Experiments 3 and 4
Table of Results - Experiment 5
Table of Results - Experiment 6
The average of the above results, equates to the following readings, as identified in Table of Results - Average of Experiments 5 and 6:
Table of Results - Average of Experiments 5 and 6
Table of Results - Experiment 7
Table of Results - Experiment 8
The average of the above results, equates to the following readings, as identified in Table of Results - Average of Experiments 7 and 8:
Table of Results - Average of Experiments 7 and 8
From these results, a graph can then be plotted with time (in 30-second intervals) on the x-axis and the volume of oxygen gas released on the y-axis (in cm3) (see Annex B).
It is important that in analysing the relationship between the enzyme concentration and the rate of the reaction within the experiment further, the surface area of the potatoes must be correctly calculated and considered, in relation to these readings. Therefore, I compared the surface area of the potato (as identified in Table 1) with the timings and production of Oxygen. With this information, I was then able to calculate the time it takes for the reaction and link this to the surface area of the potato.
CONCLUSION
The Results included in the previous section indicate that although the results are not statistically significant, the linear graph indicates that increasing the surface area of the potato (whilst maintaining the same mass) does increase the production of oxygen, due to the effect of catalase within Hydrogen Peroxide.
The graph (Appendix 2) demonstrates that although the curves of the graphs, indicate the production of oxygen over a three minute time-period, increasing sections of potato, thus increasing the surface area did produce an increase in catalase activity and hence oxygen production.
This conclusion therefore correlates with the original prediction, which was included in the 'Plan' for this experiment.
INTERPRETATION
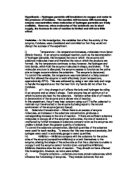
The conclusion stated above can be supported by the information included in the 'Plan', specifically that catalase's ability to function in the 'Lock and Key' method, as outlined below (Figure 6), as with all enzymes, is specific to Hydrogen Peroxide. When the substrate (Hydrogen Peroxide) approaches the active site of the enzyme (catalase), the shape of the active site changes to fit precisely around the substrate; the substrate induces the active site to change shape. The reaction is catalysed and the products are formed. The products are a different shape from the substrate so they diffuse away from the active site. The active site reverts to its original shape as the diffusion takes place.
Figure 7
Figure 6
Enzymes, such as Catalase, are protein molecules, which are found in living cells. As outlined above, they are used to speed up specific reactions within the cell. It has the ability to remove Hydrogen Peroxide from cells. Hydrogen Peroxide is the poisonous and toxic by-product of metabolism; this compound can kill cells. Catalase speeds up the decomposition of Hydrogen Peroxide into water and oxygen because the shape of its active site matches the shape of hydrogen peroxide molecules. This type of reaction where a molecule is broken down into smaller pieces is called a catabolic reaction (Rowland).
The chemical reaction for the breakdown of hydrogen peroxide into water and oxygen can be demonstrated by the following equation:
Catalase
2H2O2 2H2O + O2
Hydrogen Peroxide decomposes to form water and oxygen, a reaction, which takes place very slowly unless energy, in the form of heat or light, is supplied. The breakdown of Hydrogen Peroxide, in this laboratory experiment, was characterised by bubbling and effervescence, as the catalase permits the liberation of oxygen gas (Taylor, Green and Stout).
Furthermore, enzymes reduce the Activation Energy (Rowland). Like all catalysts, enzymes (E) react with their substrates (S) forming an intermediate enzyme-substrate complex (E-S). The activation energy for this pathway is less than the alternative without the enzyme. A single reaction therefore happens more readily, as more reactions happen in a specified time interval i.e. the reaction is faster. Catalase lowers the activation energy of this reaction from around 75 kJ mol -1 without a catalyst, to around 21 kJ mol -1. At 0oC, a temperature at which enzyme-controlled reactions are usually thought to be slow, one molecule of catalase catalyses the decomposition of about 50,000 molecules of Hydrogen Peroxide each second (Turnover Number of 50,000). Therefore, with the increased surface area of catalase, the production of increased levels of product (i.e. oxygen) is quantifiable and demonstrated within this experiment, as we would have expected from our knowledge of enzymes.
EVALUATION
Although the experiment has demonstrated that the prediction has indeed proved to be correct, under laboratory conditions, there were a number of aspects, which could be improved upon. Some of these aspects are procedural and some are down to me as the individual conducting the experiment, however, they are listed, as an evaluation of the accuracy and reliability of these results.
Evaluation Issue Number 1:
- Firstly, in conducted the experiment, once I poured in the Hydrogen Peroxide to the boiling tube, I should have simultaneously released the clamp from the tubing, whilst also simultaneously starting the stopwatch, to precisely record the timings. This was crucial to accurately record the measurement of manometer fluid that the oxygen has pushed along the tubing, at 30-second intervals, for three minutes. However, this proved to be very difficult to Co-ordinate.
Suggested Improvement: In future, 2 people should conduct this experiment.
Evaluation Issue Number 2:
- If bubbles are still being produced at the end of the three minutes time-period, then oxygen is also still being produced. At this point, it is important that once the gas is collected, it should be tested to ensure that it is Oxygen. We did not actually conduct a test to corroborate that this was the gas.
Suggested Improvement: The traditional test for oxygen assumes that oxygen is required for most things to burn. Therefore, if I were to light a tongue depressor with the match (being careful not to burn skin or clothes) and blow at the flames, so that a glowing ember remains. The exposure of the ember to pure oxygen should cause it to burn much faster. The clamp should be opened to allow the gas to be released and then hold up the ember to the jet of released gas from the tubing and watch the results.
Evaluation Issue Number 3:
- The manometer fluid should always be returned to its original level, to ensure accurate readings. However, as the manometer fluid moved so quickly along the manometer, at every 30-second interval I released the clamp and returned the manometer fluid to its original level. This would undoubtedly have caused some time delay in the manometer fluid returning to this level, and hence, would have impacted upon the accuracy of the results.
Suggested Improvement: In future, I would suggest adding a fixed quantity of distilled water to the Hydrogen Peroxide, to reduce the activity of the reaction, and thus, ensure that more accurate results are attained and the final results and thus more meaningful.
Evaluation Issue Number 4:
- If I were to do the experiment again I would measure the potato pieces using a micrometer, which would provide far more accurately sized pieces and mean a much more accurate set of results.
Suggested Improvement: Use a micrometer, to accurately record the potato pieces.
Evaluation Issue Number 5:
- Although it was useful to have included two sets of each test, if I had had more time, I could have conducted further experiments, to accurately provide an increased range of samples for analaysis.
Suggested Improvement: I would have extended the experiment, to include further sets of the experiment, and also included further sized pieces of potato.
Evaluation Issue Number 6:
- Although I felt that the experiment was conducted in as sterile a way as possible, in order to reduce the impact of increased temperature and pH; I would be more conscientious about contamination of the equipment and solutions in the future.
Suggested Improvement: The pieces of potato should be placed in the boiling tube using a pair of tweezers to prevent contamination. Tongs should also be used to hold the boiling tubes, to reduce temperature increases. Greater use could also have been made of the distilled water, as this could have been used to wash out the boiling tube and wash off the potatoes, more vigorously.
Evaluation Issue Number 7:
- The Hydrogen peroxide did not always cover all of the potato, thus reducing the effect of increased surface area
Suggested Improvement: In future, I should increase the quantity of Hydrogen Peroxide, ensuring that the same quantity is used for each experiment, however.
Evaluation Issue Number 8:
- A change in pH may have had an impact upon the results.
Suggested Improvement: In order not to disrupt the results, pH 7 buffer should be selected and inserted into the boiling tube, to match the natural pH of the potato tissue and therefore match the enzyme, to ensure that it is able to work effectively.
Evaluation Issue Number 9:
- I felt clumsy and unconfident in this experiment, due to lack of expertise and previous practice with the experiment equipment.
Suggested Improvement: In future, I would like to conduct more experiments, and certainly have a pilot experiment, to ensure that I am confident in the use of all of the equipment.
Accuracy of Results
Although I have commented (above) on suggested improvement to the experiment, on a more positive note, to conclude, I can confirm that I restricted the variables to only one - being that of the increased surface area of the potato (catalase). This ensured that the experiment was completed as fairly as possible, ensuing that all the variables except for the varying surface area of potato, remained the same for all of the experiments.
I can also confirm that completing each different groupings of potato twice, and thus calculating an average for these results, should have guaranteed more reliable results. I also measured the volume of Hydrogen Peroxide very accurately with a pipette and filler, ensuring that that meniscus was accurate.
In summary, the experiment did conclude that which I had detailed in the 'Prediction' of the experiment, however, further improvements as outlined (above) would ensure that a repeat of this experiment, would attain more accurate and thus conclusive results.
BIBLIOGRAPHY
Clegg, C (1998) 'Introduction to Advanced Biology', John Murray Publishers
Indge (2000) 'The Complete A - Z Biology Handbook (2nd Edition)', Hodder and Stoughton
Johnson, R (2002) 'Biology' McGraw-Hill
Jones, M and Jones, G (1997) 'Advanced Biology', Cambridge University Press
Roberts (2001) 'Nelson Science Biology'. Nelson Thomes
Roberts, Reiss, Monger (2000) 'Advanced Biology'. Nelson
Rowland, R (1992) 'Biology', Nelson
Simpkins, Williams (2000) 'Advanced Human Biology', Collins
Taylor, Green and Stout (1995) 'Biological Science 1 and 2', Cambridge
Toodle, G and Toole, S (1999) 'Understanding Biology for Advanced Level', Stanley Thornes
ANNEX A
Laboratory Safety
1. Report all accidents regardless of how minor to your teacher.
2. Work in the lab only when the teacher is present or when you have permission to do so.
3. Never indulge in horseplay or behavior that could lead to injury of others.
4. Before beginning work in lab, clean the lab bench top and your glassware.
5. Use goggles and lab aprons when instructed to do so.
6. Due to the dangers of broken glass and corrosive liquid spills in the lab, open sandals or bare feet are not permitted in the lab.
7. Learn the location and proper usage of the eyewash fountain, fire extinguisher, safety shower, fire alarm box, office intercom button, evacuation routes, clean up
brush and dust pan, glass/chemical disposal can.
8. For minor skin burns, immediately plunge the burned area into cold water and notify the teacher.
9. If you get any chemical in your eye, immediately wash the eye with the eye-wash fountain and notify the teacher.
10. Never look directly into a test tube. View the contents from the side.
11. Never smell a material in a test tube or flask directly. Instead, with your hand, "fan" some of the fumes to your nose carefully.
12. Immediately notify the teacher of any chemical spill and clean up the spill as directed.
13. Never take chemical stock bottles to the lab benches.
14. Use equipment only as directed:
a. never place chemicals directly on the pan balances.
b. use glycerin when inserting glass tubing into rubber stoppers.
c. be cautious of glassware that has been heated.
d. add boiling chips to liquid that is to be heated before heating.
e. point test tubes that are being heated away from you and others.
15. Never taste any material in the lab
16. Food, drink and gum are prohibited in lab.
17. Never add water to concentrated acid solutions. The heat generated may cause spattering. Instead, as you stir, add the acid slowly to water.
18. Read the label on chemical bottles at least twice before using the chemical. Many chemicals have names that are easily confused.
19. Return all lab materials and equipment to their proper places after use.
20. Upon completion of work, wash and dry all equipment, your lab bench and your clean-up area.