-
Placing a syringe filled with 6 cm3 of water (at room temperature) and 4 cm3 of air into a water-basin containing water at 45 degrees Celsius. This was a good temperature to do the preliminary experiment because it is quite equal considering all the temperatures.
- Starting my stop clock
- Bubbles will begin to come out of the syringe – This is because the air inside the syringe is heating up due to the surrounding water and gaining more energy. They are moving faster and expanding, and so some of the air will be pushed out of the syringe. If we did not allow an expansion time, we might mistake this air for carbon dioxide, and this would affect our results.
- Stopping my stop clock as the last bubble leaves the syringe.
- Recording the time taken. This is my expansion time, and is how long I will need to leave my experiment before I start to take readings.
Once it had completed, I found that I would need 5 minutes for the mixture to equilibrate. This tells me that I will have to wait 5 minutes after placing to syringe into the water before I start my experiment. This makes sure that I am not timing the mixture equilibrating, only the mixture respiring. While doing this experiment, I placed 6 cm3 of water into the syringe and 4 cm3 of air, so that during the real experiment I must place 3 cm3 of yeast suspension, 3 cm3 of 10% glucose solution and 4 cm3 of air.
Predicted Results
I predict my results to be similar to the following. They should at least follow the same sort of pattern, as I have no previous knowledge in this experiment and can only guess what my results will be. In theory, as the temp of the experiment increases by 10 degrees Celsius, the rate of respiration doubles. I predicted the table on this basis.
Predicted Graph
This was plotted using the information from my predicted results table.
Apparatus and what I used
Water basin – used to hold the water in which the syringe will be placed
Thermometer – used to measure the initial and final temperature of the water
Stop clock – used to record the time
Metal boss – used to weight down the syringe, as the syringe will float without some sort of weight to keep it at the bottom of the water basin
250 ml beaker – used to hold hot water so that when the water in which the experiment is taking place loses heat, hot water can be added to regain the desired temperature
10 ml syringe – used to hold the yeast solution that will be respiring
2 ml syringe – used to collect the CO2 produced by respiration
Thin plastic transport tube – use to transport the CO2 produced in the 10 ml syringe
Plasticine – used to cover the end of the 2 ml syringe as not to let any gas escape
Rubber glove – used as protection when placing your hand in hot water, as to prevent burns. Also used to hold hot beakers containing hot water
Kettle – used to heat water quickly and efficiently
Yeast suspension – single celled fungus that respires when activated
10% glucose solution – one of the things needed for respiration. It provides food to the yeast suspension
Air – used so that the CO2 gas will be able to escape from the syringe
Block – used to raise the water basin on one side so that it will be at an angle, thus less water will be needed to cover the syringe, thus it will be easier to control the temperature of the experiment
How will I use the equipment to minimize potential error? :
Using the block minimizes the chance of error – it creates a less amount of water needed, and so it is a lot easier to control the temperature. The more accurate the temperature the more accurate my results will be. Also, I have chosen to collect the gas produced in another syringe instead of simply counting the bubbles. I feel this will be more accurate as the bubbles may vary in size, or you may miscount them for example. I will also use a stop clock, as this will be more accurate than simply counting the time in my head.
Method:
-
I filled the larger syringe with: 3 cm3 of yeast suspension, 3 cm3 of 10% glucose solution and 4 cm3 of air. The air is there so that it allows a passage for the CO2 to get out of the syringe. When filling it, I made sure that no glucose or yeast suspension is left on the syringe. I placed the thin rubber tube on the end of the syringe.
- I set up apparatus as shown in the diagram, making sure that no air is left in the smaller syringe – all of the air must be displaced by water or my results will be incorrect
- I allowed 5 minutes for the mixture to equilibrate
- Then I started the stop clock
- While the experiment is taking place, I made sure that the water is kept at the desired temperature, and that all the apparatus was still in place
- I stopped the stock clock after 5 minutes
- I accurately measured the amount of air (carbon dioxide) that has displaced the water in the small syringe. I was careful not to measure the top of the meniscus, but the bottom. I made sure that an error of parallax is not created, by making sure that my eye was in line with the object.
- I then recorded results and observations
Safety Precautions
When working with the higher temperatures such as 50 and 60 degrees Celsius, wear rubber gloves. This will prevent burns and pain caused by the hot water. Be careful not to drip water over any electrical appliances such as the kettle. Do not carry hot or boiling water around the classroom at any time: keep a beaker or kettle next to you if you need hot water at hand. Wear a lab-coat. Take care at all times when handling equipment.
Any earlier work that helped my planning: We have studied the respiration of yeast during class, and most of this information can be found in our textbooks or else on the Internet (e.g. www.bbc.co.uk) or software programs (e.g. Microsoft Encarta)
Obtaining Evidence
The equipment that I will use will allow me to obtain precise results. There may be more accurate alternatives – such as using a digital thermometer. This would minimize the chance of an error of parallax. Also, putting it in a basin that has a specific mechanism to control the temperature automatically would minimize the chance of error. Neither of these was available to use during our coursework.
I will repeat each experiment 3 times so that I will be able to obtain average readings. This is a lot more reliable than just doing one experiment of each, although it would be better to do 5. This is not possible as we only have a limited amount of class time. Now, I am able to see if there are any great differences in results and I am able to different between correct results and anomalies.
I will do the experiment at 5 different temperatures. This will allow me to get a clear idea when the enzymes denature, and I will be able to note these averages on a graph more accurately than if I use less than 5.
*Note:
For my results, I discovered I had a distinguishing anomaly for one of the 50 degrees Celsius experiment. Experiment number 10 had a significantly greater amount of gas produced than Experiments 11 and 12. This shows that it is likely to be inaccurate. Thus, I redid it once and received a more suitable result, which is a lot closer to Experiments 11 and 12 than 10, which shows that 10 was a anomaly. This is why there are four results for 50 degrees. The rate of reaction x 1000 for the tenth experiment was 4.17 cm3 /sec, while the average rate for all four results in 50 degrees was 3.46 cm3 /sec. This shows a great difference, which is why I state that Experiment 10 is an anomaly. There was not enough time for conducting more results for any other supposed anomalies, although this would have increased reliability of the experiment.
Analysing
(See following final graph)
Conclusion
My results show that:
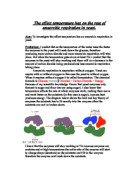
- As temp increases, so does rate of reaction, up until the enzymes are denatured. This is because the particles gain more energy as the temp increases, making them move quicker and create more successful collisions.
- The enzymes denature roughly just after 50 degrees. This is because the heat has broken them down – Their active sight has changed shape.
This proves my prediction true. The rate of respiration of yeast increases as temp increases. This also proves the Kinetic Theory (the theory that as particles gain energy, they move faster and more violently, thus creating more successful collisions).
The optimum temperature is the temperature at which the enzymes work best. This would be the temperature that has the greatest rate of reaction. From my graph, I can see that the optimum temp is roughly 47 degrees. Not all enzymes denature at the exact same temp and so some are still working at 50 degrees, but they start to denature at 47 degrees
If I continued to increase the temperature and do more experiments at these higher temperatures, it is clear that no respiration would occur as no enzymes will be working and so the reaction cannot take place.
The reaction stopped at a temp of 60 degrees, which means that the enzymes must have denatured. It was very slow at 30 and 20 degrees, and so this shows me that the particles had very little kinetic energy.
Temperature Coefficient – Q10
How much does the rate of respiration increase each time you increase the temp by 10 degrees?
Q10 between 20 and 30 degrees Celsius =
Q10 = (Gas produced at 30°)
(Gas produced at 20°)
Q10 = 0.05
0.01
Q10 = 5.67 cm3
Q10 between 30 and 40 degrees Celsius =
Q10 = (Gas produced at 40°)
(Gas produced at 30°)
Q10 = 0.05
0.01
Q10 = 5.67 cm3
*Note – For gas produced, I added up my readings for total amount of gas produced for each temperature, and then divided this amount by the sum of the number of readings that I added up. This would give an average for the total amount of gas produced in cm3, accurate to 2 decimal places.
Evaluating:
On the whole, I think that my evidence is reliable. There are a few anomalies, although when I averaged out my results these did not make too much of a difference. It proves my prediction and my results are not all too far off from each other, showing that they must be reasonably correct. I know that respiration of yeast is an enzyme-controlled reaction, and our evidence confirms this.
5 minutes was too short of an expansion time – I should have left it for seven minutes or more. This was an error in my preliminary work – I did not compensate for all the temperatures. I know this because often the first result was noticeably different from the second two. For example, my first results for 60 degrees Celsius was 0.5 cm3 of gas produced, while the 2nd and 3rd were both 0.0 cm3.
A few results did not fit: Experiments 1, 5, 10 and 14.
These were mainly the first results in each experiment. This was because the air and the mixture were still equilibrating and so some air was still being giving off. This is because the air and mixture were equilibrating with the surrounding water, and so expanding as the air gained energy. This caused some of the air to exit the syringe, causing inaccurate measurements of carbon dioxide produced. The way I could change this would be to give the mixture a longer time to equilibrate, maybe seven minutes. Also, the experiment was a little under temperature in experiment number 12 (the 2nd for 50 degrees, see results table). I can see that these experiments do not fit perfectly because they are not extremely close to the average, indicating that they were different to the others in the same temperature region.
I have enough evidence to draw a simple conclusion: that the rate of respiration of yeast increases as the temperature increases, until the point that the enzymes denature. I do not think I have enough evidence to say the exact temperature at which enzymes denature.
My results are not 100 % accurate because I know that the temp was not kept constant at all times, that the yeast suspension may have had some variance in glucose concentration (because other student may have dipped their syringes into the yeast suspension after dipping them into glucose solution).
One way I could improve my method would be to redo the entire experiment again. This would minimize chance of error as well as making sure my results are correct. The more experiments I could repeat the better, although the only problem is the lack of time.
Other ways to improve my experiment:
I could make sure that my syringe was completely clean every time I dip it into either the glucose or yeast solution. Check that the rubber tube is completely secure on the syringe, allowing no air to escape. Check the apparatus before starting each experiment to make sure there were no mistakes in this area. Make sure I start my stop clock exactly as the experiment starts. It may be better to have an alarm on the stop clock so that it will ring at the exact time, thus it will be easier to take a reading at a correct time – as the alarm rings, instead of the slightly inaccurate method of looking at the stop clock until the correct time and then taking a reading. The temperature could be measured using a digital thermometer. This would give more precise readings. It would be easy to know when too add hot water, etc. and so will improve the reliability of the final results. Make sure no error of parallax occurs when measuring how much air was formed in the syringe. Do this by keeping the object and your eye in a straight line. Try to repeat the experiment as many times as possible, and making averages. Each time I repeat the experiment, my results will become more reliable.