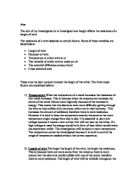
Figure A
2Xcm
Xcm
Figure A shows that when you have a longer length of wire the charged electrons have to pass by more of the lattice atoms, which will increase the number of collisions between the two which will in turn increase the resistance.
Resistance, in ohms is equal to the resistivity levels of the wire, in ohmmeters multiplied by the length in meters divided by the cross sectional area, in square meters. The material and the cross sectional area of the wire is constant throughout the experiment therefore resistance is directly proportional to the length.
Figure B
Metal = Y
Resistance = x
Resistance = x + x or 2(x)
Resistance = x + x + x or 3 (x)
Figure B shows the rule for resistance if resistance is directly proportional to the length.
Apparatus:
Apparatus I shall select to test my prediction are as follows:
- Nichrome wire 280 cm long
- Clamp stand: hold it tightly and straight
- Voltmeter: to measure the voltage
- Ammeter: to measure the current
- G clamps: to hold the clamp stands to the table
- Crocodile clips and connecting wires: to connect everything together
- Power pack: to supply electricity to the circuit
- Labels: to mark the intervals
- Variable resistor: to have better control over the current.
Factors:
- Temperature: If the wire is heated up the atoms in the wire will start to vibrate because of their increase in energy. This causes more collisions between the electrons and the atoms as the atoms are moving into the path of the electrons. This increase in collisions means that there will be an increase in resistance.
- Material: The type of material will affect the amount of free electrons which are able to flow through the wire. The number of electrons depends on the amount of electrons in the outer energy shell of the atoms , so if there are more or larger atoms then there must be more electrons available. If the material has a high number of atoms there will be high number of electrons causing a lower resistance because of the increase in the number of electrons. In addition, if the atoms in the material are closely packed then the electrons will have more frequent collisions and the resistance will increase.
- Wire length: If the length of the wire is increased then the resistance will also increase as the electrons will have a longer distance to travel and so more collisions will occur. Due to this the length increase should be proportional to the resistance increase.
- Wire width: If the wires width is increased the resistance will decrease. This is because of the increase in the space for the electrons to travel through. Due to this increased space between the atoms there should be less collisions.
Method: -
I set up the circuit as shown in the diagram that I have drawn.
I made sure that the wire was carefully tightened at both terminals to try to minimise the kinks or twists in the wire. I then switched on the power pack supply and adjusted the variable resistor until a constant current of 0.4A was flowing through the circuit. I then recorded the corresponding voltage reading that was displayed on the digital voltmeter. I repeated this procedure using different lengths ranging from 50-350cm and adjusting the variable resistor until 0.4A was flowing through the circuit. After recording the corresponding voltage readings for each length and tabulating them I decided to repeat the whole experiment again another 5 times so that I could take the average voltmeter reading for each length.
Variables in the experiment: -
- In this experiment I varied the length of the wire each time using a range of lengths from 0-250cm.
- I kept the current flowing through the circuit constant using a variable resistor which I kept varying for each length of wire so that the ammeter would always read 0.4 A. I then recorded the voltage readings from the voltmeter which corresponded to the length of the wire being used.
- The temperature of the wires in the circuit needed to be kept constant to prevent the whole circuit from overheating. I managed to do this by quickly switching off the power pack supply every time I had recorded my set of readings. I then left the power pack to rest for a small interval of time before switching it on again to record the next set of readings.
- I also kept the diameter of the wire constant by using the same piece of wire throughout the whole experiment.
Obtaining:
I will set up my results table as shown below:
I shall only change one factor; length and I shall record 5 readings at each interval and then work out a mean recording. This will make my results more results and limit the effect of anomalous results.
To work out the main resistance I will use ohms law:
R = V/I
V = Mean Voltage
I = The Current
I will use low currents to reduce the heating effect on the wire, which will in turn affect the level of resistance; I shall use a current of 0.4 amps. I have chosen to work over large distances to reduce the margin of error in my measurements I shall be working over 350cm. The ammeter and voltmeter I have selected displays up to 2 d.p. This allows control over the variables.
Analysis:
26 standard wire gage 26 SWG (0.375mm)
The graph shows the longer the wire the greater the resistance. Therefore, this proves my predictions correct. I have added a line of best fit to work out the equation:
Resistance = 0.0029*length + 0.0014
Resistance / 0.0029 – 0.0014 = length
28 standard wire gage 28 SWG (0.457mm)
The graph shows the longer the wire the greater the resistance. Therefore, this proves my predictions correct. I have added a line of best fit to work out the equation:
Resistance = 0.666 * length + 0.0479
Resistance / 0.0666 – 0.0479 = length
The graph of Resistance against length of 28 SWG is a straight line, which means R, is directly proportional to L. This means that if the length is 50cm, and resistance is 1.07, then if length is doubled to 100cm, resistance also doubles to 1.15. This is because of the scientific idea, stated in the planning that if you double length, you double the number of atoms in it, so doubling the number of electron 'jumps', which causes resistance: The results support my predictions well, the results turned out the way I had expected, they match the predicted line well. I had predicted a straight line through the origin, which means R, is directly proportional to L.
My Conclusions:
Having performed the investigation, the following conclusions were drawn:
- As predicted, an increase in length resulted in an increased resistance. This can be clearly said for both wires tested. Both wires show a strong trend of a straight line, i.e. the length of the wire is shown to be directly proportional to the resistance – double the length and the resistance doubles.
-
The overall resistance of the two wires seems to differ considerably. Due to the strong correlation of the results, the explanation of this is unlikely to be the method used to obtain the results. The more likely explanation would be that the first wire was actually of a larger diameter than the second one. The reason why this is the likely explanation is because resistance is known to be inversely proportional to the cross sectional area, i.e. if you increase the cross-sectional area (by increasing the diameter) then you decrease the resistance. This is because a wider wire means less likelihood of the free electrons having collisions and losing energy.
It is important to realise, however, that despite the fact that it would appear that the resistance of wire 2 is double that of wire 1, that does not mean that the diameter is half that of the wire 1. That is because if you halve the diameter then you decrease the area by a factor of about 3 (A = πr2)
Evaluation:
As I increased the wire length, the wire became hotter and gave off heat. I think one of the reasons why my experiment is quite accurate is because I tried to measure the wire as accurately as possible. The metre rule was labelled onto the workbench. The wire was stretched until it was nearly in a straight line so a bit was overlapping at each end. Finally, the inside edge of the crocodile clips were placed at the appropriate point.
During my experiment; I have noticed several modifications I could make to improve on the Investigation if I was to repeat it. They are:
- To be more accurate with my results I would place the metre rule directly under the wire, so therefore it would be measured easier and therefore making the lengths more precise.
- To also improve on my results I could use a new or higher quality digital voltmeter.
- The next modification I would make would be to use pointers instead of crocodile clips to attach to the wire; I would do this because pointers would be more accurate. The pointers would be more accurate because the tips have a much smaller area than the crocodile clips giving a more accurate measurement of the length of wire.
- I would also use a newer metre rule.
- Sometimes the ammeters flicked between a decimal point, I maybe could have thought it was the wrong number and therefore would have ended up with the wrong average resistance.
- In this experiment, I did not control the room temperature but instead just assumed it was keep constant throughout my experiment; this could have made the wire get hotter and therefore making my experiment not as accurate. In future experiments I would control this variable factor and make it a constant factor.
- As well as making these modifications, I could also expand on my investigation by testing the same wire but different widths of that wire. I would do this if I had more time to complete it.