In order to make this a fair test when I change the length of wire. I will keep all the other factors, i.e. the material of wire, area of cross-section and the temperature exactly the same. In all measurements of current, I will keep the voltage across the wire unchanged (constant). Also I have to consider of using a constant temperature, i.e. room temperature (25ºC), and also I have to keep the cross-section of the wire constant.
Prediction
I predict that when I double the length of wire the current will halve and if I make the length of wire three times, the current will approximately be a third of its initial value.
That is my quantitative prediction is that the current will be inversely proportional to length of wire. Therefore, if I plot (V=Voltage, I=Current) vs. length of wire, a straight line will be obtained, since V is constant.
The scientific reason for my prediction is that the resistance is caused by the obstruction to the path of freely moving electrons by the ions. When I double the length the number of ions will also double. The numbers of ions along the material of constant thickness will be proportional to the length and therefore the collision experienced by the electrons will also be proportional to the length. Hence the resistance is expected to increase while lengthening the wire.
Method
The apparatus that I will use are:
- Powerpack- This gives power to the whole appliance.
- Ammeter - This records the current of the circuit.
- Voltmeter - This records the voltage of the circuit.
- Variable resistor - This changes the resistance of the circuit
- Constantan wire (0.9mm) - This is what I am testing. This is the experiment
- Connectivity wire - This connects all the apparatus together.
- Two Crocodile clips – This hold the wire up
- Micrometer Screwgauge – This measures the area of cross-section of the wire.
- 1 metre ruler – You use this to measure the constantan wire length
- Firstly set up the apparatus like in the circuit diagram below. Cut a long piece of wire for the experiment.
- Measure, with the metre ruler, the different lengths that you are going to measure. Instead of cutting the wire up in many pieces, just move the crocodile clip up the wire. You must plan beforehand on how many readings you are going to record. The minimum is 10 readings.
- Clip the crocodile clips onto the wire at your first starting measurement and make sure that the voltage on the powerpack stays at 2 Volts because if it was higher then you might burn the wire.
- Make sure that the circuit is set up correctly. Then read off the ammeter and the voltmeter. Remember the reading on the voltmeter MUST stay constant for this test to stay fair. To do this, use the variable resistor, by using the slider, which will control the voltage and current.
- Repeat experiment until you have done all your readings. Then clear up apparatus.
Preliminary Test
I have decided to take 19 results ranging from 10cm, 15cm, and 20cm…to 100cm. The reason to do this is that my graphs will be more accurate and reliable because there are a lot more points to plot.
I chose the constantan wire because copper is a too good of a conductor and has too much current flowing through it so there will be a higher risk of getting electrocuted and also the current values would have been too high. Nichrome had too much resistance so the current values will be too low.
I chose 0.16V because firstly it was the first voltage I had recorded and secondly I wanted the current to be at its highest at 2A so it will be safe and at its lowest near 0A.
Results
When I did my experiment I had repeat it three times to make sure my results are reliable. After I have done my three tables I will do a table of average resistance.
- Table of Results
- Table of Results
- Table of Results
Average Resistance Results
Analysis
See graphs.
Conclusion
From my results (tables 1,2,3 and average resistance) and the corresponding graphs of:
- Current Vs. length of wire.
-
Vs. length of wire
The following observations can be made:
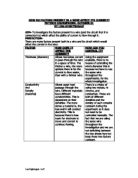
(a) The current vs. length gives a smooth curve, for all the sets of results, in which the current approximately halved when the length was doubled. For example, in graph 1a, when the length was increased from 20cm to 40cm the current changed from approximately 0.90A to 0.48A and when the length changed from 30cm to 60cm the current changed from 0.62A to 0.34A.
-
For all the sets of results, when was plotted against length, a straight line, with a positive gradient was obtained, i.e. increased length linearly. This means length or currentlength is a constant and it follows that current i.e. the current is inversely proportional to length.
These observations are in excellent agreement with my prediction that the current will be inversely proportional to the length, since the resistance, which is the opposition to current, is directly proportional. The reasons stated in my prediction are therefore. That is the resistance is due to the obstruction to the free flow of electrons, which carry current by the ions and when the length is doubled, the number of ions in the path approximately doubles thereby doubling the resistance which causes the current to halve.
Further, from the plot of average resistance (average from the 3 sets of results, resistance in each case obtained by using Ohm’s law () a very good, straight line is with a positive gradient was obtained. This showed that resistance is directly proportional to length.
The gradient of line obtained (average resistance vs. length)
= =
(It is found from advanced texts and A-Level textbooks that:
R=is the formula for the resistance of a wire with as the specific resistance of the material of wire, l the length and A is the area of cross-section.
The gradient of a plot for Resistance vs. should therefore give R=
Evaluation
The results of my investigation agreed very well with my prediction that the resistance of the constantan wire was directly proportional to length and the current through it is inversely proportional to length (when the area of cross-section was kept constant). Further, using the quantitative relationship of R=, with the gradient from my graph, a value of was obtained for the specific resistance () of constantan which worked very well with the literature vale (ref. Electricity made simple). These facts clearly show that my investigation was very successful and accurate. However, I did find some anomalous results which I could make more reliable throughout extended investigations.
Nevertheless, there were several areas that could have been improved. Accurate measurement of lengths is one such area and choosing wires of 100% uniform thickness with minimum requirements for straightening would help to increase accuracy and avoid anomalous values in the results. While random errors can be minimised by doing each step extra carefully any systematic errors due to instruments such as the ammeter and voltmeter can be overcome only by calibrating the ones used against accurate instruments.
Repeating each experiment under identical conditions will ensure reproducibility. Both reproducibility and accuracy are required in order to obtain an extremely successful outcome of an investigation. Using different thickness of wire could extend this experiment and also by using different materials, in order to demonstrate the correctness of the relationship for the resistance of the wire. I could also extend this experiment by using different sets of cross-sections of the wire so I could prove which had the highest resistance and which one had the lowest resistance.