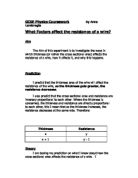
therefore thinner, there is not as much space for all the current to get through, and therefore there is a lot of resistance.
The second diagram illustrates what happens when the wire has a large cross sectional area, it shows that twice the amount of current is able to go through, and therefore the resistance has decreased by half.
i.e. Resistance= 1/ Area
This can be explained using the formula:
R= I/V
The way in which the cross sectional area of a wire is found is the following:
Using a micrometer find the diameter of the wire
Half that by two in order to find the radius
Apply formula: A= π r²
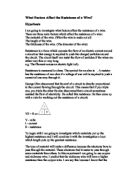
The unit in which resistance is measured is called an ohm (Ω). Ohm’s Law gives the relationship between current strength and potential difference in a circuit. From Ohm’s Law it can be deduced that:
Potential Difference (volts V)
Resistance (ohm Ω)=
Current (ampere A)
OR R= V/I
The definition of an ohm can be described as being:
A resistor offers a resistance of one ohm if a potential difference of one volt drives a current of one ampere through it.
There are also other factors that could possibly have an effect on the resistance of a wire. These are:
·length
·temperature
·material
The length affects the resistance due to the following things, metals conduct electricity because the atoms in them do not hold onto their electrons very well, and so, creating free electrons, carrying a negative charge to jump along the line of atoms in a wire. Resistance is caused when these electrons flowing towards the positive terminal, have to ‘jump’ atoms. So if the length of the wire is doubled, the
amount of atoms in the wire double, so twice the amount of energy is required: there are twice as many ‘jumps’ if the wire is twice as long.
The material of wire could also affect the resistance of a wire, as some materials may vary from one another. The material must be chosen sensibly, as some materials may be more available, less expensive and easier in use than others.
As an obvious statement, when choosing the material you must make sure that the material actually conducts electricity!
Variables
Independent variable for 1st experiment- My independent variable for this first experiment (investigating the
appropriate length) is the length of the wire.
Dependent variables for 1st experiment-My dependent variables are the following:
·The material of the wire (constantan)
·The voltage
·The Ohmmeter, to prevent differences between two or more machines.
·The micrometer, to avoid differences between two or more different micrometers.
·The temperature
·The thickness (or rather cross sectional area)
Independent variable for the 2nd experiment- My independent variable for this experiment (investigating how the cross sectional area affects the resistance of a wire) will be the cross sectional area of the wire,
Dependent variables for the 2nd experiment-My dependent variables shall be the following:
·The material of the wire (constantan)
·The temperature
·The length
·The voltage
·The micrometer, in order to prevent differences occurring
·The Ohmmeter, in order to prevent differences between machines
Apparatus
For Experiment One:
⇨One multi-meter set on the setting for measuring in Ohms (Ω).
⇨One reel of constantan wire
⇨Two crocodile clips
⇨One metre ruler
⇨Two wires
For Experiment Two:
⇨One multi-meter, set on the Ohm (Ω) setting
⇨One micrometer
⇨One reel of constantan wire
⇨One metre ruler
⇨Two crocodile clips
⇨Two wires
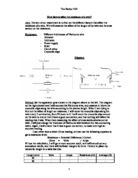
Diagrams
For Experiment One:
- +
Ohmmeter
Metre ruler
Constantan
For Experiment Two:
- +
Ohmmeter
Constantan
Method
For Experiment One:
- Sellotape a wire of 1metre long to a metre long ruler.
- Set the multi-meter to the Ohmmeter setting.
- Attach all the wires to the appropriate places.
- Clip the positive crocodile clip to the 0 cm mark on the ruler.
- Move the negative clip from 10cm, to 25 cm, to 40 cm,
to 50 cm, to 60 cm, and finally to 75 cm.
- Note down all results carefully in results table each time a result is collected.
For Experiment Two:
- Get a reel of constantan and mark it at the appropriate length.
- Set the Multi-meter onto the Ohmmeter setting.
- Attach all the wires to the appropriate places.
- Attach the negative crocodile clip to one end of the wire and the other to the marked spot.
- Note the results carefully into results table.
- Fold the wire double the previous thickness and start again.
Using these two methods I will first investigate the appropriate length, and then investigate the effect of the cross sectional area on the resistance of a wire.
I believe that the results that I am collecting will provide me with a sufficient range for me to be able to make an educated statement about how the cross sectional area of a wire affects the resistance.
Data Presentation
I will present the results that I have collected first in two results tables (one for the appropriate length and one for the cross sectional area), then in a series of graphs that relate to these results.
Fairness
In order to keep my experiment fair, I will ensure that all the boundaries defining the variables are kept to and that the results are noted down carefully.
I will also make sure that all the equipment is in correct working order to ensure that no technical mistakes are made.
Safety
In order to ensure safety, all instructions must be followed carefully at all times. If this is done, then the experiment should be carried out without any problems to the persons safety what so ever.
Results
In order to investigate how the cross sectional area affects the resistance in a wire, I will now have to convert the thickness, into the cross sectional area of the wire.
Diameter= 0.32 mm
Radius= 0.16 mm
A= π r²
A= π x 0.16²
A= 0.08 mm²
Analysis
From the results that I collected I can conclude that what I stated in my prediction was correct. Using these results, I will now prove that the cross sectional area is inversely proportional to the resistance.
In order to do this I must now compose another Graph, the graph of Resistance over 1/Area:
From this Graph I am able to verify that my statement is correct.
Evaluation
Overall the results that I collected in both the experiments were as I had expected. There were no problems when collecting my results. There were however slight anomalies such as the resistance being o.1 of an Ohm
off the expected results. But these differences are negligible.
It was also hard at times to measure the resistance at the right length as the wire had to be folded double. This caused me to have to measure to see if it was still the correct length each time.