This section on the mixing console comes just below the eq section (shown above) on each channel on the mixing console. It is used to add to the Sound input into this channel. The aux sends could be used to add an effect to the sound through an effects unit or a gate etc.
P (12) is the first dial in the aux send and would be routed to the first aux send/return section on the console and so the effect could be used on every channel if all dials of P (12) had be turned to the right a little, the amount to the right that the dial is turned shows how mush of the sound you are sending and so therefore how much effect will be added. P (13), P (14) & P (15) are used in much the same way as P (12) but they affect the sound by sending it to different aux sends and so more than 1 effect can be placed upon a sound. All aux effects are put on to the sound post eq, although S (13) and (S16) offer the user of the console the ability to make the effects work on the sound pre or post fader and so the effect is either is added after the channel fader and so would move proportionally to the fader or the effect is added manually by moving the corresponding dial pre the sound going into the channel fader. S (15) offers the user the ability to switch the use of the aux sends so that they are routed to the buses on the other section of the console. S (17) is a switch that offers the ability to change the choice of input noise into the channel and is often used to listen back as 16 channels could be taken to listen out of a hard disk recorder and so therefore it would be simple to plug it all in for recording and easy enough to switch the first 16 channels to mix b to listen back.
This section on a console is known as the fader section and it is here on each channel that the user of the console decides at what volume the output from that channel should be (Chf, up increases the volume down decreases it) and if the channel is sent to one of the 8 busses available to mix down through or if the sound if ready to send out to the main mix (S (32)). The busses mean that the 24 channels on this mixing desk can all be split up and regrouped into jus 8 channels and so could mean that a drum kit taking up 12 channels (through different mics) could be routed all to one channel that sounds nice and is balanced so you can hear all of the kit but the sound engineer would then only have to control one fader to control the whole kit. P (24) is used in routing to the busses because depending on which switch you have down ( S (28), (29), (30), (31)) you use the pan to decide if you route to the odd number or the even number so going left on the pan with S(29) down would result in that noise being routed to buss number 3. S (27) offers the user of the console the ability to mute this channel and stop it sounding on the main mix if this is in place L (27) would turn on. And S (26) allows the user to solo just this channel so that it is all that could be herd out on the main mix.
This is the channel b section on the console which comes below the aux sends section on the console it allows a small amount of eq to be added (P (18) &P (19)) this is because mix b is generally only used for playback and so most of the eq should have been done already. Channel b also offers pan ability so you can choose from which angle the sound travels P (20); P (21) is the gain control for the mix b and so turning the dial to the right offers an increase of sound. S (22) has the same use as S (26) as it allows you to mute the channel. S (23) chooses from where the sound is coming from so it could be line/ mic etc.
This is the mix b option it allows you to play all of the mix b channels through the main output it is assigned to the main mix by pressing in S (48) and the level of the signal going out is increased by turning the dial P (48) to the right hand side.
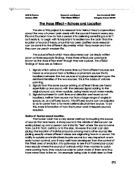
This is two of the 8 stereo busses found on the behringer mx9000 and is used by sending from each of the channels by pressing down S (28), (29), (30), (31) respectively . So to send to group 1 you need to press down S (28) and pan to the left (see page 5) and this would then send all output from that channel to this group. S (33) and (34) both allow the ability to only hear what is being played by this group they are used by pushing the button down. The faders (GrF 39) & (GrF 40) are the volume control for the output of the channel they are for group 1& 2 respectively and increase the volume when pushed up. By pressing down the S (35) button you would send the group 1 in mono to the main mix output, whereas if you send it by pressing down the S (37) button you would send it to the left hand speaker in a stereo mix. The same can be done on channel two but using the S (38) button sends this channel to the right speaker in a stereo mix. This the same with the other 4 stereo pairs on the desk as the odd channel always sends to the left speaker.
This is the auxiliary sends section on the desk it can be used to send sounds from the channels to effects units. This would be done by turning the dial P (41-46) up to the right side the more this is done the louder the output signal will be going. The signal is taken if the dials P (12-16) are turned to the right (see page 3). The switches next to the level dials correspond to the dial and they offer the ability to solo the dial out so the others can not be heard and if this is happening in any of the sends then the light at the bottom L(47) will light up.
This is the next section on the mixing console; it controls the returns from the effects etc as sent on the page above. The first two aux returns enable the user to increase the incoming signal by turning the dial P (49) up to the right. It also offers the ability to send different amounts of signal to the output so turning the P (51) to the right would mean that more signal would go to the right side of the group busses. This can be done by pressing down S (46) this would send the signal to group busses 1&2 and so if this had been done and the balance was full to the right then the signal would only be sent to group 2, this is similar for S (50-53) as the signal is sent to the group buss with the numbers underneath the buttons S (54) enables a solo function so only this return can be heard. This buttons are the same for aux returns 2. For group 3 the buttons are different as they don’t allow sends to groups they can only allow sending to the headphones S (55&56) (for monitoring) or the main output S (57). P (55) is the incoming signal gain and so turning it to the right allows an increase in volume, S (58) works the same as S (54) but for its own signal. These buttons work the same for the aux returns 3, 4, 5 & 6. The led L (01) is turned on if the solo is pressed on aux return for 1, 3 & 5. This is similar for L (74) but only works for the returns on 2, 4 & 6.
This section of the mixing console is used to monitor what is going on before it is output. P (82) is the gain used to control the level of the output going to the studio monitors, where as P (86) allows you to control the output going to the control room. By pressing in S (82) it allows you to monitor on the headphones the main mix output, the S (83) allows you to check the mix b outputs whereas the S (84) checks the input back off of the recording system. Similarly the external has no infinitive use but could be used to monitor the output off of another recorder and so check the recording is working correctly. S (86) enables the user to listen and check the phase of the outputs because it lets you monitor them back in mono.
This next section on the console controls the output to the headphones in socket 1. P (75) is the master volume control and so turning this dial higher to the right makes the output louder in the headphones. S (76-80) all give the user the option of what he can hear through the headphones. If S (81) allows the user to solo just what is in the control room and so could hear what the band playing could hear through his headphones.