There is always a risk that something will go wrong when you install or update a new software. You may lose all your data if you do not back up your programs or data. Backup everything you don’t want to risk losing before installation. You should make back up all your system with a disk image before installing new software.
If you download the software from the internet, then your system might get virus. So, before you install the software, make sure you check the file. There is not much risk of getting a virus, worm or Trojan.
The potential risks in a software installation are very different. There are some common risks include:
- improbable time
- messy and incomplete testing of the solution as it is intended to be used before going “live”;
- insufficient technical communications
- poor and irregular communication internally and between the seller and client;
-
Lack of for management and end users.
- Incompatibility of some software and hardware
- Loss of service
- Out of memory
- Existing software fails to run correctly
- Device fails to show any sign of life
To reduce the risks from your system, make sure you choose a good time for installing new software.
Which are more serious than others?
You might install your software with the latest version but you might have old windows, if you install latest version on the old version of windows you will have more risks e.g. your windows might corrupt, your system will be crash, windows shutting down and loss of data, user accounts and may be some other programs.
When you upgrade or install new software, if you install too many applications, your systems will run slow and some applications won’t work, some of them might not work at all.
Explain measures to cut down the risks.
You can reduce the risks before installing and upgrading new software. When you upgrade or install a software to your computer, the first thing that you do for your installation is planning, plan the work, woe you going to do it, how much time will you need to install, what are the requirements for the installations, what material you need before you install. You can investigate the present system facilities. Plan for access to the computer and any connected systems, and create system specification. All of these sources come under planning and they help to reduce the risks as well.
Another step is preparation, you have to be prepared, and preparing means to obtain and allocate the required materials; software CD and licence, make sure you have all the equipment and tools that you could need. And the very main and important point to cover is health and safety. You will also have to install or upgrade and to do this you will have to safely install to protect the equipment the next step would be the configuration, configurations can include security such as user accounts and profiles so you might have to create them. Once you have done the configuration the testing need to be done, and to do this you will need to check all operations and the configuration settings
Finally After the testing the sixth step is to sign off and handover, in this step the client has to accept the systems against the initial specification. For example the client has to accept what you have upgraded/installed and make sure that it’s based against the initial plan
I think this will reduce risks because I it shows that you are working in little steps there is more awareness of what you are doing and a less risk of going wrong somewhere during an installation/upgrade.
Overall I would suggest a last step which is recording you can have an information recording log book that indicates all the step by step of what you have done, I think his will reduce risks also because you can tick of what you have done and if there Is anything you are uncertain about you can come back to it.
Sometime, something will go wrong with your PC. It might refuse to start, it might freezes up, it might crash and go dead. Most computers problems have easy to find causes and simple solutions.
Make sure you have the latest versions of all the software installed on your system- while you are at it, make sure you have the latest versions of devices drivers installed for all the peripherals on your system.
Walk through each step of the process to see if you can identify a particular program or driver that might be causing the problem.
if you are having trouble getting windows to start, it is probably because some setting is set wrong. The solution is hijack your computer before windows gets hold of it and forces it to start without whatever is causing the problem. You do this by watching the screen as your computer boots up and pressing the f8 key just before windows starts to load. This displays the windows start up menu, where you select safe mode.
Safe mode is a special mode of operation that loads windows in a very simple configuration. Once in safe mode, you can look for device conflicts, restore incorrect or corrupted device, or restore your system to a prior working configuration.
When your computer freeze up, the screen looks normal, but nothing works, you cannot type on screen, you can’t click any button. If your system happens to freeze up, then there is probably nothing wrong with your computer hardware. But the wrong is probably with the operating system. This does not mean your computer is broken. It is just an error and you can recover errors.
Your computer freeze up because
- You might be running an older software program that is not compatible with your version of windows. If so, then you will need to upgrade.
- A memory conflict might exist between applications or between an application and windows itself. Try running fewer programs at once or running problematic programs one at a time to avoid potential memory conflicts.
- You might not have enough memory installed on your system. Upgrade the amount of memory in your PC.
- You might not have enough free hard disk space on your computer. Delete any unnecessary files from your hard drive.
- Your hard disk might be developing errors or bad sectors. Check your hard disk for errors.
You can shut down all your programs that are running, if that doesn’t work, press and hold down the power button on the front of your PC’s system unit until your system shuts off. You can then start up your computer again; chances are everything will be working just fine.
The worst thing that can happen to your computer is that it crashes, completely shuts down without any warning.
You should always wait for 60 seconds after crashes before you turn to turn on your system again. This gives all the components time to settle down and in some cases reset themselves. After a short while press your system unit‘s “on” button, then your system will boot up normally.
If something in your system goes bad, you can run system restore to set things right. Pick a restore point before the problem occurred(such as right before installation) and system restore will then undo any changes made to monitored files since the restore point was created.
Minimise Risks:
All organisations should identify someone with responsibility for health and safety. It is the duty of all employers to assess the risks to their employees and to minimise those risks.
Risks assessment includes:
- Identify the hazards.
- Decide who might be harmed and how.
- Evaluate the risks arising from the hazards and decide whether the existing precautions are sufficient or whether more needs to be done.
- Record the findings.
- Review your assessment from time to time.
After the risks have been assessed then the employer should take steps to minimise risks, e.g. make the chance of an accident occurring as low as possible. It is usually impossible to remove risks entirely.
Risk assessments should cover all kinds of hazards but where employees are using computers; the health and safety regulations apply. Under the regulations user have to do following:
Analyse workstations and assess and reduce risks. This means that they must look at the complete workstation, including all the furniture. They have to take into account any special needs of individual staff.
Ensure workstations meet minimum standards. The regulations list the standards that have to be met by keyboard, desks, chairs and lighting as well as the screen themselves.
Plan work, so there are breaks or changes in activities.
Describe typical software product registration procedures.
The purpose of Product registration procedure is, it helps you to prevent unauthorised use of your product by another person. It is a process that collects customer information, which entitles you to receive product updates.
Product registration requires you to provide your serial number and some identifying information such as company name, user name, address and contact method.
A procedure to back out of software upgrades.
Thorough planning
A system upgrade must be planned before installing. Unexpected problems sometimes happen during software installation.
The best way to deal with such situations is to expect them on the plan and to specify well in advance what you will do if a particular situation should arise. For example:
- if the electrical power fails,
- if old data exhibits too many errors not acceptable to the new system,
- if performance is unexpectedly slow,
Back-out procedure
When you install a new software into your system, you restore your old system. Back out procedure is important part in your installation. If you install something and something goes wrong in your installation, then you can back out, (it is like undo).
An essential property of the plans is a well defined back out procedure. You need to be able to restore the system to its working state before starting upgrade or installation.
You may well discover a serious problem after the new version has been in operation for several hours. The ability to return to the previous working version while preserving updates the new version made to the database can be well worth the extra effort in planning.
What is involved in the “handover” process?
The hand over process involves the agreement between a client and you, all the configuration meets the client needs and customer accept this process, what customer wants to install and what configuration he/she wants and if the customer is happy with the installation or upgrade.
Firstly you make the plan before installation and show the client if he/she happy with it. Then you start to install new software, before you install new software into the customer system make sure, you back out the existing system. After installing new software, clients tell you what changes or what application he wants.
You make all the changes, customize everything in the applications or any software.
After completing the installation or upgrade, you test all the system if it works properly, if everything works fine, if client is happy with the new installation and then you sign off from the client.
Guidelines:
Installing Microsoft Office
Before installing Microsoft Office XP, ensure that your computer meets the minimum hardware and system requirements.
To install the Microsoft office, open the CD case and place Disk 1 into your CD-ROM drive. The installation program should start automatically. A screen will appear, click on next, then you will get the following.
on this, enter the product key and then click on “continue”.
Read the License agreement and then click on “I accept the terms and conditions” then click on “continue”.
If you want to upgrade the system then click on “Upgrade”, this will allow you to remove the older version and install the latest version.
If you do not wish to install the whole system then you click on “Customize”. This will allow you to choose the specific applications that you want to install into your system and keep the previous system.
You choose one option that you want to, once you make your pick, there's no Back button to let you change your mind without cancelling the installation process.
Click on customize option.
During the Office 2007 installation, if you choose Customize rather than Install Now or Upgrade, you'll see a list of applications and below them, folders and subfolders showing the tools each application includes. Here's what you see when you installed Office 2007 Professional. You can reject the tools you don't need, although there's no explanation of what you might miss. For instance, if you deselect Office Tools, you won't get its spell-checking, dictionary, and thesaurus support for languages.
Click the Installation Options tab, left-click the first drop down box and click Run all from My Computer
Click Install Now.
The process will begin to install, this will take some time to complete the configuration progress.
Click Close to complete the installation.
After installing the application, you can customise toolbar. To do this, open Microsoft word. Go to File, and choose “Word Option”.
Once you have clicked this, you will get this box, click on Customise, and then you will have lots of options to choose to keep on the toolbar. Select the icons that you want to have on the tool bar, click on “Add” and then “ok”.
You will have lots of icons on the tool bar. In word, excel and power point. You can use them easily.
To minimise the ribbon – click on the arrow next to the quick toolbar above the insert tab. Then you will see “minimise the ribbon” option. Click on that and it will minimise the ribbon.
To create a folder you will need to go to the local drive from “My computer” and then create your folders. To create folders: right click > new > Folder and then you can rename it. Or you can go to file, new and click on folder.
Saving Documents to Folders
How to save different documents to different folders created such as: letters, charts and slideshows.
First click on the office button and then word options.
Then a new window will open and you will need to click the save tab on the side and then the browse button to find the folder where you want to save the document to.
Click the browser button and then a new widow will open and you will need to find the folder where you want to save you documents to.
Macros: To activate the macro – click the office button, then word options, trust centre, then trust centre settings.
Click on “enable all macros (not recommended; potentially dangerous code can run)”
Then I will need to activate the VBA project
You will see the settings under the “Developer macro settings” heading.
Click on the “trust access to the VAB project object model” and then click OK.
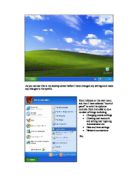
Creating Shortcuts
To create a shortcut of each application on the desktop you will need copy and paste it on to the desktop or even drag the application to the desktop and it will show the shortcut.
Click on start menu then programs then copy the applications to desktop.
Microsoft Word ,Microsoft PowerPoint and Microsoft Excel
Planning for installing and upgrading Anti Virus and PC cleanup
- Insert the CD into the CD drive
- Double click on the file to start the anti-virus
-
The process of installation will begin.
- The AVG Welcome screen will appear - click the Next button.
-
Read the Software License Agreement for AVG Anti-Virus and click the Accept button.
- The next screen should check the system status of the computer - wait until it has finished.
- On the next screen leave the default selections checked (Standard Installation) and click the Next button.
- Next, verify the user name, or enter a new one and click the Next button.
- On the Installation Summary screen, click the Finish button to begin installation.
- Once the installation has finished, click the OK button to complete the installation process.
Configuring AVG Anti-Virus
- Once the installation has completed the First Run Wizard will start - click the Next button.
- At the next screen click Check For Updates
- Select the check box that is labelled. Do not ask for update source next time and click the Internet button to download updates.
- You might see a Update Selection window appear, if so, click Update to begin the update process.
- You should now see a progress window that shows the status of the updates being downloaded.
- After the updates have completed, click the OK button.
- The next window gives you an option to create a Rescue Disk, if you do not wish to do this, click the Next button.
- The next screen allows users to configure the email scanner, to do this click Configure Email Scanner and follow the instructions, if not, click Next.
- The next window to open allows the user to scan the computer for viruses, click the Scan Computer button or, if you choose not to scan for viruses at this time, click Next.
- The next screen allows you to register AVG Anti-Virus; registration can be skipped by clicking “Next”.
- Click “Continue” to complete the configuration process.