Basic Form Inputs
Text Boxes
<input type=”text” name=”text1” maxlength=”100”>
<input type=”text” name=”text2”>
<input type=”text” name=”text3” value=”Enter some text here”>
Password Boxes (hide the users input)
<input type=”password” name=”password1”>
Select Boxes (combo boxes)
<select name=”combo1”>
<option value=”Number1”>One</option>
<option value=”Number2” selected>Two</option>
<option value=”Number3”>Three</option>
</select>
Note the selected property in the second option tag tells the browser that this option should be the one selected as default when the page first loads.
Exercise 2.
- Save your HTML file as form2.htm
- Remove the text field code from the previous exercise.
- Edit the file to hide the text users enter on your form.
- Test your changed in the browser
- Ask the lecturer to confirm your findings.
Exercise 3.
- Save you HTML file as form3.htm
- Remove the password field code from the previous exercise.
- Edit the file to include a Select box with five search options:
- Paris
- London
- New York
- Berlin
- Moscow
- Test your page in your browser.
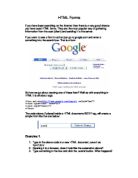
- Does your form allow users to search for all five cities on Google?
- Ask the lecturer to confirm your findings.
Advanced Form Input
Text Areas
Text areas are larger version of the text box. They have scroll bars and allow multiple lines to be entered. Hotmail and Yahoo use text areas to allow you to write your emails on their webpages.
<textarea name=”textarea1” rows=”8” cols=”20”>
This is the text that will first be displayed!
</textarea>
Exercise 4.
- Save your HTML file as form4.htm
- Remove the select box code from the previous exercise.
- Add a text area to your form.
- Test your page in your browser.
-
Experiment with the text area’s properties to try to find out what rows and cols do.
- Ask the lecturer to confirm your findings.
Radio Buttons
Radio buttons allow the browser to group together several checkboxes which the user can choose from. Only one of the boxes can be checked at anyone time though.
<input type=”radio” name=”radio1” value=”one”> One
<br>
<input type=”radio” name=”radio1” value=”two”> Two
<br>
<input type=”radio” name=”radio1” value=”three”> Three
<br>
Note: Radio buttons are grouped together by setting the name property to be the same for all the buttons in the group. Once the form is submitted it is the setting stored in the value property of that radio button that is sent to the server and not the text that follows it.
Exercise 5.
- Save your HTML file as form5.htm
- Remove the text area code from the previous exercise.
- Edit your file to include five radio buttons on your form ensuring:
- Each one is on a separate line
- Each one searches for a different music Band
- Test your page in your browser
- Confirm your findings with your lecturer
Exercise 6.
- Create a new HTML page.
- Include a form and set its action property to:
- Include a text field named “quicksearch”
- Include a submit button.
- Test your form in your browser
- Confirm your findings with your lecturer