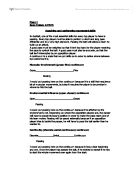
The simplest and best technique for short passes is illustrated in the photograph. The head is over the ball, the body is well balanced, and the ball is kicked with the inside of the foot, which is the flattest part of the foot. Sometimes this technique is used for short-range shots at goal, and even for taking penalties, because of its reliability. The disadvantage is the lack of power.
The pass
Keeping possession of the ball is critical for success in football. This will be accomplished with quick and accurate passing between players, giving the opponent fewer opportunities to steal the ball. How to accomplish short passes:
1. The foot not kicking the ball should be planted alongside the ball at the time of impact.
2. The hips and shoulder should be square to the player receiving the pass. An easy explanation for younger players is to have their belly button pointing at their target.
3. The kicking foot should be turned out and the ball struck with the inside of the foot.
4. The kicking leg should follow through towards the target.
For younger players, you will need to emphasize that the receiving player will be more able to trap the ball if it remains on or near the ground. It is also important that players can do this with both left and right feet, and with both the inside and outside of the foot.
The most common errors resulting in inaccurate passes are:
- Bad placement of the non-kicking foot.
- Hips, shoulders, and bellybutton not square to target.
- Not keeping the ankle and foot stiff through impact.
- Not following through to the target.
Beginners
Introducing passing to beginners;
In my opinion the best way to introduce passing to beginners is to simply give them a football between two of them and give them some time to play and have fun with it.
From mistakes they will inevitably make at the beginning they will learn the best and most effective way of passing the ball.
If they appear to be coping quite well with this then you may want to add movement and passing to there play and start to bring in the goal of kicking it directly to their partner with the right direction and pace behind the ball.
Passing progressions
Basic Passing Progression #1
Have the players form two lines about 10 yards apart facing each other. Each player in one line starts with the ball. Make sure there is adequate room between the players for errant passes. If you find that the distance between the lines is too great stop the drill and bring them closer together. The drill must be geared for success to build confidence.
Have the players begin passing to their partner. As with the static drill mentioned above watch for proper striking technique, proper foot placement, eye-foot coordination (head down) and follow through.
But now in addition to these coaching points you must look for:
- Proper "weight" on the ball. Weight is the speed, spin and/or pace of the ball. Too little weight and the ball doesn’t reach the target….too much and it is difficult to trap.
- Accuracy. The plant foot is a big determiner of where the pass will go. Generally the pass will go where the plant foot toes point. You’ll see a lot of toes turning outward at the beginning. This should be corrected.
- Stress that the player should not step back to kick the ball. A common error at the young ages is for the player to stop the ball, take one or two steps back and then pass it.
Again work both the dominant and non-dominant foot. Build success first with the dominant foot and then begin to work the non-dominant foot at a rate equal to twice that for the dominant one.
Intermediate
Basic Passing Progression #2 –The Triangle
The basic "shape" on the soccer field is the triangle. And the first basic tactical concept, which we will not go into in depth here, is the concept of support. In its simplest form the concept of support should find the ball carrier with players to his/her right and left giving him passing options. One coach I know used the approach of having the players "draw his six-shooters", holding their hands out at approximately 45o from their bodies. The fingers of the six-shooters then point at the two support players.
The easiest way to start the support triangle is to set up cones as markers where the players should stand. Start with the ball at the apex (centre) of the triangle. Have this player pass to the left and then receive the ball back. Then pass to the right and receive the ball back. After 10 repetitions change the centre player and repeat.
Coaching Points
- Watch for body position on the pass. The plant foot is still the biggest determiner of where the ball will go.
- The receiving player should take the ball on the foot opposite the direction from which the pass is coming. (i.e. if the pass is coming from the left, the right foot receives, and vice versa.) This is called opening up to the field of play, another concept that we will go into in more depth later.
Basic Passing Progression #3
Have the players form two lines about 10 yards apart facing each other. Each player in one line starts with the ball. Make sure there is adequate room between the players for errant passes. If you find that the distance between the lines is too great stop the drill and bring them closer together. The drill must be geared for success to build confidence.
Have the players begin passing to their partner. At the youngest age you may want to have the ball served by hand, i.e. have the ball rolled to the kicking partner who now has to one touch (or one time) the ball back to their partner who picks it and rolls it back.
Once everyone is comfortable with one-touch you can progress to having both partners kick the ball one touch to each other. Make a game of it. Have them count how many times they can keep the ball going without either missing. Progress to a game where on each successive kick the players take one step closer to each other until the ball is ricocheting back and forth at a rapid pace.
Below are some basic passing games you can have a lot of fun with your younger players while teaching the fundamental skill.
Basic Passing Game 1
Create a 5 - 10 yard neutral area that no player can enter. Use a minimum of one ball per two players (for best results use a ball for each player). On command, each team tries to keep it's side free of balls by kicking through the neutral zone to the opposite side. Play for a specific time limit.
Progressions
- Must use two touches.
- Only use inside of foot.
- Only use instep (laces) when kicking.
- Increase size of neutral zone for more advanced players.
- Use fewer balls.
Expert
Basic Passing Game 2
Create a grid 10 yards wide by 30 long. Line players up on both sides of the short side of the grid. Each player has a ball. One player starts on one end of the long side of the grid without a ball. Place a cone at the opposite end. The player without the ball has to run to the other end, grabs the cone and return. The players with the balls have to try and hit the player carrying the cone with their ball below the waist.
Progressions
Place several cones within the grid. The player has to retrieve them all one at a time.
Advance to retrieving two cones at a time so that the player stays in the grid longer.
Basic Passing Game 3
Place cones within a 10 x 10 yard grid. Each player has a ball. The object is to pass the ball into the grid and knock over a cone.
Basic Passing Game 4
This is a drill suggested by Ivan Mann, a coaching colleague from the soccer-coach-l mailing list.
Set Up and Execution
Make a square with pretty small sides - players line up on each side. Put an adult in the middle of each side (that means four adults) holding a dozen or so flat cones (you could use anything else similar size and shape). 50 cones or 50 slips of construction paper will do.
On a go signal, players dribble across the square, stop the ball with a foot on it, say "Trick or Treat ", take a cone from an adult, turn the ball, dribble back across, take a cone, etc. When all the cones are gone, who has the most? This requires dribbling at speed, avoiding the clump in the middle, controlling the ball around an opponent, but minimal coordination holding the cones.
After a few rounds dribble across the square, dribble around the coach, and then stop the ball, say "Trick or treat," etc. Or place the adults randomly in the square, moving at a walking pace. This makes them keep their heads up and look for the target (i.e. the adult)
Basic Passing Game 5
Players are numbered 1 to 5. (Make multiple teams and keep the numbers low so each player gets multiple touches on the ball.) Players pass the ball to the player with the number one higher than their own. (e.g. 1passes to 2, 5 to 1). Ball travels through the entire team.
Progressions:
- Initially, allow unlimited touches, players in static positions
- Then two touches, not allowing the ball to stop
- Then one touch.
- Try playing with left foot only
- Outside of foot only
- With movement through a designated area