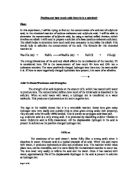
Strong Acid Vs Weak Base
e.g. hydrochloric acid as the strong acid and ammonia solution as the weak base.
Due to having a weak base, the curve will start off at a different place. It will also have a different equivalence point due to the strong acid and weak base. Here it starts off at pH of 11.5. As acid is added, the curve starts to drop down quickly. Once there is excess acid, there is a huge
drop. This is due to reaching the point of equivalence.
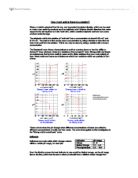
Weak Acid and Weak Base:
e.g. A common example of a weak acid and weak base is ethanoic acid and ammonia. They are both equally weak therefore, the point of equivalence would be pH 7. Once it reaches the point of equivalence, the curve drops down slightly and then ends like the curve above (strong acid Vs weak base).
Weak Acid Vs Strong Base:
e.g. ethanoic acid and sodium hydroxide is a typical weak acid and a strong base. Due to the base being strong, there will be excess sodium hydroxide. The pH starts off at pH 14. As more acid is being added, it start to fall slightly, until it reaches the point of equivalence. Once the amount of acid increases compared to the volume of alkali, the curve drops right down, and then become constant again.
For this experiment, the second graph applies, due to using a weak base (sodium carbonate- 0.10 mol dmˉ³) and a strong acid (sulphuric acid).
Indicators:
An indicator is needed for this experiment. It helps to determine the end point of the titration, once it reaches the point of equivalence (between acid and alkali). There are three types of indicators which can be used for this experiment: litmus, methyl orange and Phenolphthalein. The following table shows the pH is which it reaches at the point of equivalence and it shows the colour change once it reaches that point, of the acid and alkali:
For this experiment, I will be using Methyl Orange. My reasons are as follows:
Litmus and Phenolphthalein are weak acids, which are commonly used for titrations. Equilibrium is recognized when this acid dissolves in water. Unionized litmus is red, and the ion is blue. This helps to determine if the solution is either acid or alkali using litmus paper. Litmus turns red in acid and blue in bases. Once the point of equivalence is reached, it is hard to detect where exactly the point of equivalence has occurred. We don’t use this indicator because the colour change isn’t clear. Phenolphthalein is colourless, and the ion is bright pink. If extra positive hydrogen ions are added, the colour changes to colourless after the point of equivalence. The point of equivalence is pH 9.3. Due to the colour of the solution being pale pink and changing to colourless after the point of equivalence, it is hard to detect this point. The two colours look similar, and so it would be hard to detect the point of equivalence. These two indicators are presented on the third graph (weak acid and weak base).
Therefore, we use Methyl Orange. We have a strong acid and a weak base (sulphuric acid and sodium carbonate), we need an indicator which will fit the graph (2) perfectly. Methyl Orange is perfect for graph 2. Methyl Orange is similar to litmus paper, however, the midpoint (point of equivalence) is orange. The colour of the acid is red, and the colour of the alkali is yellow. Between these points is orange.
We shall use 2/3 droplets of methyl orange in the experiment. This is because, methyl orange is a weak acid. Therefore it will vary the pH of the solution if the indicator was added into the solution. If a large volume of indicator was added, it will affect the acidity of the solution, which will have a great affect on the reliability of your results. Due to methyl orange being an acid, it will cause an increase in the amount of positive hydrogen ions being added, if a lot of this indicator was added; and so the minimum amount of this indicator is needed.
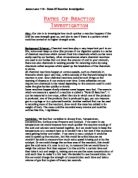
Here is a diagram showing the colours which show up when neutralization occurs, using these indicators. Note: methyl orange will be used for this experiment:
Methyl Orange:
Methyl Orange is an acidic solution which turns red in acidic solution. It absorbs blue- green light to do this. In an alkaline solution, the blue-green light is absorbed and causes a yellow colour to appear.
Methyl Orange can cause equilibrium, as the acid is dissolved in water. When the point of equilibrium is nearly reached, the concentrations of the two colours will become equal. The colour you see will be a mixture of the two (orange). There is a 50/50 colour, due to equal concentrations of acid and alkaline.
Sodium Carbonate:
In this investigation, there will be a chemical reaction between sodium carbonate and sulphuric acid. Sodium carbonate is a carbonate. It contains two atoms of sodium, one atom of carbon and three atoms of oxygen. Sodium is a group one metal, and is more stable to heat, than corresponding group 2 elements. Sodium is seen to be very soluble and has high thermal stability. It is not affected by heat and so if a substance like sodium carbonate was heated, it would evaporate any water present. Carbonates decompose on heating to give carbon dioxide and a metal oxide. In this case, Sodium Sulphate is produced with carbon dioxide and water. The burning of a carbonate is a type of reaction called a Decomposition reaction. Here is the equation for this chemical reaction, which is a neutralization reaction:
Na2 CO3 (aq) + H2SO4 Na2SO4 (aq) + H2O (l) + CO2 (g)
From the equation, I can see that the ratio of sodium carbonate to sulphuric acid is 1:1. 250 ml of this solution will be made, with the concentration 0.10 mol dmˉ³. 2.65 g of sodium carbonate will need to be used. The calculations below state how I calculated the mass (2.65g) needed for this experiment. The mass of the anhydrous sodium carbonate must be specific, and needs to be 2.65g. I used a weighing scale to be accurate, to two decimal places. Here are the calculations showing the mass of sodium carbonate required to produce a solution of concentration 0.10 mol dmˉ³:
Aim: Make a standard solution of sodium carbonate (aqueous), with the volume of 250 ml, and the concentration 0.10 mol dmˉ³
1 mole of sodium carbonate has a relative molecular mass of:
(23 x 2) + (12) + (16 x 3) = 106g
We want to obtain 0.1 mol dmˉ³ of sodium carbonate, therefore:
106 x 0.1 = 10.6g
This means 0.1 mol dmˉ³ of Na2 CO3 is dissolved to make one litre of the solution. We need 250 ml, and so the next step is taken place:
10.6/4 = 2.65g (10.6g is divided by 4 because, one litre contains 4 times 250 ml. Therefore, you divide it by 4)
2.65g is needed to make 250 ml of Na2 CO3 with the concentration 0.1 mol dmˉ³.
I will use a weighing scale to measure the weight of sodium carbonate. I will be putting it to 2 decimal places because, burette readings can show upto 2 decimal places. Therefore, all of my readings will be 2 decimal places. The weighing scale and burette readings can only be read through 2 decimal places, and not more than that, so therefore I cannot be any more specific with the results. Also, I cannot write long reoccurring numbers because, it will be too complicating and will not help when I am analyzing my results.
Risk Assessment:
Sulphuric Acid:
Risk Assessment
Sulphuric Acid is Corrosive and very dangerous to the skin. It can cause damage to the skin, and can burn skin if it is left for a very long time. The chemical contained inside this acid chemically destroys any exposed skin. Care should be taken whilst working with this. It can also cause blisters. If it was inhaled, it would cause irritation of the throat with a feeling of tightness in the chest. However, in this experiment, the concentration of sulphuric acid will be low, and so the chemicals are irritants rather than corrosive.
Risk Reduction
If it accidentally gets spilt onto the skin, it should immediately be washed thoroughly with water. If it has irritated the skin and burnt it, seek medical attention. Where goggles, to prevent any droplets falling into the eye, during titration. If it comes in contact with the eye, bathe the eye in running water for about fifteen minutes.
Sodium Carbonate:
Risk Assessment
Minimum risk involved. It has low toxicity and irritation and therefore, isn’t very dangerous; however, care should be taken whilst handling it. However, it is harmful if it was inhaled.
Risk Reduction
Suitable clothing should be worn so the substance does not come in contact with your own clothing. It vapour/gas/fumes shouldn’t be inhaled. Goggles should also be worn so it doesn’t come into contact with the eye. It can cause irritation.
Methyl Orange
Risk Assessment
Methyl Orange is a weak acid, and therefore, care should be taken whilst handling. It can cause irritation of skin, and if it is left on the skin for a long time, it shall cause burns. It will also cause an orange mark to be left on the skin. It is also toxic and cause respiratory problems.
Risk Reduction
Methyl Orange shouldn’t be inhaled and shouldn’t come in contact with the skin. Care should be taken whilst handling it. If it comes in contact with skin, wash with water thoroughly and with sodium thiosulphate. Seek medical attention if burns/blister starts to occur. If it is inhaled, move into a spacious area outside, where you can have space to breathe air. If it causes a danger in breathing, then medical attention is required. Wear an apron, to protect clothes from any droplets of this indicator.
…Furthermore…
- If any glassware gets broken, then it should be cleared up immediately to prevent any harm to yourself and others.
- Make sure that the desktop is clear and all bags and coats are placed somewhere away from the table, where the experiment will take place.
- Apron, Gloves and Goggles should be worn at all times, due to the chemicals used in this experiment.
- No type of food/drink should be near the experiment. Keep only the equipment needed for the experiment on the table and nothing else.
- Be very careful whilst inserting the pippette filler into the bulb pipette. Make sure that the bulb pippette isn’t forced into the top of the burette.
- All hair must be tied up and out of the way, or else you can damage your hair. Your hair can also get in the way of you seeing what you are doing in the experiment.
Apparatus:
- 400 ml of Distilled Water:
400 ml of distilled water is needed because, this is what helps to dilute the anhydrous sodium carbonate into a solution. 400 ml is a rough calculation of how much distilled water may be needed. This is because, at the end of the preparation of the sodium carbonate solution, 400 ml is supposed to be made (this is explained later in the next section).
- 5 grams of Sodium Carbonate:
5 g of anhydrous sodium carbonate is needed to be made, and therefore we heat up the sodium carbonate to ensure it is anhydrous. Anhydrous sodium carbonate is needed because this is the main reactant of this experiment. 5 g of it is used; this is excess anhydrous sodium carbonate used, we only need 2.65g (this is explained later in the next section). The reason for this is because, when it is heated up, the mass will differ due to any water in the sodium carbonate being evaporated. 2.65 g is then used by taking it out of the 5 g, by using a weighing scale.
- Sulphuric Acid (Volume was not fixed)
Sulphuric Acid is compulsory for this experiment, because the aim of this experiment is to find out the concentration of the acid. The volume of it wasn’t fixed. Sulphuric Acid is just added into the burette, and the volume put in is recorded (before titration), and the volume at the end of the titration is recorded. The sulphuric acid is added into the sodium carbonate solution and just swirled.
This device is needed to weigh the amount of sodium carbonate used. The weighing scale weighs the sodium carbonate accurately to 2 decimal places. I can add or take away some of the sodium carbonate where it is needed or not needed, to obtain the accurate mass of the sodium carbonate. Only one weighing scale is needed, because I will be able to weigh everything on one.
The weighing boat helps to hold the sodium carbonate in place; this helps to weigh the sodium carbonate. The weighing boat doesn’t weigh much, and doesn’t affect the weight of the sodium carbonate. It is very light and made out of a shin sheet of plastic. It is flexible, and helps to get the sodium carbonate into the volumetric flask (read method). 1 weighing boat is used because, then different products do not get mixed together, altering the product (sodium carbonate) which goes into the weighing boat.
Volumetric Flask is needed to store the diluted sodium carbonate solution in, where it is mixed. The volumetric flask is made to store 250 ml of a solution, therefore it is used. It contains a line representing 250 ml, where the meniscus must sit on. This helps to obtain reliable data. This will help to swirl the solution contained inside, and will store it without it spilling. I will only be using volumetric flask to mix the sodium carbonate, and that is the only reason why I need this equipment.
1 evaporating dish is required due to the fact that only sodium carbonate is going to be heated up. The evaporating dish helps to heat the sodium carbonate up to make it anhydrous. Nothing else is going to be heated. This equipment is effective for heating because of the material, which helps it to heat the sodium carbonate up.
Methyl Orange is required to show when neutralization has occurred, when I mix the sodium carbonate solution with sulphuric acid. A couple of drops are required, so it doesn’t change the pH majorly. This indicator helps to form a colour when it is an alkaline or an acid. This helps to see exactly where neutralization occurs.
A Burette is needed to hold the sulphuric acid in. It is like a long, slim measuring cylinder, and contains units, which helps to measure the volume of sulphuric acid contained inside. The volume of sulphuric acid used can be measured too. There is a tap at the bottom of the burette, which allows the sulphuric acid to come out. This helps in the process of titration.
A bulb pippette is needed, because this is what holds the sodium carbonate in. It can hold exactly 25 ml of the solution; this is needed for the experiment. (The calculations later on in this experiment will show how I obtained this measurement). It helps to transfer exactly the amount I require into the conical flask. It has a narrow end at the bottom, which helps to get the sodium carbonate out. The sodium carbonate is drawn up this, to obtain 25 ml of it. 1 bulb pippette is required because only one is needed to draw up the sodium carbonate. This will be the only solution will be stored in this.
The pippette filler helps to draw up the sodium carbonate up into the bulb pippette. This is attached to the top of the bulb pippette, and there is roller which is twisted. This helps to draw up the solution out of the volumetric flask. 1 pippette filler is required because it will be used once every time I use it. I will only be using it to draw the up same solution, so therefore the same pippette filler is used.
A funnel is needed to help me get the sulphuric acid into the burette. It is placed on top of the burette, and because the burette has a narrow top end, where it is hard to get the acid in, therefore that is why we use a funnel. Only one is required, because I shall only use it for this job and will use it with the same solution. I will not need to use various funnels at the same time.
1 conical flask is required because this will store sodium carbonate solution only, and nothing else. This will hold the solution in place, and the conical flask is only required for this job.
The pipette will help to draw up small amount of solution, which can alter the volume slightly. It will help me to draw up the indicator methyl orange into the conical flask. Only 3 drops is required, and the pipette will help to do this. This is the only reason why this is used, and therefore, that is why only one pipette is needed. This helps to get accurate results and reliable result.
1 white tile is required so the colour change can be seen clearly, during neutralization. It gives a clear surface to observe the colour change. This helps to obtain accurate and reliable results.
1 clamp stand is required to hold the burette up in place. Only one clamp is required because only one burette is needed to be held up.
ALL EQUIPMENT SHOULD BE WASHED BEFORE HAND WITH THE SOLUTION THAT WILL GO ON, TO PREVENT CONTAMINATION. This will help to produce reliable data.