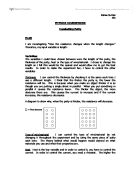
A diagram to show why, when the putty is thicker, the resistance will decrease.
Type of wire/material I can control the type of wire/material by not changing it throughout the experiment and by using the same piece of putty each time. The theory behind what would happen would depend on what materials you use and what their properties are.
Heat Heat is the key variable and in order to control it, you have to control the current. In order to control the current, you need a rheostat. The higher the heat, the more collisions occur. If there are more collisions, the slower it takes for the electricity to go through. How long it takes affects the current and if it takes longer it means that there is less current. If there is less current, there is more resistance.
The band theory is shown below:
Prediction
I predict that the longer the length, the higher the resistance. I predict this because if the putty is longer, it means that there would be more collisions and it would cause it to be slower. This would cause the current to decrease, making the resistance increase.
The formula I will use to find out the resistance is:
A diagram to show why I think the resistance will decrease is shown below.
I think that my line graph will look like this:
Apparatus
- Conductive putty
- Knife
- 2p coins (x2)
- Rheostat
- Voltmeter
- Ammeter
- Power pack
- Crocodile clips
- White tile
Method
- Firstly, roll out, on a white tile, an even roll of putty. The putty must be 1.7cm throughout and make it slightly longer than 12cm.
- Use a knife and cut the ends off so that they are straight.
- Push 2p coins onto the end of them, as this maximizes the surface area and allows you to get better results.
- Set up the apparatus as shown in the diagram below.
- Switch on the power pack and adjust the rheostat until the current is 0.42A.
- Touch the putty and check whether it is hot. If it is, switch off the power pack until it is cool.
- Once the putty is cool switch on the power pack and write down the voltage on your results table.
- Repeat steps 6 and 7. So you should have 3 readings for the 12cm length.
- Switch off the power pack and take the putty out of the circuit.
- Now, cut the putty, carefully, with the knife, so that it is the next longest length (eg. 11cm instead of 10cm)
- Repeat steps 4-11 until you have done your final length.
I will find out the resistance by measuring the voltage with a voltmeter. I will keep the current constant so that I can use the formula V=IR.
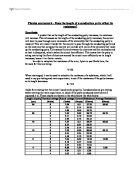
We will be using a current of 0.42A for the preliminary, as it is not too high and not too low.
We will test 6 different putty lengths, starting at 12cm, being the largest, and shortening the putty 2cm each time, finishing at 2cm. We will use 12cm as the largest because we can cut the putty a number of times to get good results. Also, 12cm is not too large and so we can have a reasonable thickness so that we maximize the surface area.
The thickness we will have the putty is 1.7cm as it is quite high and is smaller than the 2p coin.
We will have 3 readings for each length so that our results are more accurate and reliable. We will have 3 readings as we do not have a lot of time and we can get reasonably accurate results with 3 readings.