Investigation To Measure The Resistivity Of Graphite
Aim
The aim of the experiment is to find out the resistivity of graphite. The resistance which is measured in ohms of a resistor is applied with three basic elements. These are length (in meters) the cross sectional area which is measured in meters squared, and finally resistivity which is measured in ohms multiplied by meters.
The experiment is aimed to measure resistivity of the graphite. To measure this you cannot just put a measuring device on the graphite and measure the resistivity. No resistivity is done by measuring three different readings that can be arranged in an equation. The four parts to this equation are :- A (Cross-sectional area) R (resistance) L (Length) ρ (Resistivity). These put in an equation to find resistivity are:-
ρ= A R
L
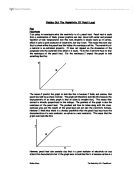
So lets say if the length is doubled, then the resistance of the wire is doubled, then because of this the current is then halved. Because off this we assume that resistance is proportional to length. If the cross section area of the wire doubled then the resistance is halved because the current can flow more easily. Resistivity is actually giving a material a value. Every material has a value. This value is sensitive to temperature. So the experiment will have a constant current, as the can affect the results as current affects temperature. So the experiment will have three sets of current, these sets will also include length values of 1cm through to 10 cm. As the current will be kept at a constant uniform value, then the experiment’s results will be more accurate due to current causing more heat throughout the graphite. As the experiment is keeping the current the same and using variables of length, I am able to measure the voltage of the circuit, so because I have these two values I can measure resistance. Thus I now have length, resistance, and cross sectional-area I can calculate the resistivity.