
An electron microscope has many uses today, mainly to do with scientific study.
Electron Microscope Charmain McNulty An electron microscope has many uses today, mainly to do with scientific study. The electron microscope has been developed to look at the tiniest structures, arrangements and components; it can magnify an object two million times. It works by using electrons instead of light. The electrons can fit through smaller gaps in specimens creating a clearer magnified image. There are two types of electron microscope, a scanning electron microscope and a transmission electron microscope. A SEM creates a magnified image of the surface of an object, and a TEM produces a magnified image of a specimen. Within the science of living organisms come the studies of bacteriology, cytology, histology and genetics to name a few. All of these use an electron microscope to further its research into its field. A general study that uses an electron microscope is microbiology, and the findings from this goes on help medicine with applications in biotechnology helping to produce antibiotics, vitamins, metals, and proteins industrially. Bacteriology, the study of bacteria, uses an electron microscope to visualise viruses and then tries to determine what causes disease. Samples of skin can be taken from people and studied with an electron microscope, known as biopsies, to find diseases such as cancer. And as the electron microscope has improved, so has the

Microscopy. History of the microscope:-
Microscopy Microscopes are tools which allow us to see objects which we cannot see with the naked eye. There are two main types of microscopes used nowadays. These are light microscopes and electron microscopes. During the 16th century the microscope was invented, which was of great assistance to works in medicine and biology. At first, the microscope was basically used recreationally, and was found in the homes of wealthy people. However, not long afterwards, proper uses for the microscope were discovered, and so study of bacteria and diseases began. History of the microscope:- * Circa 1000AD - First vision aid was invented called a reading stone. It was a glass sphere that magnified when laid on top of reading materials. * Circa 1284 - Italian, Salvino D'Armate invented the first wearable eye glasses. * 1590 - Zaccharias Janssen and his son Hans Janssen experimented with multiple lenses in a tube and observed that objects appeared greatly enlarged * 1665 - Robert Hooke noticed some "pores" or "cells" in a sliver of cork looking through a microscope. * 1674 - Anton van Leeuwenhoek built a simple microscope with only one lens to examine blood, yeast, insects and other tiny objects. He invented new methods for grinding and polishing microscope lenses that allowed for curvatures providing magnifications of up to 270 diameters, the best available lenses at that time.

A brief history of how the light microscope has developed since the 17th Century to the present day.
BIOLOGY A.S. LEVEL INDUCTION TASK: The History, Development and Use of the Light and Electron Microscope A brief history of how the light microscope has developed since the 17th Century to the present day A microscope is "an instrument that enables the human eye, by means of a lens or combinations of lenses, to observe enlarged images of tiny objects. It made visible the fascinating details of worlds within worlds." 1 The earliest simple microscope was a tube with a plate for the object at one end and, at the other, a lens that gave a magnification less than 10 times the actual size. Around 1590 a discovery was made by Zaccharias Janssen and Hans Janssen his son, two Dutch spectacle makers, while they were experimenting with numerous lenses in a tube. They found out that nearby objects were greatly enlarged when looking through the lenses in the tube. Later in 1609 Galileo heard of these experiments and worked on the principles of lenses. After doing so he made an instrument that incorporated a focusing device. Antony van Leeuwenhoek (1632-1723) of Holland was apprenticed in a linen-draper's shop. He set himself up in business as a draper (a fabric merchant) and at some time before 1668, Antony van Leeuwenhoek learned to grind lenses, made simple microscopes, and began observing with them. He taught himself how to polish and grind lenses. Leeuwenhoek's skill at grinding
Does the focal length of a lens depend on the colour of light used?
Physics coursework PSA3 experiment Does the focal length of a lens depend on the colour of light used? Aim The aim is to investigate the Focal lengths of light in the visible spectrum. Introduction I intend on using light with as much difference in wavelength as possible so that I can compare my results with more ease and so that errors in my experiment do not lead to overlapping results that have no distinct difference in them. However as I am restricted to a school laboratory I shall be using light on the part of the electromagnetic spectrum visible to the human eye. This is because filters for red and blue light can be found and used easily and have a large enough wavelength difference (red light with a wavelength of around 700nm whilst blue light is nearly 400nm) as they are on opposite parts of the visible spectrum to each other. Before I started the experiment I was given the lens I was going to use in the experiment so that I could work out the rough focal length of the lens. This meant that I could work out the distances I will I was going very useful because the equation I was going to use was 1/U + 1/V = 1/F My hypothesis is that light with shorter wavelengths will have shorter focal points. Throughout my coursework U will stand for ...... and V will stand for.......... Apparatus ) Ray box (12V) 2) Power supply (able to supply12V) 3) Object slide 4)

To investigate the relationship between u and v for a convex lens.
To investigate the relationship between u and v for a convex lens. Prediction I predict that the values of u two times greater than the focal length of the lens, the image will be diminished and the value for v will be greater than the focal length of the lens but not greater than two times the focal length of the lens. The bigger u the smaller the image and closer to the focal length v is. A simple ray diagram can prove this: I also predict that the values of v less than two times the focal length but greater than the focal length the image will be magnified and the value for v will be greater than twice the focal length. The closer to the focal length v is the more magnified the image and the bigger the value of v. This can be proved by this diagram: I also predict that for the values of u less than f a virtual image will be produced as this does not connect u and v there is no point using values of u less than the focal length. Ideal Results My Ideal results are on a separate page and were calculated using the formula /u+1/v=1/f u= the distance of the object from the lens v= the distance of the image from the lens f= the focal length of the lens I found this formula in my research (Internet, http:// relativity.phy.olemiss.edu) and is widely accepted as reliable way of finding the focal length of a lens. Preliminary Investigations My first preliminary

Lenses experiment
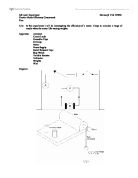
Planning Hypothesis I hypothesise that moving the object further away from the focal point of a converging lens will decrease the magnification of the size of the image. Apparatus Method I will set up the apparatus as shown in the diagram above. To decide which lens I am to use I will find the focal lengths of different lenses and us the lens that gives the easiest focal length to work with, this will be found out in my preliminary experiment. In this experiment I will be trying to prove my hypothesis, to do that the results that I obtain have to help me find the magnifications of different lengths away from the focal length. The object will be put on the focal point for the first result then I will measure the diameter of the object, this should always be 2.0cm, and then I will measure the diameter of the image. I will record my results into a suitable table; all of my results must be to 1 decimal place apart from the results for the magnifications, which will be to 2 decimal places. I will obtain results every 2.0cm and take four results so that I can take an average result for the object distance (U), for the width of the image and the magnification. I will obtain results every 2.0cm because the image size drastically changes at the beginning when moving it away from the lens just a little bit and less so later on when got past 2F(twice the focal length), therefore
In this experiment I will be investigating the efficiency of a motor. I hope to calculate a range of results when the motor lifts varying weights.
AS Level Experiment Hermanjit Virk 12WSI Electric Motor Efficiency Coursework Plan Aim: In this experiment I will be investigating the efficiency of a motor. I hope to calculate a range of results when the motor lifts varying weights. Apparatus: Ammeter Circuit Leads Crocodile Clips G Clamp Motor Power Supply Ruler/ Scissors/ Tape Stop Watch Variable Resistor Voltmeter Weights Wire Diagram: Safety: In this experiment it is important to consider the safety aspects when carrying out this practical task; I will make sure of the following things before starting the experiment: * The circuit has been connected correctly according to the circuit diagram (Previous page) * Make sure that the connected leads are all working in order and are not tangled * Check that the motor is working correctly * The Power supply is working, and the voltage is not exceeding the limit * Check the circuit before starting and be standing during the experiment * A Mat should be placed on the floor as weights will land on to the ground Keeping the same Changing Current Length of string /Height Temperature Voltage Motor Weight Variables: Theory: Efficiency is often expressed as a percentage. What efficiency shows us is the power wasted in the experiment, not all the power is used efficiently as it is wasted when the power is being transferred. The power

Determine the effect changing the object to the lens distance has on the distance at which the image is displayed.
Lenses Aim: To determine the effect changing the object to the lens distance has on the distance at which the image is displayed Prediction: To make my predictions I decided to use a quantitive prediction method, the equation for this is: 1 = 1 + 1 focal length (cm) Object-lens distance Lens-image distance To use this method I will have to know the focal length of the lens. To do this we did a preliminary experiment where I put a lens opposite a window with a piece of paper behind. I moved the paper back and forth until the image of the outside became clear on the paper. The distance from the lens to the card, when the image is in focus gives the focal length. Having established the focal range of the lens was 10.5, and that at this distance the image would not become clear for infinity. Here is our predictions using the equation explained earlier: 1 = 1 = 1 - 1 = 11 - 10 - 1 = V=110 V 10 11 110 110 110 2 = 1 = 1 - 1 = 6 - 5 = 1 = V = 60 V 10 12 60 60 60 3 = 1 = 1 - 1 = 13 - 10 = 3 = V = 43.3 V 10 13 130 130 130 4 = 1 = 1 - 1 = 7 - 5 = 2 = V = 35 V 10 14 70 70 70 5 = 1 = 1 - 1 = 3 - 2 = 1 = V = 30 V 10 15 30 30 30 Prediction shows that the

I am going to be preparing a slide of an onion piece and looking at it through a microscope in low and high powers. By doing this I expect to accomplish a drawing of an onion cell close up and how to use the assured tools similar to the microscope.
Introduction: I am going to be preparing a slide of an onion piece and looking at it through a microscope in low and high powers. By doing this I expect to accomplish a drawing of an onion cell close up and how to use the assured tools similar to the microscope. Discussion: Microscopy is vital for the reason that it allows you to look into certain bits and pieces closely and find out more information about the item. It allows you to glance at many existing cells and other things as well. History: In 1665 an Englishman named Robert Hooke cut out some very thin strips of cork and looked at them using a very primitive microscope. What he saw was little tiny spaces which he called cells as they reminded him of tiny rooms. He was the first person to actually see this. The invention of the microscope was a huge technological breakthrough which enabled scientists to develop ideas about the structure of living things. Safety Points: * Take care not to cut yourself while cutting the onion. * Make certain with the function of the microscope is handled with care. * Pay attention not to stain yourself while undertaking the experimentation. Materials: * Knife * Onion * Dissection scissors * Fine forceps * Water * Pipette * Microscope slide * Microscope * Cover-slip * Mounted needle * Iodine solution * Filter paper Method: * I sliced vertically through an onion bulb

Measurement of the focal lengths of a concave lens and a convex mirror
Kwun Tong Government Secondary School Advanced Level Physics (TAS) Experiment Report Experiment No.: 3 Title: Measurement of the focal lengths of a concave lens and a convex mirror Date of Experiment: 2006/11/28 Mark: Sch. Code 2114 TAS Group 5 Name: Chan Man Lok Class: S.6C Class No.: 6 Objective: . To measure the focal length of a concave lens with the help of an auxiliary convex lens and the lens formula 2. To measure the focal length of a convex mirror with the help of an auxiliary convex lens Apparatus: Instrument Convex lens x 1 Concave lens x 1 Convex mirror x 1 Metre rule x 1 White screen x 1 Ray box with a fine gauze grid x 1 Lens holder x 2 Theory: Measurement of the focal length of a concave lens using an auxiliary convex lens: . Position the screen to catch the real image formed by the auxiliary convex lens 2. Add the concave lens between the convex lens and the screen and reposition the screen to catch the image of fine grid again 3. Calculate the focal length of the concave lens f by using the lens formula: By using real-is-positive convention, u will be taken as negative. Measurement of the focal length of a convex mirrorusing an auxiliary convex lens . Position the screen to catch the real image formed by the auxiliary convex lens 2. Add the convex mirror between the screen