
Materials for different contact lenses
Materials for different contact lenses There are three main types of contact lenses. They are hard contact lenses, soft lenses and gas permeable lenses. Contact lenses were invented a century ago. At the beginning, there are only hard contact lenses which are made out of glass, then soft contact lenses were invented and gas permeable lenses have only started the development in the last decade. They are trying new material for gas permeable lenses. Hard contact lenses Hard contact lenses nowadays are made of Polymethylmethacrylate (PMMA) which is generally known as Perspex. It is the second stage of hard contact lenses. The advantage of hard contact lenses is that it doesn't pull moisture from eyes. The hardness of the material cause it to retain shape better which make the vision crisper. Also, more different kind of lenses could be made out of it. They also tend to last longer than soft contact lenses. They are cheaper than other contact lenses. However, the biggest disadvantage of hard contact lenses is that they do not stick to the cornea. This cause it to fall out of the eye easily and it is very hard to find because it is a very small piece of transparent. They also scratch easily. They are not very good for the health of the eyes because eyes need oxygen and they block the oxygen supply from the air. Hard contact lenses are also very uncomfortable. It takes a long

Light and Electron Microscope.
Biology Light and Electron Microscope * The light microscope (like the ones commonly used in schools) relies on light being reflected onto a mirror, which shines through a very small, thin specimen. Often this will be a section through some living cells or tissue. The section must be thin enough to allow the light rays to pass through it and then onto the eye of the person using the microscope. Glass lenses focus the light rays. * The electron microscope is a much more powerful and expensive piece of kit. Instead of light, it uses a beam of electrons which are fired at a very thin section of material. The electrons scatter when they hit the specimen and affect a photographic plate so that a black and white image of the specimen is formed. These microscopes are harder to use, but the enable you to look at really tiny objects, even molecules. The main comparisons of a light microscope (LM) and electron microscope (EM) are outlined below; * Resolution. This is the ability to distinguish between 2 separate points. The distance is half the wavelength of the medium used. For light then the effective resolution is 200nm, anything smaller cannot be seen clearly. The electron microscope has a resolution of 0.5 nm, which means that all the organelles and ultrastructure of cells can be viewed. * Magnification (X). This is the number of times larger an image can be made compared to

The electron microscope is an intense microscope. It can see things that a normal microscope cannot.
Lynsey Mansfield 26th September 2002 Electron Microscopy The electron microscope is an intense microscope. It can see things that a normal microscope cannot. The electron microscope cannot be used to look at living cells. Increasing the magnification in electron microscopy results in an increase in the amount of visible detail. There is a vacuum inside an electron microscope. Photographs of specimens viewed with an electron microscope are called electronmicrographs. The electron microscope uses electromagnets to focus the image onto a fluorescent screen. Light areas on an electronmicrograph are produced when electrons have been able to pass through the specimen. Electrons must be able to pass through parts of the specimen. Molecules in the air interrupt the flow of electrons. Electron-dense areas scatter the electrons and produce dark areas on the electronmicrograph. Electron beams cannot pass through glass. Beams of electrons have a very short wavelength. Thin sections are mounted on copper grids, which provide support. The atoms in organic molecules have a low atomic number and so do not scatter electrons. The resolving power of a transmission electron microscope depends on the wavelength of the electromagnetic radiation used. The transmission electron microscope allows us to see as separate structures, particles that are as close together as two nanometres. The

Electron microscopes allow the viewer to see much smaller objects than the original light microscopes. The wavelength of electrons is thousands of times smaller than the wavelength of light
Electron Microscopy Electron microscopes allow the viewer to see much smaller objects than the original light microscopes. The wavelength of electrons is thousands of times smaller than the wavelength of light, with a ratio of around 0.01nm : 500nm, electron wavelength : light wavelength. This overcomes some of the problems faced with light microscopes, such as the depth of focus that can be obtained, the obstruction of objects and the blurred images that often occur due to the wavelengths of light. Electron microscopes can therefore show more detail then light microscopes and can be used to study much smaller objects in finer detail. As electrons cannot be seen as light can, the image is shown on a screen when the electrons are detected within the microscope. A stream of electrons is formed at a hot cathode, or 'electron gun' inside the microscope, which is then 'fired' at the object being viewed using positive electrical charges. Metal apertures and magnetic lenses are used to confine the stream into a thinner, more focused beam. The beam is then directed onto the sample by magnetic lenses. The electrons are detected by a fluorescent screen or photographic plate at the front of the microscope, causing the screen to glow and producing an image of the subject. Due to the finite energy of the electrons, care must be taken in the preparation of the specimen for viewing, and

To compare the growth of yeast between two yeast suspensions.
Yeast Growth under the Microscope Aim: To compare the growth of yeast between two yeast suspensions Materials: * 2 Sterile conical flasks * Non-absorbent cottonwool plugs * 50 mL of grape juice * 1 teaspoon of sugar * dry active yeast, half a packet * Bunsen burner * tripod * gauze mat * Microscope * 2 Glass slides * 2 glass cover slips * 2 dropping pipettes Method: 25mL of grape juice, and half a teaspoon of sugar was added to Flask A, then heated to boiling point for one minute. A thermometer was then placed in the flask and plugged with cottonwool. Flask A was then left to cool down to 30?C. Once the flask reached 30?C the cottonwool was quickly taken out and a quarter of a packet of yeast was added, as quickly as possible the cottonwool plug was replaced. The rest of the grape juice and sugar was then placed in Flask B and then heated at boiling for one minute. The yeast leftover was then added to the boiling mixture, plugged with cottonwool then allowed to cool. Both Flask A and B were then left at 25?C overnight. The cottonwool was then removed from Flask A and a sterilised dropping pipette was used to place a drop of the suspension onto a slide. A cover slip was then placed on top and the slide was then observed under the microscope. Cells were then observed under the low power lens and yeast was observed under the higher power setting.

An electron microscope has many uses today, mainly to do with scientific study.
Electron Microscope Charmain McNulty An electron microscope has many uses today, mainly to do with scientific study. The electron microscope has been developed to look at the tiniest structures, arrangements and components; it can magnify an object two million times. It works by using electrons instead of light. The electrons can fit through smaller gaps in specimens creating a clearer magnified image. There are two types of electron microscope, a scanning electron microscope and a transmission electron microscope. A SEM creates a magnified image of the surface of an object, and a TEM produces a magnified image of a specimen. Within the science of living organisms come the studies of bacteriology, cytology, histology and genetics to name a few. All of these use an electron microscope to further its research into its field. A general study that uses an electron microscope is microbiology, and the findings from this goes on help medicine with applications in biotechnology helping to produce antibiotics, vitamins, metals, and proteins industrially. Bacteriology, the study of bacteria, uses an electron microscope to visualise viruses and then tries to determine what causes disease. Samples of skin can be taken from people and studied with an electron microscope, known as biopsies, to find diseases such as cancer. And as the electron microscope has improved, so has the

Investigating the relationship between the image distance and the object distance for a convex lens
Investigating the relationship between the image distance and the object distance for a convex lens FAIR TESTING In this experiment I will be changing two factors which will be the object distance and the image distance. The following factors that are going to be kept constant are:- . The positioning of the image and light source - if this is changed; it could affect the results and may give anomoulous results. The light source must also point at the image and directly at the convex lens. 2. The convex lens - if the size of this convex lens is change; it could again affect the results and may give anomoulous results. 3. The light source - The intensity of the light source needs to be kept the same to prevent any anomoulous results. 4. The bulb watt - this would have to be kept constant, i.e. if I use double the watt of the bulb than my overall outcome of results is will doubled. APPARATUS LIST To perform this experiment I will need some apparatus. This will consist of:- * 30cm ruler * 1m ruler * A Pencil * Blank A4 piece of paper * Connecting wires x2 * Convex Lens * Light bulb * Power meter DIAGRAM Below is a labelled diagram of how the experiment is going to be set-up:- METHOD This is the procedure that I will use to do the experiment:- . Set up apparatus as in shown in the diagram. 2. Turn on the power. 3. Measure the object distance 4. Measure

An essay on Electron Microscopy
An essay on Electron Microscopy An electron microscope (EM) shows the essential features of a cell. This uses an electron stream which is directed at the specimen. This invention was built in the 1930's. The transmission electron microscope (TEM) has extremely high magnification and resolution properties. The reason why biologists need a high resolution is in able to see the specimen in more detail. Feature Electron microscope Wavelength Electron beam - 1.0 nm Resolution 0.5 nm Maximum useful magnification X 250 000 Image Black and white - colour enhanced By computer Specimens Non-living Advantages Very high resolution- can see Plenty of cell detail Focused by Magnets Illumination Electrons The way an image is formed on a electron microscope (EM) is by the electrons in an electron microscope (EM) are focused. Here the particles or the membranes in cells can be seen as separate objects if they are further apart than half of the wavelength of the beam of the electrons used. Electron microscopes have a high resolution because the electron beams have a shorter wave length. Also the other reason why biologists need a high resolution is in able to see the specimen in more detail. The table below gives information about an electron microscopy: The development of electron microscope (EM) has had a huge impact on biology. Due to the fact that the
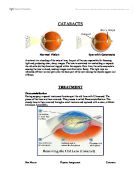
How to treat Cataracts.
CATARACTS Normal Vision Eye with Cataracts A cataract is a clouding of the natural lens, the part of the eye responsible for focusing light and producing clear, sharp images. The lens is contained in a sealed bag or capsule. As old cells die they become trapped within the capsule. Over time, the cells accumulate causing the lens to cloud, making images look blurred or fuzzy. The light rays are refracted off their normal path onto the back part of the eye making the objects appear out of focus. TREATMENT Phacoemulsification During surgery, a special instrument breaks apart the old Lens with Ultrasound. The pieces of the Lens are then removed. This process is called Phacoemulsification. The cloudy Lens is then removed through a small incision and replaced with a clear, artificial Intraocula Lens (IOL). Extracapsular Surgery During Extracapsular Surgery, an incision slightly larger than for Phacoemulsification is made in the eye and the Lens Nucleus is removed, leaving the rear Capsule of the lens intact. Leaving the Posterior Capsule reduces the risk of complications later on. The Intraocula Lens is then implanted behind the Iris. Posterior Chamber Lens Implant A Posterior Chamber Lens Implant is similar to a contact lens, with one big difference: The Intraocula Lens is an internal and permanent part of the Eye. An Intraocula Lens is
The demonstration of the main stages of mitosis altered by the growth of broad bean seedlings in varied concentrations.
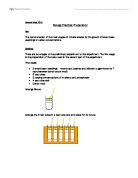
Hannah West 2313 Biology Practical Preparation Aim The demonstration of the main stages of mitosis altered by the growth of broad bean seedlings in varied concentrations. Method There are two stages to the preliminary experiment to this experiment. The first stage is the preparation of the roots used in the second part of the experiment. First stage: * 5 broad bean seedlings - roots intact (soaked and allowed to germinate for 7 days between damp cotton wool) * 5 test tubes * 5 varying concentrations of nutrients and phosphates * A test tube rack * Cotton wool Arrange like so: Arrange the 5 test tubes in a test tube rack and leave for 24 hours: Stage 2: * 5 prepared broad bean seedlings * 10cm3 of 50:50 concentrated hydrochloric acid and absolute alcohol * 10cm3 of 45% glacial acetic * 100cm3 of 70% alcohol * Acetic orcein in a dropping bottle * Microscope with a light source * Stop clock * Scissors * Watch glasses with glass covers * Forceps * Mounted needle * Teat pipette * Scalpel * Beaker * Glass rod * Microscope slides * Cover slips * Labels * Lens tissue * Filter paper . Cut off the root tip, about 2mm in length, from each seedling,. Using a mounted needle, place the root tips ion a covered watch glass containing a mixture of concentrated hydrochloric acid and absolute alcohol in equal volumes. Leave for 5 to 10 minutes. 2.