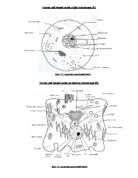
TEMs work by using a tungsten filament to produce an electron beam in a vacuum chamber. The emitted electrons are accelerated through an electromagnetic field that also narrowly focuses the beam. The beam is then passed through the sample material. The specially prepared sample is a very thin (less than 100nm) slice of material. The electrons that pass through the sample hit a phosphor screen, CCD or film and produce an image. Where the sample has less density, more electrons get through and the image is brighter. A darker image is produced in areas where the sample is more dense and therefore less electrons pass through. The image produced on the screen can be photographed to give a photomicrograph (photo created by a microscope).
The main advantages of TEM are that they give a better magnification and resolution better than70 years ago. They had given us a better view of trilaminar cell membranes which is about 7nm, globular proteins such as haemoglobin which is about 3.5nm and molecules of DNA 2nm and lots more.
However, TEM has a number of limitations as well. Mainly that the electrons cannot travel in the air so the microscope have to have a vacuum chamber, which makes it bulky and expensive. Secondly the specimen have to be de-hydrated because the microscope is a vacuum. Therefore, no living specimen can be examined. Thirdly, the electron beam in a TEM cannot penetrate far in to a biological molecule, therefore the specimen has to be sliced into usually 100nm thick. A complete staining process has to be carried out and even then the image is only black and white. Moreover, the image may contain artefacts. Artefacts are the things that results in the preparation of the samples. They are not part of the actual specimen but appear on the photomic-rographs. So we can’t be sure what we see on the photomicrograph is what is really on the specimen. Lastly, because the specimen is really thin, the TEM only creates a 2-D image. So if you what a 3-D image they analyse a few different parts of the specimen and put them together for a 3-D image.
Scanning Electron Microscope---------------------------------------------------------------------------------------------------------- The SEM pass a beam of electrons over the surface of the specimen in the form of a ‘scanning’ beam. Electrons are reflected off the surface of the specimen as it has been previously coated in heavy metals. It is these reflected electron beams that are focussed of the fluorescent screen in order to make up the image. The reason a three-dimensional image is created is because a SEM scans the beam of electrons back and forth across a sample, which is known as raster scanning. The electrons hitting a substance are either reflected or absorbed by the substance. The reflected electrons bounce back into a cathode ray tube detector, which analyses the shape of an object based on how the electron reflected. If an electron is absorbed, it can emit X-rays from the substance, which can also be detected with the proper equipment. As a final note, many non-metal specimens are coated in gold for a SEM so as to make them able to reflect electrons without any charge from being collected at the surface of the object.
The limitations of the TEM still applies to SEM. However now the specimen doesn’t have to be so thin like in the TEM as in SEM the electron are not penetrated. The SEM directs a beam of electrons on the surface of the specimen from above rather than penetrating it from below. The beam passes back and forth in a regular pattern. However, the resolution power of the SEM is much lower than a TEM’s where the TEM’S is 200nm, the SEM’s is 20nm, which is still ten times better than a light microscopes.
- Sample Preparation
-
1) Fixation: Chemicals preserve material in a life like condition. Does not distort the specimen.
-
2) Dehydration: Water removed from the specimen using ethanol. Particularly important for electron microscopy because water molecules deflect the electron beam which blurs the image.
-
3) Embedding: Supports the tissue in wax or resin so that it can be cut into thin sections.
Sectioning produces very thin slices for mounting. Sections are cut with a microtome or an ulramicrotome to make them either a few micrometres (light microscopy) or nanometres (electron microscopy) thick.
-
4) Staining: Most biological material is transparent and needs staining to increase the contrast between different structures. Different stains are used for different types of tissues. Methylene blue is often used for animal cells, while iodine in KI solution is used for plant tissues.
-
5) Mounting: Mounting on a slide protects the material so that it is suitable for viewing over a long period.
-
6) Cryofixation – freezing a specimen so rapidly, to liquid nitrogen or even liquid helium temperatures, that the water forms vitreous (non-crystalline) ice. This preserves the specimen in a snapshot of its solution state.
-
7) Sectioning – produces thin slices of specimen, semitransparent to electrons. These can be cut on an ultramicrotome with a diamond knife to produce ultrathin slices about 60-90 nm thick. Disposable glass knives are also used because they can be made in the lab and are much cheaper.
There are some common and other disadvantages of Electron microscopy as well as the technicality of it. Electron microscopes are very expensive to buy and maintain. They are dynamic rather than static in their operation: requiring extremely stable high voltage supplies, extremely stable currents to each electromagnetic coil/lens, continuously-pumped high/ultra-high vacuum systems and a cooling water supply circulation through the lenses and pumps. As they are very sensitive to vibration and external magnetic fields, microscopes aimed at achieving high resolutions must be housed in buildings with special services. A significant amount of training is required in order to operate an electron microscope successfully and electron microscopy is considered a specialised skill.
-------------------------------------------------------------------------------------------------------------------