The software I am going to use for producing this database is going to be a database-creating software called Microsoft® Access. You can use it to create databases from scratch or you can also use it to edit existing databases. It is included in the software called Microsoft Office.
When you first open Microsoft Access, you will see a start-up screen similar to the one below:
This screen simply shows up while Microsoft Access is loading up.
It displays some important information about the software package and also some security information.
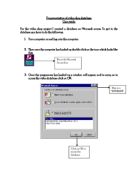
Once Microsoft Access has loaded up, a screen that is similar to the one below appears:
Once this screen appears, you click on Blank Database. This is the option that you have to select in order to create a database from scratch.
Once you click on Blank Database, you will encounter a screen similar to the one below:
In the box where it says File Name, you have to type what you want the database to be called e.g. Film Database.
After you have typed in the File Name, you click on create:
You have now created a new database to work on.
Once you have created a database to work on, you will encounter a screen similar to the one below:
Usually, when you want to create a new table to enter data into, you should click where it says Create Table In Design View:
Once you click on Create Table In Design View, you will encounter a screen similar to the one below:
In the column where it says Field Name, you should type in whatever you want the field name to be called e.g. Member ID because I will use this table to keep records of all the members of the movie company.
Once you have entered all the field names, your table should look something like this:
As you can see, in the column called Data Type, all the data types are text. To change them, you have to click on the data type that you want to change:
When you do this, a drop-down menu will appear with all the various data types. To choose one, simply click on it.
A primary key in a table in a database is used to identify each record in the table. It has to be unique e.g. a member ID.
You can allocate a primary key by first clicking on the field where you want to allocate the primary key and then clicking on the primary key button in the toolbar:
After you click on the Primary Key button, you will see a picture of a key next to the field where it has been allocated:
This means that the primary key was successfully created.
Now, you have successfully created a table for your database.
Next, click on the close button on the table screen:
When you click on close, there will be a screen asking you to name your table. This is what the table will be called.
Instead of filling in information into tables, you can make it easier by creating forms.
To create a form, you have to click on the Create Form by Using Wizard button:
This will help you to create a form using existing data from a table.
When you click on the button, you will encounter a screen similar to the one below:
In the Tables/Queries drop-down menu, there will be a list of tables that you have created. From these, you have to choose the table or query that you want to create a form about.
In the Available Fields column:
there is a list of fields that are in the table. From these, you have to choose the fields that you want to be available in the form.
To do this, you can either select the fields one-by-one and then click on the arrow facing right between the two columns, or just click on the double arrow between the two columns. (This will add the whole contents of the Available Fields column.)
After you have added the columns that you desire, you have to click on the next button.
When you click on next, you will encounter a screen similar to the one below:
This screen simply lets you choose the type of layout you wish to use in your form.
The simplest type of layout is the columnar option. To choose this, simply click on the circle next to it and then click on Next.
When you click on next, you will encounter a screen similar to the screen below:
This screen is for choosing the design that you want to use for your form. The simplest design is the design called Standard so you click on the Standard button and then click Next.
When you have clicked on Next, you will encounter a screen similar to the one below:
This Screen is the last screen in the Form Wizard. In this screen, you have to enter a name that you wish to call your form.
Underneath this section, there is a button which says Modify the form’s Design.
Click on this button and then click on Finish
When you have clicked on Finish, you will encounter a screen similar to the one below:
In this screen, you have to choose the colour scheme of the form. You can also change the sizes of the background, boxes, etc.
I have chosen a blue colour scheme.
When you are happy with the design of your form, click on close and save the changes.
Now you can start filling in the form appropriately.
If you want to link certain fields in a database, you need to use the relationships function:
To access Relationships, you have to click on the Relationships icon:
Once you have clicked on the Relationships button, you will encounter a screen similar to the one below:
This simply shows the different tables that are in your database.
If you want to create a relationship between any of the fields in a database, you have to click on one of the fields, and then drag it down to the field that to want to form the relationship with.
Once you have dragged one field to another, you will see a screen similar to the one below:
This screen is showing the fields that are going to be linked together.
For the relationship to work properly, you have to tick all the boxes under the relationship.
Once you have done this, click on Create.
This will create the relationship.
Once you have created your relationships, it should end up looking something like this:
As you can see, I have also created two relationships, one for Member ID, and one for Video ID.
The 1 and ∞ signs at each end of the relationship mean that the type of relationship we have made is called a ‘one-to-many’ relationship.
Now my database is complete and I can start using it to help run a video shop.
I think my database turned out exactly as I had planned. I think I used the right field names, data types, etc.
I can now extend the database by adding a new table for, let’s say, video games.
I kept my data and system for errors using an AntiVirus Software package called Symantec Norton SystemWorks 2003:
This is a very reliable software package and I also used it as a means to keep my work safe and secure. I also avoided data loss by saving my work on a removable disk regularly.