lashes. This mascara can also be used when you do make-up for men.
3. Lash-building mascara already has lash thickener in it.
4. With block-type mascara, you must add water to create the perfect texture.
Steps in brief:
1. Apply lash thickener before your mascara. This lash thickener has a white
silicone texture and will become translucent after about 5 minutes.
2. Choose mascara that will complement the make-up that you have used on
yourself / your client. Brown or black mascara is the most common colors.
3. When applying mascara on your client, let her close her eyes and then take her
eyelid in a “grip”. Apply the mascara in zigzag movements.
4. One coat is perfectly fine, but you can apply two coats.
5. Take your eyebrow brush and comb gently through your / your client’s eyelashes,
making sure that you separate each eyelash from the other.
6. For smudged mascara take a wet cotton bud and gently wipe it over the areas that
need correction.
15. How to Apply Blush
There are 2 types of blush:
1. Compact blush
2. Cream blush
Benefits of using blush:
1. It gives your skin a natural glow.
2. It gives shape to your face and accentuates your cheekbones.
Application in brief:
1. Take your contour brush and dab it into a suitable blush color.
2. Make sure that you accentuate the cheekbones by looking at your/the client’s face
shape.
3. Then take your blusher brush and blend the already applied blush.
16. How to Apply Lip Liner, Lipstick and Lip Gloss
Steps in brief:
1. Make sure that your lip liner pencil is soft and not too sharp.
2. Have a look whether you or your client have full or thin lips.
3. For thin lips – Draw the lip line just outside your or your client’s natural lip line.
Choose a natural light or shiny lipstick to fill in your lips. This will create the
illusion that you have bigger lips.
4. For fuller lips – Draw the lip line just inside your or your client’s natural lip line.
Use darker colors such as plum, red, etc. This color will make your lips look
smaller.
5. Use your lipstick brush and dab it into your lip gloss pot.
17. How to Apply Lipstick to Stay on Longer
Steps in brief:
1. Firstly start of by applying foundation, a bit of cover stick and lots of powder
onto your lips. This will set the base for your make-up.
2. Take a lip liner pencil, similar to the lipstick color that you are going to use and
apply it either just inside your natural lip line if you have full lips, or just on the
outside of your natural lip line for smaller lips.
3. Take your lipstick color and apply it with your lipstick brush.
4. Apply some powder over this.
5. Repeat steps 2 and 3.
18. How to Correct Makeup Mistakes
Useful items to have:
1. Tissues
2. Cotton buds
3. Latex sponge
Brief description:
∙ Tone down dark make-up by softly wiping over these areas with a latex sponge.
∙ This technique can also be used for blush that is too dark.
∙ Take a cotton bud, dip it into make-up remover and lightly wipe it over any
uneven lines such as eyeliner or lip liner. This can also be used to blend in lip
liner pencil for a softer look.
∙ Take a tissue and blot it on your lips to remove any excess lipstick.
19. How to Apply Day Makeup
Steps in brief:
1. Test the foundation on your cheekbones to know if you are using the correct
color.
2. Use your foundation brush to apply the foundation. This will ensure that no
streaks are visible on your face. Don’t apply a pink or yellow toned foundation to
give color to the skin, the foundation is only the basis to any make-up.
3. Use cover stick that is 1-2 shades lighter than your skin. This can be applied over
the whole eyelid and also on blemishes and acne scars. Green cover stick can be
used to cover any red areas on the skin. Just make sure that you blend the cover
stick well.
4. Loose transparent powder is the best to use. Avoid any powder that has a glow,
because this will create a wet look. Concentrate especially on the eyelids and the
lips. The main purpose of the powder is to ensure that the eye shadow and lipstick
stays on for longer.
5. Take an eyebrow / eye liner pencil and dip it into some brown or black eye
shadow and fill in your eyebrows. Then you will take your highlighting brush and
dip it into beige, gold or white eye shadow color and apply this color all over
your eyelid. Then you will take your eye shadow applicator brush and dip it into
the required eye shadow color that you want to apply. This color you will apply in
the fold of your eye, making sure that you follow the natural shape of your eye.
6. Then you can apply eye liner on top of your eyelashes in a very soft line and
blend it in very well just to soften it up. You can use a brown or black eye liner or
otherwise you can use any other color that will compliment the eye shadow color
that you have on.
7. Apply 1 or 2 coats of mascara onto your eyelashes in zigzag movements. This
zigzag movement will ensure that your eyelashes are separated from each other
and it will also make your eyelashes appear longer.
8. Then you can apply blush- one with a glow or either one that has a matte finished
look. The blush must be applied softly to the cheeks or just underneath your
cheekbones and it must be blended in well, otherwise it will look harsh and
unnatural. A creamy blush has the tendency to smudge and it can also create a wet
look.
9. Line your lips with a soft and natural lip liner pencil and blend this lip liner in by
using a cotton bud and moving it softly over that line. Then you will take your
lipstick brush and fill in your lips with a soft peachy or pinkish color. Finish the
look off by applying lip gloss to your lips.
20. How to Go From Day to Evening Makeup
Steps in brief:
1. Look at you or your client’s eye shape so that you know how to apply the eye
shadow correctly.
2. Take your highlighting brush and apply any of the above mentioned highlighting
colors onto your eyelid and also just underneath your eyebrow.
3. Then you take your eye shadow applicator brush and apply any of the above
mentioned medium colors in the fold of your eye.
4. Then you can take your eyeliner brush to apply any of the above mentioned
eyeliner colors onto your eye. You can also take an eyeliner pencil, whichever one
you decide to use.
What to remember:
∙ Use a darker eye shadow over your natural eye shadow. Make it darker on the
outside corners of your eyes. Smokey eyes always look good!
∙ Use a darker eyeliner / liquid eyeliner. You can even draw the line thicker in the
evening to create a more dramatic effect.
∙ Blush or highlighter
∙ Darker lipstick color. If you do not have darker lipstick with you, then you can
always use a darker lip pencil, fill in your lip line and take the lip pencil color all
over your lips.
∙ Lip gloss
21. How to Apply False Eyelashes
To make it easy for you, firstly do your eye make-up before applying these eyelashes.
What you need:
1. Tweezers
2. False eyelash strips or individual lashes
3. Eyelash glue
4. Cotton buds
5. Scissor
Steps in brief when applying eyelash strips:
1. Take your tweezers to remove each eyelash from the holder.
2. Put your eyelash strips over your client’s eyes to see if you need to make any
adjustments to it.
3. Use a cotton bud to take out the glue from its holder and then place it neatly onto
the eyelash strip.
4. Gently put the eyelash strip onto your / client’s eyes and press it down softly with
the back-end of your tweezers. Make sure not to glue your / client’s eyelids
together.
5. Let your client open her eyes and then make some corrections to her eyeliner if
there is to be done.
6. Take some black mascara and apply one coat over the eyelashes, making sure that you comb your natural eyelashes upwards towards the eyelashes. This just gives it a more natural appearance.
Steps in brief when applying individual lashes:
1. Take your tweezers to remove each eyelash from the holder.
2. “Dip” the eyelashes’ end in your eyelash glue and gently push it down against
your / client’s eye – beginning on the outside corner and working inwards.
3. Take some black mascara and apply one coat over the eyelashes, making sure that you comb your natural eyelashes upwards towards the eyelashes. This just gives it a more natural appearance.
4. Take your eyebrow comb and divide each hair from another.
22. How to do Perfect Smokey Eyes
Steps in brief:
1. Comb your eyebrows and fill it in with an eye shadow color that is the same as
your hair color.
2. Take your highlighting brush and use either a white, gold or beige color. Apply
this color underneath your eyebrow.
3. Take your eye shadow applicator brush and dip it into grey eye shadow. This you
will apply all over your eyelid or just in the fold of your eye.
4. Take a tissue and clean your eye shadow applicator brush. Take the same brush
and dip it into black eye shadow. Apply the eye shadow in the fold of your eye
but at the outside corner of your eye – making a little V as you go downwards to
the outside corner of your eyelid.
5. Take your eye shadow blending brush and blend in the black eye shadow that you
applied.
6. Take a black eye liner pencil, making sure that it is not too sharp and draw a line
just above your eyelashes. If you do it on yourself, close one of your eyes and
look with the other eye in the mirror so that you can see what you are doing.
Place your finger at the outside corner of your eye and softly pull your eyelid so
that it is easier to apply your eyeliner. Draw the line almost into your eyelash line.
Do it on both eyes and then take your eyeliner brush, dip it into black eye shadow
and just “smear” the color gently over the eyeliner line. This will soften the look.
7. Take some black mascara and apply one or two coats onto your eyelashes.
8. For a very dramatic look, you might want to put on some individual lashes and
finish that off with a touch of mascara.
9. A smoky eye do not always have to be black, you can use various color such as
brown, plum, etc. Just make sure that you stay in the same color chart when doing
it with another color. Buy eye shadows that come in a trio of the same color.
23. How to do the Perfect Pin-Up Look
Steps in brief:
1. Prepare your / client’s face by putting on some foundation, cover stick and loose
translucent powder.
2. Take black eyeliner pencil or liquid eyeliner and apply it over the top of your
eyelid drawing it slightly out at the end of your eye line.
3. Put on some individual eyelashes or eyelash strips and cover it with a coat of
black mascara.
4. Apply just a touch of blush or a tan-like color to the apples of your cheeks.
5. Take a bright red lip liner pencil and apply it all over your lip line. Just neaten it
with a wet cotton bud if you went over the natural lip line. Lightly cover the
inside of your lips with the lip liner pencil.
6. Take your lipstick brush and apply the same reddish color onto your / client’s lips.
24. Your 5 Minute Makeup Look
What you need:
1. SPF
2. Foundation
3. Eyeliner pencil in black, plum, navy blue, etc.
4. Eye shadow in the same color as the eyeliner pencil.
5. Eyebrow comb
6. Natural lipstick
7. Black mascara
Steps in brief:
1. Apply some SPF onto your skin to protect it from any sun damage.
2. Pour a pea – size amount of foundation onto the top of your hand. (Make sure
your hands are clean).
3. Take your foundation brush or sponge and apply little amounts of foundation over
your forehead, nose, cheeks, and chin and make sure that every area of your face
is covered.
4. Take your latex sponge and lightly blend all around your forehead, sides of your
face and chine area.
5. Comb your eyebrows.
6. Choose an eyeliner color and apply it over the top of your eyelid and also
underneath your eyes. Take your eye shadow applicator brush and lightly apply
the same color eye shadow over the eyeliner lines.
7. Take your lipstick and make three dots underneath your cheekbones, in line with
each other and stretching from your nose tip to the top of your nose bridge. Take
your finger and blend these dots in.
8. Wipe your lipstick with a tissue and apply the same color to your lips.
9. Finish off this look with black mascara.
25. Eye Makeup Tips When Wearing Glasses
Here are some tips to keep in mind when choosing the correct glasses / spectacles for you:
∙ The thickness of the lens must be the same as that of the frame.
∙ The glass’s or spectacle’s frame must sit comfortable on your face.
∙ The frame must be functional and practical.
∙ The glasses must also be attractive and suit your face shape.
Face Shapes
Round Face
∙ If you have a round face, then it is very important that you do not buy a round –
shaped frame, because your face will look more round.
∙ It is ideal to choose a square shaped frame – this will soften the roundness of your
face.
∙ If your square shaped frame is multi – colored, then the darker color of the two
must be on the outside corners of the frame.
Square Shaped Face
∙ For a square shaped face, it is important not to buy a square or rounded frame this
will make your face look funny.
∙ The emphasis must be on your eyebrows, so the ideal shape will be an oval or
rectangular frame.
Heart Shaped Face
∙ Any frame can be worn for a heart-shaped face, except a tear dropped one.
Long Face
∙ If you have a long face, then the emphasis must be on the width of the frame on
the side. A big frame can be worn with ease.
Please note that the frame must never be underneath your eyebrows.
Hairstyles
Feathery Hairstyle
∙ If you have a feathery hairstyle, then a plain frame will look suitable with that.
Formal Hairstyle
∙ With a formal hairstyle a striking frame can be worn.
Always remember that your frame’s color must suit the color of your hair.
Eye Shapes
Wide Apart
∙ For eyes that are wide apart, wear an oval or rectangular frame.
Close to Each Other
∙ For eyes that are close to each other, it is important to wear a rounded shape. This
will give the impression that the eyes are not so close to each other.
Always ensure that your eyes are right in the middle of each lens.
Nose Shapes
Long Nose
∙ If someone has a long nose, then the bridge of the glasses must sit low onto your
client’s nose. This will actually divide your nose in half and make it look shorter.
Short Nose
∙ If your client has a short nose, then the bridge of the glasses must be a bit higher.
Forehead Shapes
High Forehead
∙ For a high forehead, ensure that the frame of the glasses sits just above your
eyebrows.
Short Forehead
∙ For a short forehead, the frame of the glasses must sit onto your eyebrows.
How to do makeup for someone that is far-seeing / long – sighted:
∙ Such a person can see very well on far distances, but not on short distances.
∙ The lenses of these glasses are normally very thick and this will make the eyes
appear bigger. It is thus very important to apply your make-up very neatly
because every fault, etc. will show through your lenses.
∙ Use light make-up eye shadows, not any shimmering make-up, black eyeliner or
black mascara. Keep it subtle by using rather brown mascara and remember to put
the eye shadow color in the crease of your eye, following your eye’s shape.
How to apply makeup for someone that is short-sighted / near – sighted:
∙ Such a person can see very well on short distances, but not so good on far
distances.
∙ The lenses of the glasses will not be thick at all and this will make the eyes
appear smaller.
∙ Use stronger colors such as charcoal, dove-blue, plum, etc. and remember that the
emphasis must fall on the fold of your eyes and the outer corners of your eyes.
∙ You can use a shimmering color over your existing eye shadow just to accentuate
your eyes.
∙ Finish it off by applying black eyeliner and mascara.
26. Bridal Makeup Look: Young and Beautiful Bride
Makeup Used in the Video:
∙ MAC primer to apply over entire face area
∙ MAC Studio Sculpt foundation
∙ Maybelline Light Powder
∙ Black eye shadow to fill in your eyebrows
∙ Light beige eye shadow which will be applied over entire eye area
∙ Revlon Beyond Natural Palette Peach- which was applied in the fold of eyes
∙ Revlon Beyond Natural Palette - brown eye shadow was applied over the peach
eye shadow and also in a curved v-shape at the outside corners of the eyes
∙ Black eyeliner
∙ Zoomlash Mascara from MAC
∙ Revlon Toast of New York Blush
∙ Light pink lip liner
∙ MAC Amplified Fast Play Lipstick
∙ See Thru Lip gloss
27. Bridal Makeup Look: Elegant Bride
Makeup Used in the Video:
∙ MAC primer to apply over entire face area
∙ MAC Studio Sculpt foundation
∙ Maybelline Light Powder
∙ MAC black eyeliner
∙ Illuminating eye shadow / pearl eye shadow to apply all over eye area
∙ Bronze eye shadow which will be applied in the fold of your eye
∙ Dark charcoal eye shadow to apply on the outside corner of your eye
∙ Eyelash curler to curl your eyelashes before applying mascara
∙ Zoomlash mascara from MAC
∙ Maybelline Mousse bronzer
∙ Brown lipliner
∙ Bronze lipstick
∙ See thru lip gloss
28. Bridal Makeup Look: Shiny, Happy Bride
Makeup Used in the Video:
∙ MAC primer to apply over entire face area
∙ MAC Studio Sculpt foundation
∙ Maybelline Light Powder
∙ MAC black eyeliner
∙ MAC ORB satin eye shadow which will be applied all over your eyes
∙ Golden Rose eye shadow colour which will be applied in the crease of your eyes
∙ MAC Mythology to apply on the outside corner of your eyes
∙ Individual eye lashes
∙ MAC Zoomlash Mascara
∙ Revlon’s Toast of New York Blush
∙ Light pink lip liner
∙ Fuschia lipstick
∙ See Thru lip gloss
29. Bridal Makeup Look: Soft, Mysterious Bride
Makeup Used in the Video:
∙ MAC primer to apply over entire face area
∙ MAC Studio Sculpt foundation
∙ Maybelline Light Powder
∙ MAC black eyeliner
∙ MAC ORB Satin which will be applied over the entire eye area
∙ Light Sand / Soft Brown eye shadow to apply in the crease of your eye
∙ MAC Twinks eye shadow to apply onto eyelids
∙ Charcoal eye shadow to apply on the outside corner of your eye in a curved
vshape
∙ Zoomlash Mascara from MAC
∙ Dream Matte Mousse Bronzer from Maybelline and this will be applied onto
cheekbones
∙ Light brown lipliner
∙ MAC Amplified Blankety Lipstick
∙ See Thru Lip gloss
31. Bridal Makeup Look: Modern Bride
Makeup Used in the Video:
∙ MAC primer to apply over entire face area
∙ MAC Studio Sculpt foundation
∙ Maybelline Light Powder
∙ MAC black eyeliner
∙ MAC ORB satin eye shadow which will be applied all over your eyes
∙ Light bronze eye shadow which will be applied in the crease of your eye
∙ MAC Satin Taupe eye shadow to apply on the outside corner of your eyes
∙ Charcoal eye shadow colour which will be applied over the Satin Taupe from
MAC
∙ Individual eyelashes
∙ MAC Zoomlash Mascara
∙ Diamante gems
∙ Revlon’s Toast of New York Blush
∙ Light brown lip liner
∙ MAC Amplified Blankety Lipstick
∙ See Thru lip gloss.
32. Bridal Makeup Look: Romantic Bride
Makeup Used in the Video:
∙ MAC primer to apply over entire face area
∙ MAC Studio Sculpt foundation
∙ Maybelline Light Powder
∙ MAC black eyeliner
∙ MAC Phloof eye shadow to apply over entire eye area
∙ Satin Taupe from MAC which will be applied from the outside corner of your
eye, in the crease, till about half of your eye
∙ MAC Beauty Marked Velvet will be applied over the Satin Taupe eye shadow
∙ MAC Twinks eye shadow for your eyelid
∙ Eyelash curler
∙ MAC Zoomlash Mascara
∙ Revlon’s Toast of New York Blush
∙ Brown lip liner
∙ Peach-pink lipstick
∙ See Thru Lip gloss
37. Celebrity Makeup Look: Penelope Cruz
Makeup Used in the Video:
∙ MAC primer to apply over entire face area
∙ MAC Studio Sculpt foundation
∙ Maybelline Light Powder
∙ Black eyeliner to fill in your eyebrows
∙ MAC ORB Satin to apply over entire eye area
∙ Light shimmering pink eye shadow to apply onto your eyelids
∙ Medium Lavender eye shadow which will be applied over the light pink eye
shadow
∙ MAC ORB Satin which was applied over eyelids to soften up the eye shadow
∙ MAC Mythology eye shadow was applied over eyelids
∙ Black eye shadow to line eyes at the top as well as the bottom
∙ Zoomlash Mascara from MAC
∙ Revlon Tender Plum Blush
∙ Light blackcurrant lip liner
∙ MAC’s Amplified Blankety mixed with MAC’s Satin Snob lipstick
∙ See Thru Lip gloss
38. Celebrity Makeup Look: Rihanna
Makeup Used in the Video:
∙ MAC primer to apply over entire face area
∙ MAC Studio Sculpt foundation
∙ Maybelline Light Powder
∙ Black eyeliner to fill in your eyebrows
∙ Light beige / gold eye shadow to apply over entire eye area
∙ Light brown eye shadow to apply in the fold of your eye
∙ Medium brown eye shadow to apply over the light brown eye shadow
∙ Re-apply the light beige eye shadow over your eyelids
∙ Black eye shadow to line your eyes and to create the curved ends
∙ MAC Zoomlash Mascara
∙ Maybelline Dream Mousse Bronzer
∙ Ligth pink lip liner
∙ Fuschia Lipstick
∙ See Thru Lip Gloss
46. Corrective Makeup on Different Face Shapes
Brief description:
∙ Always use matte eye shadow when you do corrective make-up.
∙ Corrective make-up works on the principle of highlighting and shading.
∙ Dark colors pushes something back and make it appear smaller where as lighter
colors brings out something and make it appear bigger.
Long face
Characteristics:
∙ High forehead
∙ High cheekbones
∙ Long chin
∙ Small face
Corrective Steps:
1. Do shading around your hairline and at your chin.
2. Highlight your cheekbones with a light matte eye shadow and apply blush just
underneath your cheeks.
3. A fringe is good to wear with this face shape.
Square face
Characteristics:
∙ Wide forehead, cheeks and jaw line.
Corrective Steps:
1. Do shading at the sides of your head (temples) and also at the sides your jaw line.
2. Highlight your cheeks.
Round face
Characteristics:
∙ Round hairline, jaw line and wide cheeks that cannot be seen.
∙ Sometimes a person with this face shape will have a double – chin.
Corrective Steps:
1. Do shading at the sides of your head at the temples and also at the sides of your
jaw line.
2. Highlight your cheeks.
Oval / diamond shaped face
This is the ideal face shape.
Characteristics:
∙ Narrow forehead
∙ Small jaw line
∙ Accentuated cheekbones.
No correction required.
Heart- shaped face
Characteristics:
∙ Heart shaped hairline
∙ Wide cheeks
∙ Small face
∙ Sharp chin
Corrective Steps:
1. Do shading in the middle of your hairline and chin.
2. Highlight your cheekbones and the sides of your cheeks.
Pear shaped face
Characteristics:
∙ Small forehead
∙ Wide cheekbones
∙ Strong jaw line
Corrective Steps:
1. Do highlighting at the sides of your forehead.
2. Highlight your cheeks.
3. Do shading around your jaw line.
47. Corrective Makeup on Different Eye Shapes
Eye Shadow Charts for Different Eye Shapes
Corrective Steps for Different Eye Shapes
Eyes that are close to each other
The goal is to make the eyes appear more apart from each other.
Corrective Steps:
1. Apply a white, beige or golden eye shadow colour onto the eyelid and also under
your eyebrows.
2. Apply any other natural eye shadow colour in the fold of your eye, but
concentrate on the outer corners of your eye. The eye shadow colour must
become gradually darker to the outside corners of your eyes.
3. Apply a highlighting colour in the inside corner of your eye.
4. Eyeliner must only be applied from the middle of your eye to the outside corner
of your eye.
Eyes that are far apart from each other
The goal is to make the eyes appear closer to each other.
Corrective Steps:
1. Apply highlighter as normal.
2. Apply your eye shadow colour in the fold of your eye, but make sure that you
apply the colour darker on the inside corner of your eyes and going slightly
lighter to the outside corner of your eyes.
3. Eyeliner can be applied all around your eyes.
Small eyes
The goal is to make these eyes look bigger.
Corrective Steps:
1. Apply highlighter onto your eyelid.
2. Apply a light eye shadow colour in the fold of your eyes and work it upwards.
3. Eyeliner must only be applied at your bottom eyelashes.
Eyes that appear as if they are flat
The goal with these eyes is to make them appear rounder.
Corrective Steps:
1. Apply highlighter on your eyelid and keep it as light as possible.
2. Apply a darker eye shadow colour in the fold of your eyes and work upwards by
creating a more rounded effect.
3. Eyeliner must be applied only on the inside corner of your eyelid and then on the
outside corner of your eyelid. This will create a broken line and the eyes will
appear more rounded.
Almond shaped eyes
These are very big eyes. The goal is to make it proportional to the rest of the face.
Corrective Steps:
1. Apply highlighter just underneath your eyebrows.
2. Dark or light colours can be used on your eyelid creating a half moon effect.
3. Any eyeliner colour can be applied all around your eyes.
Deep sunken eyes
These eyes can be big or small. The goal is to bring it forward.
Corrective Steps:
1. Highlight underneath your eyebrows and also on your eyelid.
2. Apply light eye shadow on the fold of your eye.
3. A good tip is to avoid any eyeliner.
Droopy eyes
The goal is to lift the eye area.
Corrective Steps:
1. Apply highlighter onto your eyelid.
2. Use a dark eye shadow in the fold of your eye and concentrate to lift the area that
hangs.
3. No eyeliner must be applied.
Protrude eyes
The goal with your make up is to push back the area that stands out.
Corrective Steps:
1. Use a highlighter underneath your eyebrows and in the fold of your eyes.
2. Apply a darker eye shadow on your eyelid and go slightly lighter to the fold of
your eye.
48. Corrective Makeup on Different Nose Shapes
Description in brief:
Long Nose:
∙ Make a long nose appear shorter by doing shading at the tip of the nose and
applying highlighter onto the bridge of the nose.
Wide Nose:
∙ Do shading on the sides of a wide nose and highlight the bridge of the nose.
Hawk Nose:
∙ If your client has a hawk- nose then you must do shading on the hawk of the nose.
Apply highlighter on the bridge of the nose.
Snub Nose:
∙ For a snub nose (tip- tilted), it is important to do shading on the part where it is
tilted.
∙ Do highlighting on the upper part of your nose.
Sharp Nose:
∙ A sharp nose can be corrugated by doing shading on the bridge of the nose and by
applying highlighter at the sides of the nose.
49. Corrective Makeup on Different Jaw Lines
Description in Brief:
For a very strong jaw line you must do shading on your jaw line and highlighting
underneath.
For a weak jaw line that cannot be seen, you must highlight the jaw and do shading
underneath.
50. Corrective Makeup on Different Cheekbones
Description in Brief:
∙ When your cheekbones are not that visible, always remember to apply blush
underneath them and highlighter onto them.
∙ If your client has high cheekbones, then the blush must be applied onto the
cheekbones with the highlighter just underneath your cheekbones.
∙ If you want have your face appear narrower then the blush must be applied closer
to your nose.
∙ If you have a small face and wants to make it appear wider, then you must apply
the blush a bit further from your nose.
51. Corrective Makeup on Different Lip Shapes
Steps in brief:
Small Lips
∙ To make small lips appear bigger, apply the lip liner just outside your natural lip
line.
∙ Use light and glossy lipstick – this will create the illusion that your lips are fuller.
Fuller Lips
∙ To make fuller lips appear smaller, you must apply the lip liner on the inside of
your natural lip line. Use dark and matte lipstick – this will create the illusion that
your mouth is smaller.
52. Corrective Makeup on Different Forehead Shapes
Steps in brief:
High Forehead
∙ If your client has a high forehead then you must do shading all around the
hairline.
Small Forehead
∙ If your client has a small forehead then your must highlight all around her
hairline.
53. How to Give a Makeup Lesson
Description in brief:
∙ In a make-up lesson you will personally teach your client / clients how to apply
make-up for casual occasions, work and special occasions.
∙ You will also show your client how to go from day to evening makeup.
∙ Ask your client to bring her daily make-up along so that you can give advice on
the products that she is using. You will also teach your client what colors to use to
accentuate her best assets.
54. How to Apply Eye Shadow on Green Eyes
∙ The first thing that you must remember is to never match your eye shadow with
the colour of your eyes, unless you have grey eyes.
∙ Warm colours like brown, bronze, gold, peach, deep green, copper, medium pink
and apricot are excellent choices to play around. Also deep purple, plum, mauve
and lilacs bring out the green of your eyes.
∙ These colours are all on the opposite side of the colour wheel and they tend to
brighten the whites of your eyes, so you won’t go wrong when using any of these
colours.
∙ For highlighters, you can use taupe or light apricot or even light beige colours,
depending on the medium colour that you are going to apply in the fold of your
eye.
∙ Avoid using cool colours like blue, white, silver and pastels as this will give you a
washed out and weary look.
∙ When it comes to eyeliner, you can use brown, golden brown, deep purple, steel
grey or black for a very dramatic look. If your eyes are very small, then you can
use gold or white eyeliner pencil just to open them up.
∙ You can never go wrong with black mascara.
55. How to Apply Eye Shadow on Brown Eyes
Hello brown-eyed lady! You are very lucky, because you have a lot more options when it comes to eye shadow colours. Since the pigment of your eye is already dark, few colours will clash with it. You can use a variety of shades combined or on their own to make your eyes beautiful!
∙ Colours like blue, grey, plum, brown, gold, vanilla and different shades of violet
and purple all make your eyes more appealing. Opt for gold, brown, pink and
bronze to make your eyes look pretty.
∙ For day make-up, keep your make-up soft and lighter than the brown of your eyes
and for evening make-up, be brave and use bolder, darker colours.
∙ You also have the option to use lighter eye shadow colours such as champagne,
light pink, peach and taupe to make your eyes brighter and darker colours such as
grey and charcoal for that smoky effect.
∙ Apply black mascara in two coats to finish off your look.
56. How to Apply Eye Shadow on Blue Eyes
Ladies, consider yourself lucky if you are one of those fortunate ones with baby blue
eyes. Someone can get lost in them already, but just imagine what the correct eye shadow colour will do to make them pop.
∙ The best shades to use when you have blue eyes are brown, gold, peach,
chocolate, rust and shades of orange. One of the best shades to make those blue
eyes pop is especially a chocolate brown.
∙ You can even use shades of purple and plum together with grey or light lavender
shade and then just quickly adjust it by going darker if you are planning a night
out with friends.
∙ Again, do not use blue eye shadow on your eyes as this will only make your baby
blues dull.
∙ You can apply shimmering silver in the crease of your eye to enliven it a bit.
∙ If you want to apply eyeliner, you can use browns or bronzy colours during the
day and black in the evening.
∙ You also get to choose between brown or black mascara.
57. How to Apply Eye Shadow on Grey Eyes
If you have grey eyes, you must consider yourself very unique and this must be shown off.
∙ It is nice to know that when you have grey eyes, you can actually wear colours in
a darker variant than your eye colour such as deep grey, dark silver and black.
∙ The darker you go with your eye shadow, the more it will bring attention to your
natural eye colour and make it stand out. Even try out the smoky eye look as this
will look awesome with your grey eyes. This does not necessarily mean that it has
to be black; you can get a smoky look by using darker shades of purple as well.
∙ You can also use complimentary colours such as deep browns and purple for a
dramatic night time look. Have a look at eye shadow colours that work for blue
eyes as well as some of these colours, like pebble, pearl and bronze, work well for
both eye colours.
∙ Stick to dark brown or black eyeliners as this will give the eye more definition.
∙ The best choice for mascara will be black as this will keep your eyes well
defined.
58. How to Apply Makeup on Mature Women
Makeup Used in the Video:
∙ MAC Primer
∙ Liquid concealer
∙ Good coverage foundation
∙ MAC Loose or pressed translucent powder
∙ Brown or black eye shadow to fill in your eyebrows
∙ Cream or powder eye shadow
∙ Brown or black eyeliner
∙ Brown or black mascara
∙ Cream stick or powder blush
∙ Lipstick
Application:
∙ Your client’s face must be cleansed, toned and moisturised.
∙ Apply primer all over your face.
∙ Use a liquid concealer to cover any dark lines, wrinkles or pigmented areas.
∙ You can either dip your foundation sponge into water before applying your
foundation or you can just use a foundation brush to apply the foundation with.
Make sure that everything is blended in well.
∙ Dab the pressed or loose translucent powder all over your face.
∙ Fill in your eyebrows with an eye shadow colour that matches your natural hair
colour.
∙ Apply a light eye shadow colour over your entire eye area.
∙ Apply a medium colour eye shadow in the fold / crease of your eye and blend it
by making circular movements.
∙ Line your eyes with either brown or black eyeliner, but make sure you apply it all
the way at the top and bottom if you have big eyes or all the way on top and only
halfway at the bottom if your eyes are small.
∙ Apply 1-2 coats of mascara in zigzag movements.
∙ Use a rosy pink or peach colour blush on the apples of your cheeks to give you a
youthful glow.
∙ Apply a lipstick colour that is in the same colour scheme as the rest of your
makeup.
59. How to Cover Fine Lines and Wrinkles underneath Your
Eyes
Makeup Used in the Video:
∙ MAC Primer
∙ Liquid concealer that is 1-2 shades lighter than your skin colour.
∙ Concealer brush
Application:
∙ Make sure that your face is cleansed, toned and moisturised.
∙ Apply primer all over your face.
∙ Apply the liquid concealer all over your eye area as well as underneath your eyes.
∙ Take your concealer brush and gently stroke it over your eye as well as
underneath your eye.
∙ Repeat this one more time if the wrinkles are still visible after the first
application.
∙ Continue with your normal application of foundation and powder before applying
your eye shadow etc.
64. How to Apply Eye Shadow on Hooded Eyes
∙ Fill in your eyebrows with a colour similar to your hair colour and extend the line
to the outer part of your eye.
∙ Apply primer over your entire eye area. This will prevent the eye shadow from
creasing in the fold of your eye.
∙ Apply a bit of concealer over and underneath your eyes just to cover any dark
circles or fine lines. This will give your eyes already a more refreshed look.
∙ Apply foundation over your entire eye area and follow with translucent powder
just to set the foundation and to ensure that the eye shadow stick to your eyes.
∙ Apply a highlighting colour (cream, beige, white, ivory) from the inner corner of
your eyelid to the middle of your upper lid. Extend this colour even around the
inner corner of your eye just to brighten it up.
∙ Use a light shade eye shadow colour on the eyelid and going no further than the
crease of your eye.
∙ Apply a medium shade eye shadow from the outer corner of your eye, in a vshape
inwards and blend this colour over the crease area. Use a little bit of a
lifting-action at the edges just to give your eyes a bit of a lift.
∙ Run a white eyeliner pencil on the inner part of your eye area just to make it
bigger.
∙ Apply black eyeliner in a very thin line into your eyelashes just to line your eyes
and finish off the look by curling your eyelashes and then applying two coats of
mascara.
55. How to Remove Your Makeup
Steps in Brief:
1. Pour some eye make-up remover onto two cotton wool pads.
2. Hold these pads in your hands, folding each hand’s ring- and middle finger over the cotton wool.
3. Start at your eyebrows and work in three strokes downwards towards your eyelashes.
Place the cotton wool on the outside corner of your eyes and move gradually to the inside corner of your eye. Moving in an S- shape, go over your eyelid to the outside corner of your eyebrows and then again to the inside corner of your eyebrow.
4. Take a cotton bud and lightly dip it into some eye make-up remover. Gently rub/ roll it over your eyelashes in downwards movements. Also take the cotton bud and clean underneath your eyelashes.
The Art of Applying Makeup
Learning the correct techniques when applying makeup can help you look your best.
When you know what types of makeup to use and how to properly apply them, you can make sure your appearance is always at its best. In addition to learning how to apply makeup, you should also understand what types of products are best for your skin type and what colors are most flattering to your complexion.
Applying makeup, while using the correct techniques, does not have to be difficult or
frustrating. There are two very common mistakes that women make. They either use the wrong colors, or they apply too much. Using the wrong colors can make anyone look silly. Generally, choose colors that compliment your skin tone. If you have light skin, do not go with dark colors. Also, do not try to apply too much makeup. Apply just enough for a natural glow.
So let’s look at the basic steps needed to apply makeup correctly:
Apply Concealer
When you are ready to apply, consider using a concealer. Concealer can help you hide circles under your eyes, or flaws and blemishes on your skin. This can enhance the overall look of your face. Look for a concealer that is 1-2 shades lighter than your normal skin color / tone, especially if you want to hide dark circles underneath your eyes. Since the under eye- area is already dark, you want to tone it down so that it is more or less the same color as your skin tone. If you use a color similar to your skin tone, it will make the area darker and will appear funny after your foundation is applied. When you apply the concealer, do not stretch the skin. Use a small brush or cotton bud to apply concealer underneath the eye area as this will prevent the skin from stretching. Concealer comes in various forms such as in a stick, creams, bottles and powders
.
Apply Foundation
After you have covered your dark circles or blemishes you will be ready to apply
foundation. The types of foundation vary from one another. You get foundation that is suitable for those of you who want minimum coverage and this usually comes in a bottle with a little pump on top. Then you also get thicker foundation for those of you who want full coverage, due to age or bad acne skins, and this can be found in a bottle with a little pump on top or in a stick or in a powder form.
A very important thing to remember is that the foundation must be the exact same color as your skin color. Are you one of those people that blends the foundation deep into your neckline not for the simple reason of age spots? If your answer to this is yes, then the most probable reason for this is because the foundation that you are using, is not the correct color. Make sure you get professional help when choosing your foundation, before you end up spending a lot of money on unused make-up.
Not everyone uses foundation, but if you have uneven skin tone, pimples or freckles,
using foundation can enhance your appearance. When applying foundation, you can
either use a make-up sponge, a foundation brush or lastly your fingers (for those of you who don’t have a lot of time at hand). Generally, start applying from the centre of your face and work your way out. Make certain that the foundation is well blended around the edges of your face so that there is no visible line.
Apply Powder
The next step in the process of making yourself beautiful is to apply powder over your foundation. The best color to use is a translucent one which blends perfectly into your foundation. Take a powder puff, dip it into loose powder and dab the powder onto your face, applying each layer close to the previous one. You can either begin at your forehead and work your way downwards or you can begin from the left side of your face going all the way to the right side. Apply powder over your eyelids and lips as well to ensure that your eye shadow and lipstick stays on for longer. The last step is to take your powder brush and to brush off any excess powder from your face.
Apply Eye Shadow
The very first step in your eye make-up application is to fill in your eyebrows. Neaten
your eyebrows with an eyebrow comb and then use either an eye shadow color similar to your hair color or an eyebrow pencil. I prefer using an eye shadow color for a more natural look. Eye shadow itself can be fun to use if you want to experiment with different colors. Try a few shades until you find one that is flattering to you. When applying eye shadow, start at the outside corner of the eye, in the fold of your eye, and work your way inwards. The simple reason for this is because after dipping your eye shadow brush into the eye shadow, your eye shadow will be very dark at the first place of application. So, the color will become lighter as you work your way towards the inside corner of your eye and it’s easier to blend the darker color on the outside of your eye.
You can either use the applicator which the makeup comes with or use a small brush that will look like a flat paintbrush. Apply a lighter shade over your whole eye area. The medium color will be applied in the fold of your eye. Take your brush and blend these two colors together. You can even experiment with using several shades together as long as you blend the the colors together.
Apply Eyeliner and Mascara
Now you can apply eyeliner and mascara. When you apply eye makeup, always use clean and sterilised equipment. Do not apply eyeliner on the inside of the eyelid. Eyeliner comes in various shades and in pencil form or a liquid form. Pencil eyeliner is usually easier to apply than the liquid. For a dramatic make-up look, apply liquid eyeliner when you go out in the evenings.
Mascara also comes in several colors, mostly of which brown and black are the most
popular. If you have droopy eyelashes, consider using an eyelash curler before applying your mascara or if your eyes are a bit sensitive or you want to go for a swim, then it’s best to use waterproof mascara.
Apply Blush
After applying your eye shadow, the next obvious step is to apply blush. Blush also
comes in many colors and varieties. Powder blush is probably the most popular, followed by sticks or creams. Find a shade that compliments your skin tone. If you are applying the powder variety, use an angled makeup brush to apply the blush with. If you have no obvious cheekbones, then you can apply the blush underneath your natural cheekbone (you can feel it with your fingers).
For obvious cheekbones, apply the blush on top of your cheeks just to soften it up or for that all natural look, apply the blush on the apples of your cheeks. Begin applying the blush in line with your nose and going no further than the end of your eye. It is best to apply a thin straight line at first, then you can take your brush and make circular movements just to blend it in. Make sure the blush is well blended and that no streaks are visible. Remember that you only want that healthy glow.
Apply Lipstick
When you are done, you can apply your lipstick. As a general rule, do not go too bright if you have pale skin. Use a natural lip liner just to see where your lip line is and blend it in softly with a cotton bud. The best way to apply your lipstick is to use a lipstick brush.
This ensures just the right amount of lipstick on your lips and it is also more cost
effective when using it this way. You use less lipstick which resolves in you not having to buy lipstick all so often.
Very important about make-up: Make sure that you thoroughly remove all makeup before going to bed each night. Also, throw away old makeup when it is dry or cracked. Do not try to use old or expired makeup, especially around the eye area as this can cause eye infections. Try to keep your make-up application simple and remember that less is more when it comes to day make-up.
As you can see it is fun and easy to apply makeup. If you want to learn how to apply
makeup more professionally then it’s also good to join a makeup course. There are great makeup courses available on the internet. Being able to create stunning looks and feeling confident are the fruits you pick when you learn how to apply makeup correctly.
Foundation Facts
Everyone has their own natural beauty. And for centuries, ladies have been using makeup in some form or fashion to enhance that beauty. These days, the cosmetic industry is booming with a plethora of products from eyebrow pencils to lipsticks to eye shadows to foundation. It is foundation, or liquid makeup, that provides the base for most women’s beauty regiments.
Obviously, with the variety of ethnicity and skin types, all foundations are not created
equal. So how do you decide which foundation is right for you? First of all, you have to know where to buy your foundation. You can purchase your makeup from the grocery store or even a pharmacy. And while there are some great makeup buys at those stores like eye pencils and lipsticks, the best place to buy your foundation is a department store.
The makeup counters have experienced personnel who know about the various products that complement certain skin types as well as matching the skin tone and application techniques.
One of the first things you have to consider in regards to choosing the foundation that works best for you is your skin type. What condition is your skin in? Do you have dry or flaky skin? What about oily skin? Or maybe, your skin is a combination of the two. If you are a little unsure of what may describe your skin condition, ask for the opinion of the makeup consultant at the department store beauty counter.
After determining your skin type, you have to decide which foundation formula would
best suit your needs. If your skin is dry, hydrating or moisturizing foundation formulas
are great choices to provide a great base for you beauty regiment. Oil control or oil-free foundations work best for the oily skin. And if you are prone to breakouts, look for formulas that cater to acne-free and oil-free results. When you have combination skin, you need to find a foundation formula that would suit both oiliness and dryness.
When shopping for new foundation, make sure that you are not wearing any makeup.
Having a clean face will ensure that you can apply a few colors of foundation on your
face without it clashing with something else. Determining your skin tone is very helpful in choosing the best foundation as the basis for your makeup.
Fair skin might require a foundation with rosy undertones while a darker complexion
might need something more yellow-based in color. With the multitude of skin colors –
from the fair skin of Caucasians to the olive complexions of Latin descendants to the
darker undertones of African Americans or Middle East Asians, there are countless
shades to choose from.
Pick the two or three shades that you think might best suit your skin tone. Apply the
foundation shades at various places along your jaw line. Your skin in this area is the most true to the type of makeup color you need. Whatever you do, do not apply the makeup on your wrist or hand because these are not optimal areas to best determine the foundation’s tone and color. Because the lighting in the store is mostly fluorescent, you want to go outside in natural sunlight to look at how well the foundation blends in with your skin.
Your best selection would be the one foundation that is virtually undetectable on your
skin. You should be the one wearing your makeup, not the makeup wearing you.
The reason why buying your foundation at a department store is stressed is because no one person perfectly fits the standards colors you may find in a pharmacy or grocery store. For the most part, people are in between shades. The department stores offer higher end foundations that are possible to custom blend into the shade you require.
Another reason that department stores are optimal for your foundation purchase is
because the makeup consultants can give you tips on applying your foundation as well as suggest complementary products or alternatives that you may not have thought of like concealer or tinted sunscreen or moisturizer.
Be sure and think about what you want out of your foundation as well. Do you want light and natural or something that makes your skin more luminous for evening events? How about a satiny finish or matte finish? The possibilities are many, but your needs are few.
Decide what role your makeup will play in your daily life and activities and choose the best foundation that fits that role.
Makeup Brushes and Tools
Makeup Sponges
Many women might use their fingertips to apply their foundation. While there is no real problem with that, sponges are definitely more advantageous. First of all, if you are prone to breakouts, your fingertips might add that extra oil you skin really doesn’t need. Secondly, applying makeup with a sponge will give your face more even coverage than applying it with the fingertips. Plus, blending is easier and less noticeable with a sponge. Triangular shaped sponges work the best to get into the crevices of your face like around your eyes and along your nose. They are also great for blending foundation and other makeup along the jaw or hair lines without any noticeable makeup lines. Sponges can also be reused several times and even washed to prolong its usefulness.
Powder Brush
A thick, lush power brush is a necessity in your beauty palette of tools. Most face
powders come with a small applicator or powder puff. These devices do not adequately distribute the face powder on your face. The powder brush will help blend the powder and give you control on exactly where you want the powder applied.
Eyebrow Brush
Your eyebrows are like the window dressing to your eyes. When your eyebrows are not groomed properly, it is one of the first things people notice. Brushing your eyebrows into a certain shape can help you identify those errant hairs that need plucking. Also, an eyebrow brush can best distribute a little color to your brows in case you have to fill in any “bald” spots or enhance the brow color.
Eyelash Curler
This is a tool that is not in many women’s repertoire, yet it has the power to really make your eyes pop. The eyelash curler is especially helpful to ladies whose lashes don’t curl up very well. The trick is to briefly heat up the curler with a hair dryer, and then curl the ends of the lashes for several seconds. Once completed, you would follow up with an application of mascara to the lashes to maintain that curl.
Eye Shadow Sponge Applicator
Eye shadow can sometimes appear flaky upon application. The eye shadow sponge
applicator allows more control over gliding the makeup along your eyelids, thus reducing the chance of powder flakes from escaping. In addition, the use of a sponge applicator allows for easier color blending, especially if you are using a base color on the lower lid along with a highlighting color above it.
Foundation or Concealer Brush
Many makeup artists are now swearing by using a thick, densely packed brush to apply foundation. The reasoning is that it gives you a light application of makeup without looking “made up.” It is a great blending tool.
Concealer brushes are similar in scope, except have a smaller head for easier
manipulation for smaller areas. Even if you don’t wear foundation, you can use it to
apply a concealer for dark under eye circles, blemishes or other imperfections.
You can probably “get by” without these six makeup tools. However, when they are
available and you add them to your beauty regiment, you will notice a discernable
difference in your appearance after your makeup application. Makeup will look more
natural on your skin with no noticeable delineations. You will also find that you have cut down your prep time in your beauty routine. Some of these tools can be bought at the dollar store or a pharmacy. However, if you want your beauty tools to last, consider a trip to the department store makeup counter. Sure, these makeup tools will be more expensive, but remember – you are investing in your appearance! Aren’t you worth that investment?
When Beauty Products Go Bad
As a guideline to how long you should keep your makeup products, a water-based
foundation will last for up to one year and an oil-based one for a year and a half. If you find that your water-based foundation dries out before it is all gone (or has expired) all you need to do to revive it is to add a few drops of alcohol-free toner and then shake it a little to rid it of any lumps. Oil-based foundation on the other hand is likely to separate as opposed to dry out, so you will need to give it a shake sometimes to refresh the consistency.
Concealer (or cover stick) can be kept up to a year and face powder (pressed and
translucent although translucent usually stays fresh longer) up to two years. Blush can be kept up to six months and cream and gel cleansers, a year.
Eye liners can last up to a period of three years time and should be sharpened on a
regular basis for a smooth application and finish and to guarantee that no bacteria has had time to settle and take up residence on it. Eyeshadow can last up to three years as well, whereas mascara is the product that must be disposed of most readily. Get rid of your mascara after three or four months (regardless of whether the tube is finished or not). Mascara is the most likely to harbor bacteria which can make it bad news! And contrary to popular belief, there is no need to pump the mascara wand in and out before applying it, instead simply twist it slowly in a circle in the tube before opening it up to use.
Lip liner can last up to three years but there is a mixed opinion about lipstick. Some
cosmetic experts say lipsticks are good for a year or two while others say they are good for a period of up to three to four years. You will know that a lipstick has gone bad when it smells funny. If it does then don’t use it on your lips whatever you do, toss it out. In order to preserve the longevity of your lipstick, keep it in the refrigerator.
Nail polish can be a tricky one. If stored properly it can last up to two years (if you store it in the refrigerator it will last even longer). In some cases nail polish will only last one year. If you notice that the bottle of nail polish has separated, then shake it up a bit. If the colors and oils don’t meld back together and it smells odd then it is old and it is time to get rid of it.
There are other things to bear in mind about the ditching of makeup products. Learn to use your own discretion when it comes to deciding if a product is safe to use or if it
should be thrown out. Some products might be safe to use past the expiration date but this is not recommended. It is very easy for contaminants and bacteria to innocently find their way into makeup products (in particular eye makeup) no matter how hygienic you attempt to be. Always wash your makeup brushes every two to three months in warm soapy water, mild detergent or baby shampoo. Sponges should be washed every ten to fourteen days and then rinsed with cool water. Sponges should not be kept anymore than a month or two.
Six Important Tips in Makeup Removal
Removing makeup every day is a tricky process as you don’t want to pull or tug the
delicate skin around the eyes nor do you want to cause your skin to dry out by using a harsh cleanser and/or makeup remover. Let’s take a look at six important points to keep in mind when removing your makeup each night.
First of all baby shampoo is an excellent way to remove mascara that is resistant to other kinds of removers. Waterproof mascara can be one of the most difficult mascaras to remove as it is designed for staying power and a little bit of baby shampoo applied to a cotton ball or your finger tips should do the tricky nicely. Baby shampoos contain lower concentrations and softer detergents than other shampoos which makes them less irritating to the eye area.
Baby shampoo can also be used to remove makeup on the face but use a very small
amount as too much can be drying to the skin. Another option for the removal of
waterproof mascara is extra- virgin olive oil. Olive oil is very gentle to the skin and ideal to use in the eye area as it is a natural anti-oxidant and does not contain any harmful substances. All you need to do is apply a few drops to your fingertips, a tissue or a cotton ball, and while keeping your eyes closed massage the eyelashes in a gentle motion until all traces of the mascara are gone. Then use a mild soap or cleanser and water to clean up further.
The majority of cosmetics are oil-soluble which makes baby oil an excellent way to
remove all traces of eye makeup, blush, foundation, and concealer and so on. All that is needed is to apply a tiny bit of baby oil to a tissue and then gently wipe it all over your face until the makeup is all gone. After you finish there is no need to use soap of any kind, simply rinse your face with cool water and your skin should feel soft to the touch.
The fourth tip is one that can never be stressed enough- never ever go to bed with your makeup still on! Not only will you stain your pillowcase but also you will be contributing to the clogging of your pores that can lead to acne, breakouts, blotchiness and a host of other potential skin problems. No matter how tired you are, take the time to remove the day’s makeup and grime off of your face and let it breath and regenerate while you sleep!
The fifth tip is to always use a mild makeup remover- nothing harsh or drying to the
skin- and never use makeup remover that is specifically for your eyes on other parts of your face. This is particularly important if you suffer from oily skin as this can lead to break outs. Pay attention to what the label says as it specifies these things for a reason!
The sixth tip is to not remove your eye makeup with any kind of cleanser. Keep in mind that the eye area is very sensitive and delicate and you don’t want to injure it in any way or cause an allergic reaction to take place. Also some people are prone to oily eyelids and you don’t want to encourage an overabundance of oil in this area. If oily eyelids are not a problem you might to consider using petroleum jelly (such as Vaseline) to take off your eye makeup but remember to be gentle! Use a tissue or cotton ball to take off your eyeshade and a Q-tip to get rid of the eyeliner.
It’s best to always start by removing your eye makeup first. Always choose a facial
cleanser that is meant for your particular skin type and if possible purchase one that has been tested to both breakdown and remove makeup from the face. All cleansers are not designed for this purpose and some soap as well does not thoroughly remove makeup from the face. Go over your face gently more than once but be as precise as possible. Do the same thing when you rinse, rinse a number of times to remove all traces of both cosmetic and cleanser residue.
Lipliner
Lipliners help prevent lipstick moving beyond
the lip area (known as feathering or bleeding).
Select a shade that matches your lipstick.
Always sharpen a lipliner; then soften and
warm the tip on the back of your hand prior to
use. This way it will be much easier to create
an even line and not drag the skin.
Apply lipliner in short strokes. Start at the Cupid’s bow (middle upper lip) and work outwards along the lip’s edge.
Similarly, repeat on the lower lip, working from the center to the outer edges.
You can slightly change the color of a lipstick, by coloring the entire lip area with a lipliner of a different shade first.
Applying lipliner over the whole lip also helps lipstick last longer.
Lipstick
To avoid an uneven lipstick finish, prepare the lip area first. Rub the lips with a soft toothbrush to remove any dead
skin cells and then apply a lip balm. Otherwise, the color pigment will appear darker on the dry skin and look patchy.
Not hot!
Apply natural shades straight from the bullet,
or dab them on with your fingertip for a softer
effect.
For a more structured lip, apply lipstick to
lined lips using a small, synthetic eyeshadow
or concealer brush. These are wider than a
regular lip brush and quickly give the lips
a full-coverage finish.
To remove excess lipstick and soften the look,
pat your lips repeatedly with your fingertip at
the edges.
For a perfect party pout that lasts all night,
choose a matte-textured lipstick and drink
through a straw!
It’s time to pucker up, girls!
Soni says . . .
“Dark shades are the hardest to maintain and the
fastest to bleed, so take your time when applying
them. Often just working the color in with your
fingertip is easiest and looks great. Select matte
textures as they have more staying power.”
Want lips as smooth as silk?
Melanie loves . . . Crème de la Mer Lip Balm,
Elizabeth Arden Eight Hour Skin Protectant and
Lucas’ Papaw Ointment. Lather on these fab
products and literally kiss dry lips goodbye!
Intense
To create a dramatic, smoky eye, use a velvety, matte black eyeshadow. To begin, apply it to the upper lash line and work
it up into the crease, repeatedly patting on more product. Patting on the shadow, as opposed to blending, is necessary to
slowly build up the required intensity and depth of color. Follow the natural shape of the eye and work right along the socket
line from the outer edge inwards. Decide whether you want the shape more rounded or square at the outer corner and adjust
the edges accordingly. Blend the shadow along the lower lash line to the inner corner of the eye, and add a black kohl pencil
or matte black shadow to the inner rim if you wish. Further personalize your look by adding black glitter, or a highlight shadow
in dark metallic gray, to the center of the upper lid and/or inner corner of the eye. Finish with a lick of black mascara, top and
bottom, to open up the eyes, and complete the look with a nude lip and barely-there cheek.
Seductive
For a sultry eye, smear a cream-textured shadow over the upper eyelid and blend it back and forth with your fingertip.
The color should be more intense toward the outer edge of the socket and slightly winged. To create a sexy smolder
underneath the eye, use your fingertip to brush the product across your lower lashes. Then, apply a soft, waxy pencil to the
top and bottom lash lines to give definition, and blend. Curl your upper lashes and load them with mascara, paying particular
attention to the outer corners of the eye. For a distinctively sexy look, be slapdash and add a few individual falsies just for fun.
Defined
Eyeliner is center stage in this look, so it is all about precision. Cast aside your waxy, smudgy pencils, and bring out a liquid
eyeliner with a fine, inbuilt brush or tip, and/or a matte black shadow and an angled eyeliner brush. Mastering the application
of eyeliner requires a steady hand and plenty of practice, so have the makeup remover and a Q-tip (cotton bud) ready. If you
want to use both products, stipple the powder on first using the angled brush, and pat it along the top lash line ensuring
good penetration into the roots of the lashes. For extra definition and staying power, go over the powder line with liquid liner.
To create a feline effect, apply matte shadow, in pale yellow, beige or white, to the bottom inner cor ner of the eye. Then,
using a liquid liner or powder eyeshadow and brush, draw along the lower lash line, from the outer cor ner of the eye inward.
Just prior to reaching the inner corner, drop the line below the lashes and extend a fine, pointed wing beyond the innermost
corner of the eye, which fades into nothing.
Team heavily lined eyes with bold lips to create a sense of balance. Dark eyeliner is imperative for those with bulging eyelids,
as the depth of the color makes them appear less protruding. It also works well on almond-shaped eyes.
What you need . . .
c Pair of full-strip false eyelashes
c Duo surgical adhesive
c Plastic or disposable spatula
c Tweezers
c Small scissors
c Thin-handled makeup brush or
orange/cuticle stick
Before you start . . .
Apply your makeup as normal: foundation, concealer, powder, eyeshadow, eyeliner, mascara, brow powder,
blusher and lip gloss.
Launch your lashes
1. Squeeze a pea-sized amount of Duo surgical adhesive onto a plastic or disposable spatula. Leave it for a few minutes
to become tacky; this will help it adhere to the skin better.
2. Pick up a false eyelash strip at the middle with tweezers and measure it against your top lash line. If it is too long, you
will need to cut it to size using small scissors.
Makeup artist tip
False eyelash strips sometimes have short lashes at one end. This end should be placed at the inner corner of the eye,
leaving the longer lashes for the outer edge. So . . . when trimming the lash to fit your eye, cut from the end with the
longer-length lashes.
Soni says . . .
“Duo surgical adhesive is a water- and latex-based
product. It is perfect for adhering decorations to the
hair and skin, and an added bonus is that it washes
off easily.”
Soni says . . .
“At the end of the night, pull the false lash strips off from one end. If you re-use them, make sure you
remove any old adhesive first. Gummy eyes are boohoo, not woohoo!”
3. Once trimmed, hold the centre of the eyelash
strip with tweezers and apply Duo surgical
adhesive along the spine against the roots,
using the handle end of a thin makeup brush
or the tip of an orange/cuticle stick.
4. Still holding the false eyelash strip with tweezers, place it onto the middle of the top lash line and move it into position,
using your fingers. Press the spine right into the base of the natural lash line. The end with the shortest lashes should
be placed, more or less, where the natural lashes start at the inner corner of the eye.
Makeup artist tip
For perfect lashes apply the strip to closed eyes. This gives better access to the base of the lash line.
5. Make sure the false eyelash strip is securely in place against the roots of the natural lashes; there should not be a gap.
6. The visible adhesive will appear white initially, but will dry clear. Open your eye to ensure you haven’t glued your eyelids
together! If there are any strings of adhesive between the top and bottom lashes, break them gently with tweezers.
7. Repeat these steps for both eyes. When the adhesive is dry, apply a final coat of mascara to help blend your old and
new lashes, and then flutter, baby, flutter!
Never plucked before?
Take a close look in the mirror. You should be able to see the natural contour that you should follow. If you are lucky, you may
just have a few outlying brow hairs to remove to achieve a perfect brow line.
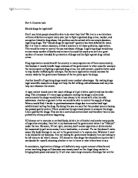
Where should brows start and finish?
See Figure A.
Starting point
Hold a pencil vertically against the side of your nose; when it reaches brow
level (above the inner corner of your eye), this is where your brow should start.
Figure B(3) illustrates a brow which starts in the wrong place.
Finishing line
Hold the pencil on a diagonal from the nostril to the outer corner of your eye;
when it reaches brow level, this is where your brow should finish.
Scared or struggling?
Seek the services of an eyebrow specialist. They will create the best shape for
you, and then you can maintain it at home by simply tweezing the regrowth.
Mad plucker?
If you are a tweezing addict and have over-plucked in the past, the best move is to grow your brows back and start over. Go
on, get growing!
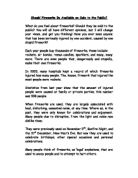
Time for a tidy-up?
Before
Make sure the skin around the eyebrows is clean before you begin.
During
Always start shaping the brows from the bottom. Remove stray hairs from underneath by plucking quickly, as close to the
root as possible and in the direction of hair growth. Start at the thicker end of the brow (nearest the nose) and work outwards.
Finally, take away any noticeable stray hairs from the top.
After
Post-plucking redness is common but will disappear after about 10 to 15 minutes. Always use cleansing water, or toner
on a cotton pad, to cleanse and soothe the skin in the brow area.
Pluck it!
Soni says . . .
“Any artist will tell you that a bad frame can ruin a masterpiece. The same applies when it comes
to the eyes. Overgrown, unkempt and unruly brows make poor frames for the eyes, whereas those
which are well groomed, structured, and defined in shape enhance them.”
Beauty Secrets Exposed, Series 1, Part 3
Figure A How to determine where brows
should begin and end.
Makeup artist tip
Less is more with brow plucking. Tweeze slowly and with caution. Glance from brow to brow regularly to ensure they are
as symmetrical as possible. Don’t pluck too heavily, because if you have to grow your brows back it seems to take forever.
Makeup artist tip
Does the pain drive you insane? Pull the skin taut when plucking. If it is still painful, try a numbing product on the area
before you begin.
Makeup artist tip
If you are right-handed, start by tweezing the left brow first because this side will be more difficult to do. Once the left brow
is complete, mimic it on the right side.
Eyebrows not identical?
This is normal. As long as your eyebrows are similar in shape it’s fine—so don’t panic if one of your eyebrows has a scar
through it, has sparser hair growth, or arches slightly more than the other.
Sparse or short brows?
Fill or elongate them with an eyebrow pencil. Warm it on the back of your hand first and then use short, upward strokes
to fill any gaps or add length. Otherwise, for more sweeping definition, lightly apply brow powder in an outward direction
with a small, angled brush. Opt for a color that is one shade lighter than your brows and build it up for a natural finish.
Wild brows?
Groom the brows by brushing them upwards with a brow brush; then, hold them in place with brow gel or wax.