Resistance is responsible for the current that flows – high resistance produces a low current and low resistance a high current. Resistance is often evident as the conversion of electrical energy to heat. I might expect the wire to get hot to show that there is resistance.
RESISTIVITY is a property of a conductor that tells you how hard it is to push current through it. Resistivity is independent of the dimensions or shape of the material.
Relationship between resistance, resistivity, length of wire and its x-sectional area is:
Resistance = Resistivity x length
x-sectional area
Therefore, to find the resistivity of a wire, you need to know its resistance and the dimensions of the wire.
Variables
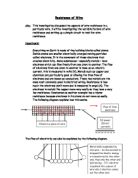
PREDICTION
- Double the length of wire and the resistance will double. (The length is directly proportional to the resistance.)
Length of wire α resistance
METHOD
Equipment
Power pack (to provide varied voltage)
Voltmeter
Ammeter
Copper wire
Plastic coated wires
Croc clips
Wire cutters
Ruler
Controlled variables: Room temp
Resistivity (type of metal)
x-sectional area
Procedure
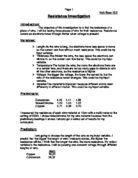
- Set up equipment as shown; begin with copper wire length 100cm.
- Turn on power pack and set it so that the voltmeter reads 0.1volts.
- Record current shown by ammeter.
- Increase voltage to 0.2volts, 0.3volts, 0.4volts and 0.5volts. (This is because when the resistance is calculated [=V/I] there will be 5 readings recorded and it will be possible to take an average resistance.)
- Repeat steps 1-4, varying wire length in intervals of 10cm.
Fair Test
Ensure all control variables are kept constant.
Measure length of wire accurately each time.
Record current readings neatly to avoid miscopying when writing up experiment.
Risk assessment
Take care if the wire gets hot due to the transfer of electrical energy into heat energy.
Do not get the power pack or the wires wet.
Be careful when cutting the wire.
Make sure the mains to the power supply is switched off when removing the wire from the circuit to be measured.
Results
Obtaining Evidence
The results table above shows that I tried to take voltage and current measurements as precisely as possible by taking five different current readings from five similar low voltages which enabled me to take an average resistance from five different resistance readings per length of wire.
All of the measurements taken are relevant to the experiment, as it is necessary to record the voltage and the current across a resistor in order to calculate its resistance, given
Resistance = Voltage
Current