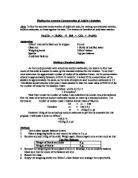
Diagram
The diagram below shows how equipment should be set-up while conducting a titration.
Titration Basics
Titration is basically a general class of experiment where a known property of one particular solution is used to infer an unknown property of another substance. Since this experiment involves acid/base chemistry, than I can use this technique to find out how much acid there is present in a solution.
I already know that this investigation is going to involve using a strong acid and a weak alkali. A strong acid is an acid, which is completely ionized in an aqueous solution; in other words an acid, which is capable of producing 1 or more protons for every acid molecule originally present. Basically I have to find out the unknown concentration of sulphuric acid. Even though this sounds like a simply titration, actually it is not, because a normal titration involves 2 liquids; however sodium carbonate is a solid.
As I already mentioned sulphuric acid is a strong acid, which reacts with weak base, therefore the new solution if acidic (pH<7).
Once I know the average of 3 results, I should be able to work out the number of moles present in solution, hence the concentration of acid.
Collision Theory
The end-point of a titration corresponds to the position where the acidic H+ ions and basic OH- ions are in equal concentrations. This reaction causes water molecules to form a small number of acidic/basic ions remaining in the solution. This is represented the equation below:
H+(aq) + OH-(aq) → H2O(l)
By adding more acid/basic ions, the solution will eventually become more acidic/basic and this is why indicator will change its colour, to identify the end point of a titration.
Firstly the acid solution should contain san excess amount of H+(aq). At some point these ions should disperse randomly through out the possible solution. If basic OH(aq) ions are added to the solution, they will travel through the solution, until they meet a H+(aq) ion.
During a successful collision they will interact, causing possible formation of covalent bonds and production of water molecules. There is very little tendency for this particular type of molecule to dissociate into ions again, which means that the concentration of H+(aq) ions present in water is 10-7mol dm-3.
On normal basis this neutralisation process is repeated over and over again, until the remaining number of ions present in solution is very low; even though the solution stays quite acidic anyway. This occurs because a solution with pH of 1.0 for instance has a H+(aq) concentration of 0.1mol dm-3.
Towards the end of neutralisation, the concentration should approach 0.00001mol dm-3 (equivalent of pH 4). Considering that the entire solution has a low number of H+(aq), it is very important to swirl solution constantly, so that more successful collisions can occur. Water molecules can not form unless these molecules collide.
Right at the end of the reaction the indicator should demonstrate neutralisation clearly, because on addition of an extra drop of basic solution the colour change should be instant. At this point 2 ions mat take longer to collide into each other in the solution.
At the end point there should be few H+ ions remaining, so there will be little chance of basic OH-(aq) being neutralised at any given time. This enables the concentration of OH-(aq) to increase, causing pH to change rapidly. This fast response is pH denotes the change in indicator’s colour. In the case of sulphuric acid, there should be two H+(aq) ions present initially. These ions are produced from each single molecule of an acid, but soon they will be neutralised whilst meeting a basic OH-(aq) molecules.
Bronsted-Lowry
This definition relates to acid’s ability of donating protons to another compound, a base. Since base is a proton acceptor, than there is a competition present between 2 bases for a proton, so if X and Y are two specific species, than the equilibrium can be denoted by this equation:
HX + Y- ↔ HY + X-
Both HX and HY are Bronsted-Lowry acids, similarly X- and Y- are Bronsted-Lowry bases.
If reacting runs mostly to the left than HY is considered to be a stronger acid, while X- is the strongest base.
On the other hand in the reaction runs to the right, than HX is the stronger acid and Y- is the stronger base.
Under normal circumstances the stronger of two acids is the one, which reacts more completely with a common base. Furthermore HX is called a conjugate acid, because X- is a conjugate base of HX. Some compounds such as water can act as an acid or a base therefore it is said to be amphoteric.
Chemical Indicators
A chemical indicator is a compound, which is capable of changing colour to indicate that the end-point of a titration has been reached. The colour change occurs, because the indicator is affected by the concentration of ions in a solution.
Methyl Orange
Methyl orange is a pH indicator, which is going to be used in this titration coursework. The reason behind using this type of indicator is that it provides a clear colour change. Since it is usually involved in titrations between strong acids and weak basis, than it should be ideal for this particular piece of coursework. Even though methyl orange does not have a full spectrum of colour change, compared to universal indicator for example, it provides a clearer end-point.
Usually when a solution turns less acidic, turns from red > orange > yellow. Reverse effect occurs when solution increases in acidity. Furthermore the entire colour change only occurs in acidic conditions.
Titration Curves
Titrations can be recorded on titration curves, whose main compositions are almost always identical. The independent variable is considered to be the volume of a particular titrant, while pH of the solution is considered to be the dependent value. Below is a picture of a typical titration curve:
The point at which all of the starting solution, usually an acid has been neutralised by a titrant is called an equivalence point. This point can be calculated by searching for a second derivative and than computing a point of inflexion.
Sulphuric acid is said to be a polyprotic acids, because there is more than 1 acidic hydrogen present. This means that while titrating a polyprotic acid, the graph should show a sudden rise or an end-point for each of the protons in the acid. Therefore two protons will have tow corresponding end-points. The quality of the shape of the graph will gradually start to deteriorate for each successive point being present; so the first end-point is extremely obvious, while end-point number 2 is not as well defined, the same pattern is repeated for any further end-point.
Buffer Solution
These are solutions which are capable of resisting change in hydronium ion concentration (pH of a solution in other words) upon a minor addition of acid/base during a dilution process.
Results Reliability
There were few errors observed whilst conducting the experiment. First of all I noticed that while pouring the alkali solution into the volumetric flask, some residue of sodium carbonate remained behind. This was than washed out with non-ionised water into the flask and once the meniscus line has been reached, no more sodium carbonate could have been poured in, this still leaving some residue in the beaker. This would have had some sort of effect on the accuracy of the results.
Also I noticed that during my second and fourth titration, the size of the methyl drops added to the solution appeared to be twice the size compared to normal ones and this might have contributed to a smaller amount of acid being needed to neutralise sodium carbonate. Even though I tried to refill the pipette 3 times in order to cancel out previous marginal error, it was not always possible to exclude the air-pocket, which prevented a correct amount of methyl orange being sucked up.
I think that overall all measurements were quite precise and accurate, since I maintained a careful check on all of the equipment through out each titration. Also I ensured that precisely 2.65g of anhydrous sodium carbonate was used.
In addition whilst using graduated volumetric flask to add distilled water, I used a pipette once I got close to the graduation point (approximately 2cm away from the graduation point), as it is easier to do this, instead of pouring water in drop by drop.
I ensured that none parallax errors occurred through out the experiment by positioning myself, so that my eyes were level with the graduation mark and observing carefully until the bottom of the meniscus was horizontal to the graduation mark.
To make sure that no deposits of sodium carbonate remained in the conical flask, I washed out the contents using wash bottle filled with distilled water and than transferred solution into graduated volumetric flask.
Buffer Solutions
Since I am conducting a titration which involves a strong acid and weak base, than solution has to begin with a basic pH. As more acid is gradually added, a buffer solution should form, but pH should not change until all of the acid has reacted with weak base. When this happens, an equivalence point should be in the acid range.
Accuracy of Results
One of the most important things which I have to take into account is the actual reliability of results. For instance I might have made some mistakes while measuring the amount of sulphuric acid. Similarly I could have made some parallax errors while reading off the values from the scale.
In addition some technical mistakes might have been made while producing sodium carbonate, for instance some of the initial anhydrous sodium carbonate might not have been mixed fully with 250ml of water and a small portion of solid particles might have remained behind. Of course not all errors can be accounted as being human, because air pressure, room temperature, etc might have played a minor part on the outcome of the experiment.
Results
As it can be seen from results above the average titre for this specific titration appears to be 21.1475cm3. This means that in order to work out the accurate sulphuric acid concentration I will have to work out the concentration of a standard solution.
Concentration =
No. of moles =
No. of moles =
Titration equation: H2SO4(aq) + Na2CO3(aq) → Na2SO4(aq) + H2O(l) + CO2(g)
The above equation shows that the actual ratio of sulphuric acid: sodium carbonate is 1: 1. This means that both sodium carbonate and sulphuric acid solutions have the same concentration of 0.1M. This is why only 1 mole of sodium carbonate solution is required to neutralise 1 mole of sulphuric acid.
As I already pointed out only 1 mole of sulphuric acid reacts with 1 mole of sodium carbonate, so this means that 0.0025 moles of sulphuric acid reacted with 0.0025 moles of sodium carbonate, as it can been seen from the above equation.
So far I have worked out the number of moles of acid used and the precise volume of an average titre and this means that I am ready to work out the specific concentration of the sulphuric acid.
As I already mentioned, concentration of acid =
Sulphuric acid concentration =
Concentration is sulphuric acid is therefore 0.1184mol dm-3
I have now calculated the concentration of sulphuric acid that is required to neutralise 25cm3 of sodium carbonate solution. 0.1184mol dm-3 of 21.1475 is the concentration of sulphuric acid needed to neutralise 25cm3 of 0.1mol dm3 concentration of sodium carbonate solution.
This result shows the concentration of sulphuric acid which has to be present to neutralise 25cm3 of sodium carbonate solution is shown by all the calculations that I worked out previously.
Percentage Error
I already know that the concentration of sulphuric acid lies somewhere in-between 0.05 and 0.15mol dm-3, therefore I decided to take an average of these 2 values to find out the possible true percentage.
Also it is possible to work out possible mass percentage error, for sodium carbonate.
Percentage error =
Sodium carbonate percentage error =
Volumetric flask percentage error =
Volume of distilled water percentage error =
Average titre percentage error =
Pipette percentage error =
Now that I have worked out each margin error, I should be able to add all previous values to achieve a percentage total.
Total error = 0.19 + 0.080 + 0.2 + 0.1182 + 0.2 = 0.7882%
The above value denotes that my overall experiment should be 99.2118% accurate.
As I can be seen from the above working out, the majority of percentage errors appear to be quite low. These percentage errors are reflected in the accuracy of the equipment used.
Particular attention was paid to calibration and measurements through out titration and this is why percentage errors are so marginal.
Furthermore by making sure that the solution of sodium carbonate in the volumetric flask was exactly 250cm3 I had extra amount of solution available to me, in case I missed the end-point and had to repeat the titration from the beginning. This also ensured that there was sufficient amount of solution present to repeat titrations and so that average titre value could be worked out.
In addition to make sure that the entire mass of sodium carbonate was transferred into the volumetric flask, I rinsed the glass rod, funnel and conical flask 3 times using non-ionised water.
Washing out the burette, pipette and volumetric flask with solutions they are supposed to contain before the initiating the primary titration eliminates a lot of error, as by doing this it is possible to wash out the previous remains of the substances present in the equipment.
The conical flask was rinsed out with non-ionised water in between each titration, because any remains from the previous experiment had to be got rid off, otherwise the concentration of new solution might have been contaminated by the previous one.
I also made sure that all readings of menisci were taken at eye-level, in order to avoid any possible parallax error.
As I previously stated sulphuric acid is a strong base while sodium carbonate is a weak acid. This means that the most suitable indicator to use was methyl orange. Even though the colour change was quite obvious during each titration, it was almost impossible to tell the exact amount acid which has to be used to make sure that the colour change was 100% correct.
Possible Experimental Errors
The percentage errors discussed on the previous page might have occurred due to the following reasons:
- The glassware that I used for the titrations might not have been cleaned out thoroughly enough resulting in some chemical impurities remaining behind which could have made a difference to the final outcome of the experiment.
- While recording the reading of the burette I might have misread the value or not have taken the reading from the bottom of the meniscus, therefore recording an inaccurate result.
- The actual sodium carbonate solution made up in the volumetric flask might have been not shaken well enough, resulting in uneven particle dispersion through out the solution.
- While pouring 25cm3 of sodium carbonate solution into the conical flask, few drops might have remained behind, resulting in different amount of sodium carbonate being used for each titration.
- Since burette tap is maintained by hand, the number of drops probably varied from experiment to experiment.
- I think that even though solution of sulphuric acid is homogenous, the concentration of ions present in the neck of the flask might have been different to the once at the bottom for instance.
Possible Changes to the Experiment
In this section of the coursework I am going to discuss varies which relate to improving the overall experiment.
Make sure all equipment is cleaned thoroughly prior to the start of the titration.
Whilst transferring sodium carbonate solid to the beaker, all visible particles are transferred and none are left behind. This will allow exactly 2.65g of sodium carbonate to be conveyed precisely.
Also it is very important to check that before each titration is conducted, the burette is placed at eye-level and sulphuric acid does not exceed the graduation mark. The bottom of the meniscus should always touch the line for accurate results. While filling up the burette it is essential to remove the burette and at the same time allow few drops left in the funnel to drip into the burette. (This can be achieved by touching the wall of the burette lightly and dragging the funnel slightly upwards.
Place a white tile underneath the conical flask, so you can see clearly the sudden colour change.
Before attempting to use the burette, make sure you familiarize yourself with tap control. Practise adjusting it ever so slightly when a single drop of solution is required.
As you come close to the point of neutralisation attempt to turn the tap ever so slightly and add 1 drop at a time, otherwise by adding too much solution you will end up ruining the experiment.
It is extremely important to swirl the conical flask consistently once a single drop of solution, because if not swirled well the solution will not show any change in colour.
It is advised to use the same sodium carbonate solution through out each titration, since a new solution batch might seriously alter the results.
Before starting a new titration make sure that all the equipment is properly washed out.
Although you can use an ordinary beaker for titrations, it might be a better idea to use a volumetric flask instead, because its shape makes it easier to swirl contents around and prevents any spillages at the same time.
Instead of using pH indicator it might be better to use pH meter instead, since the neutralisation point can be clearly seen this way. This eliminates almost all-human error and prevents too much sulphuric acid being added.
Another important point, which I think I should mention, is to practise different experimental techniques before actually performing the real titration. This way you should get a “feel” for the equipment and how it should be used. Especially practise reading off the values as accurately as possible and controlling the flow of sulphuric acid into the flask containing sodium carbonate solution.
Further Improvements
Obviously using high-end computer equipment would have reduced any possible errors dramatically, since all human error would have been eliminated. On the other hand I can say that there are some drawbacks present even with such sophisticated equipment, because first of all I would have to learn how to program the machinery specifically for this titration. Secondly I would have to understand how majority of equipment works, before I could actually use it in any way.
Another point of finding out an exact point of neutralisation is by using a pH probe, which can be directly connected to a computer.
Also being such equipment would not have being realistic considering the school budget.
I think one of the main problems with this piece of coursework is the fact that you have estimate/judge by eye approximate colour change and neutralisation point.
Due to the fact that this was my first ever titration that I did from scratch, I was not sure of the best possible way to describe the actual outcome of the titration and therefore I excluded prediction from this write up. Obviously any other experiment, excluding titrations has to have some sort of prediction section which relates to the possible outcome and results, but since all I have to find out in this piece of coursework is a titration of a solution.
Even though I was given methyl orange is a choice of indicator I think that practically any indicator could have been used. For instance green methyl orange would have provided with significantly clear end-point compared to ordinary methyl orange, so instead of solution turning from red to orange, it would have turned to green instead.
References
Burton.G, Holman.J, Lazonby.J, Pilling.Gwen, Waddington.D., Salters Advanced Chemistry., Chemical Ideas., Measuring amounts of substance,1-12.
Chemical Ideas., Atomic Structure, 16-27.
Chemical Story Lines, Amount of a
OCR SALTERS CHEMISTRY COURSEWORK
Contents
Acid Base Titrations 1
Sodium Carbonate Solution 1
Titration Theory 1
Sodium Carbonate 2
Sulphuric Acid 2
Safety Precautions 2
Prediction 3
Apparatus List 3
Method 3
Diagram 5
Titration Basis 5
Collision Theory 6
Bronsted-Lowry 6
Chemical Indicators 7
Methyl Orange 7
Titration Curves 7
Buffer Solutions 8
Results Reliability 8
Buffer Solutions 8
Accuracy of Results 9
Results 9
Percentage Error 10
Possible Experimental Errors 12
Possible Changes to the Experiment 12
Further Improvements 13