For this experiment I will need: 1m of wire (30sgg Constantan)
1 Ohmmeter
2 Crocodile Clips
2 Wires (for attachment of crocodile clips)
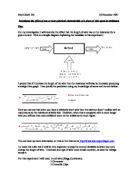
Diagram:
Method: Take the 2 short wires and place one end into the ohmmeter and to the other, attach the crocodile clips. Complete the circuit by placing the length of wire you will be testing (I am using a range from 0cm-100cm in 10cm intervals) in between the crocodile clips. Record your results in a table
NB: Although only small amounts of current are involved there is a small chance that the copper wire will get hot over prolonged use. In the interests of safety it is suggested that you turn off the power when the apparatus is not being used (for example you sit down for a rest).
Result Gathering
Analysis
As the results produced a strait line graph through the origin I can conclude that the length of wire is directly proportional to the resistance given. This exactly matched my prediction given in the planning section. From the results we can notice certain trends about the rate at which the resistance increases. As the wire is increased by a further 10cm the resistance increases by approximately 0.4Ω. We can also see that the resistance at 0cm was 0.1Ω, which doesn’t make sense because at 0cm you will get no resistance, so we can conclude that the resistance of the connecting wires and crocodile clips is 0.1Ω so to find the real resistance we must subtract 0.1 from each reading. This would make the first point 0.6Ω so we can use this to find the resistance of any length of wire by calculating the resistance at 1cm and multiplying this by x (x being the resistance you wish to calculate). So the resistance at 1cm is equal to 0.6/10 which is 0.06 then multiplying by x giving the formula 0.06x.
Evaluation
Although my results seemed very accurate I did get one anomaly on the graph, however, it was very small and therefore more insignificant but instead of producing an increase of around 0.4Ω it increased by 0.6 at 10cm making this point fall slightly further from the line of best fit than the others. The multimeter not being capable of reading resistance to more than 1 decimal place probably caused this. It would have been much better to have had the readings much more accurate and this probably happened when I was conducting the experiment the wire kept bending into awkward positions and made measuring out a certain length more difficult. However, it is important to remember that my results, no matter how accurate, would only work for the thickness and type of wire I was using (see plan section of investigation). All this considered there are a few important factors to consider when dealing with the accuracy of the experiment. Firstly, the wire had small kinks in it that may have increased the resistance. Secondly, contact resistance may have affected the experiment (this is where dirt particles may have formed on the crocodile clips and made it harder to push current through the wire. Thirdly, the cross-section of the wire would not have remained constant and finally, as I took my readings over two days, the temperature may have affected my readings.
There are a number of variables that could have been experimented on that I may be able to do as extension work. Below is a full description of the experiments involved.
Thickness of wire: This experiment would have the same method as the length investigation but instead of length being the input variable we would use thickness.
Cross Section: Connect the multimeter to the wire using connecting wires and crocodile clips and keep everything constant apart from the wire that should be replaced by wires with varying cross-sectional areas.
Temperature: Possibly the most complicated experiment. Here you should fill a beaker with water and apply heat from a Bunsen burner. Place the wire into the water and using a thermometer remove the wire when it reaches a given temperature, dry the wire then repeat experiment as before.