Explanation for the steps
- The heat-proof mat prevents damage to the tables by not conducting the heat through to the table. If the Bunsen burner wasn’t in the centre then there may be a possibility that it will get knocked over and damage other equipment and people.
- The gauze spreads out the heat evenly across the bottom of the evaporating basin and also protects it from being damaged by the open flame. This is important since we don’t want to damage any equipment.
- When the nozzle is fully closed, less oxygen is able to get in and therefore combust. This means that the resulting flame will not be very hot. Also, it’s luminous, which means it gives out light. This is important since we need to be sure that there is a flame and it’s much easier and safer too if you can actually see the flame, since other dark blue flames can easily blend into the background, making it unclear.
- Now the nozzle can let more oxygen in, the flame will be hotter and a different colour, dark blue. The evaporating process can take place now, since the flame can give out more heat. Because the flame is so hot, it would be very dangerous to put your finger through it.
- The large measuring cylinder is useful for measuring the volume of larger amounts of liquids. However, this comes with less accuracy, since the readings are closer than they would be in a smaller measuring cylinder.
- The evaporating basin should be clear of any liquid from previous experiments by now since it has been heated for a couple of minutes in blue flame. The evaporation process takes place when the liquid molecules gain enough kinetic energy to overcome intermolecular forces (forces between molecules).
- When there is nothing on the scales, it should display ‘0.00g’. If it doesn’t, then the readings would be wrong because after putting an object on the scales, it would display the mass of the object and the mass of something that isn’t there. This is why it’s important to calibrate it by making sure it displays ‘0.00g’ when there is nothing on the scales.
- Only pick up the evaporating basin from the tripod after it has sufficiently cooled for handling. This is because it may be too hot to handle and you may be forced to drop it while you’re transferring it to the scales. Also, by dropping it, you risk damage to the equipment.
-
We decided on 20cm3 to be the volume we use to sample both of the samples. When putting 20cm3 into the measuring cylinder, we used a pipette to have more control over the amount of liquid we were putting into the cylinder.
-
You need to pour the 20cm3 of water in the evaporating basin so you can find out the mass of the water. This can be done by subtracting the mass of the evaporating basin from the mass of the evaporating basin and the mass of the water together.
- We need to get rid of the water so all that’s left is the mystery solid. Therefore, we need to put the evaporating basin (now containing the sample of water) back onto the gauze.
- Evaporation takes places and the water escapes the evaporating basin by turning from liquid to gas. The white ring inside the evaporating basin is the mystery substance we’re looking for.
- You need to let the evaporating basin cool otherwise you could burn yourself.
- The desiccator protects chemicals from the humidity in the atmosphere. It reduces the amount of moisture in the chemicals and dries them out. It is important that we desiccate because we need to make sure all we have got rid of all of the water; otherwise our results wouldn’t be valid. We weighed the evaporating basin containing the mystery solid just in case we didn’t have time to desiccate it or measure its mass after desiccating. The results would’ve been invalid, since it would’ve still contained some water, but it would’ve been better to have something than nothing.
- When we weigh the evaporating basin containing the mystery solid and no water, we can work out the mass of the solid and therefore the concentration of the solid dissolved in the liquid.
- To find out the concentration in grams per cubic decimetre use the formula
- To ensure validity, do everything (like heating the liquid for the same amount of time) as you did for the first sample otherwise the results may not be accurate, and accuracy is important for valid results.
Results and calculations
Sample A
Total volume of sample A = 256cm3
Volume of the sample of sample A used = 20cm3
- Mass of empty evaporating basin = 55.63g
- Mass of empty evaporating basin + sample = 75.43g
Mass of sample = ❷ - ❶ = 19.80g
- Mass of empty evaporating basin + solid left over before desiccating = 55.63g
Mass of solid left over before desiccating = ❸ - ❶ = 0.00g
after desiccating = ❹ - ❶ = N/A
Sample B
Total volume of sample B = 227cm3
Volume of the sample of sample B used = 20cm3
- Mass of empty evaporating basin = 40.77g
- Mass of empty evaporating basin + sample = 60.98g
Mass of sample = ❷ - ❶ = 20.21g
- Mass of empty evaporating basin + solid left over before desiccating = 42.65g
- after desiccating = 42.42g
Mass of solid left over before desiccating = ❸ - ❶ = 1.88g
after desiccating = ❹ - ❶ = 1.65g
Apparatus diagrams
Reliability in stage 1
Our experiment was quite reliable. There were not many things that could go wrong. However, when we tested sample A I don’t think our experiment was reliable, since there was absolutely no solid whatsoever left in the evaporating basin after evaporating. Unfortunately, we didn’t compare our results for sample A with other people’s results. Also, the large measuring cylinders don’t provide an accurate reading for volumes that are small like 20cm3.
How reliability could’ve been improved in stage 1
If we could do the experiment again, I think that we’d have different results for sample A; and this time there probably would be some solid left over after evaporating. We should have checked with other people to see whether they had no solid left over as well. If we had a small measuring cylinder to measure out 20cm3 of sample I think our accuracy would’ve greatly improved.
Validity in stage 1
I think our experiment was quite valid, as we tried to keep it as fair as possible. We used the same amount (according to the large measuring cylinder) of sample of liquid for both times we did the test, and we heated the samples for roughly the same amount of time. However, there must’ve been a major flaw in our attempts to conduct a fair test. This is because the mass of the sample of water (20cm3) was 19.8g; and after heating the results indicated that there was no solid left over and the water had all evaporated. As we know, 1000cm3 of water = 1000g. So that means that in theory, if there was no solid (just water), the sample of water (20cm3) should’ve weighed 20g, but it didn’t. This shows that there was something else in there, or that when measuring 20cm3 of water out there was a mistake and we accidently measured out 19.8cm3 instead. I think that this was what probably happened, since it sounds like the most realistic reason.
How validity could’ve been improved in stage 1
I would like to have used a smaller measuring cylinder for measuring out a small volume such as 20cm3. The accuracy would be far greater when measuring with a smaller measuring cylinder because the readings are spaced out and the ‘cylinder’ is quite narrow. I would also have like to only heat the evaporating basin for a certain period of time, taking the guesswork out, since the solid was white and so was the evaporating basin. This makes it difficult to see whether all of the water has evaporated, as we can’t take a closer look otherwise we might burn ourselves.
Stage 2 - cations
After we had separated the solid from the water, we had to find out what the solids were. In order to do that, we had to carry out a series of tests. To save time and effort, we didn’t have to extract the solid from the evaporating basin. Instead, we were given the two substances. This made it easier for us because it gave us more time to do the tests, since there were a lot. The first test we decided to do was the flame test. This test is for the detection of cations. The flame test works by holding the substance in a flame and noting down the colour of the flame produced. This works when the energy from the flame causes electrons to move onto the next shell of energy (which is around the nucleus of the atom) and when the electrons return to their ground state (lowest energy state) they release energy. In the case of metal cations, this energy is visible to the human eye as these characteristic colours.
Apparatus
- Substance(s) to be tested
- Bunsen burner
- Heat-proof mat
- Nichrome wire loop
- Beaker
- Hydrochloric acid (HCl)
Method
- Place the heat-proof mat on the table and the Bunsen burner of top of it. Plug the Bunsen burner into one of the gas taps using the flexible rubber tube.
- Get a splint and light it from someone else who has their Bunsen burner already lit up.
- Turn the gas tap on.
- Making sure the nozzle on the Bunsen burner is fully closed, light it up and a safety flame should start up.
- Open up the nozzle so it’s half-open.
- Use the Nichrome wire to scoop some of the substance to be tested.
- Hold the wire loop in the middle of the blue flame and a distinctive colour should be produced, if the substance is a cation that is.
-
Note down the colour and, using a reference table such as TABLE 1, identify the cation.
-If there are more substances to be tested-
- Dip the wire loop in the hydrochloric acid.
-
Repeat from Step 6.
Explanation for the steps
- The heat-proof mat prevents the heat from the Bunsen burner conducting through to the table and eventually burning it. This is important as we don’t want to damage any tables. Also, it is useful for stubbing out splints after they’ve been used.
- The splints we use are thin pieces of wood which quite easily catch fire and are cheap to replace. The only way to ignite the gas is to already have a fire and that through either a lighter or a lighted splint from someone else’s fire.
- The gas taps allow gas to come through and enable the Bunsen burner to work. It is important to turn on the gas tap after lighting the splint because if the splint goes out then you will have to light it again and that takes time; meaning that if you turned on the gas tap before you will be wasting the gas which could potentially become a hazard.
- It is important to make sure the nozzle on the Bunsen burner is fully closed since it will produce the highly-visible yellow safety flame. Since the nozzle is closed, less oxygen is able to get in and combust, so the flame is not very hot and can be easily seen. This is crucial as the flames, when the nozzle is partially or fully open, are really dark blue and almost see-through which is dangerous because it’s very hot, and also because since it can’t be seen very easily, someone may start to handle the Bunsen burner as if there is no flame and may burn themselves quite badly.
- Opening up the nozzle means more oxygen and come through, the resulting flame can combust more and therefore it will be hotter and have a dark blue colour.
- We need to scoop up the substance so it can be tested. It’s better if we take the substance to the flame rather that the flame to the substance (e.g. holding and pointing the Bunsen burner towards the substance on a heat-proof mate). This is because then the experiment will be more safer as if we happen to drop the substance then it will cause hardly any, if any, damage to the surrounding area like tables; but if we were to drop the Bunsen burner while trying to handle it then it will probably cause a lot of damage to other equipment and more importantly, ourselves.
-
The middle of the flame is the hottest part of the flame, so that’s where we held the substance. The energy from the flame causes electrons to move onto the next shell of energy (which is around the nucleus of the atom) and when the electrons return to their ground state (lowest energy state) they release energy. In the case of metal cations, this energy is visible to the human eye as characteristic colours.
-
Using the reference table (TABLE 1) you can find out which cation is present in the substance by looking at the colour of the flame and then finding which cation it corresponds to.
- Dipping the wire loop in hydrochloric acid removes any traces of previous substance that have been tested. This is important in order to achieve valid results because traces from other substances can mislead people and corrupt results, which is bad for validity of the experiment.
Results
When we put sample A into the flame we initially thought that the colour was ‘intense yellow’. However, when we put sample B into the flame the colour produced suited ‘intense yellow’ more than sample A did. Therefore, we changed sample A’s flame colour from ‘intense yellow’ to ‘brick red’. As you can see, from conducting the flame tests we were able to identify the cation present in the solution.
Apparatus diagrams
Another way of testing for cations is to see if it will produce a precipitate when sodium hydroxide (NaOH) is added. These are the colours and some information about using precipitation reactions to test for cations:
To distinguish between calcium and aluminium cations, add excess sodium hydroxide (NaOH), and if the precipitate dissolves then the metal cation present is aluminium, if it doesn’t, then the calcium.
Stage 2 - anions
Now that we know one part of each of the two compounds (Na and Ca), we just need to find out the other parts (anions). These are the methods and some information such as equations for the different ways of determining which anion is present in the solution.
OH- (hydroxide) - Turns litmus paper or universal indicator paper blue/purple as it’s an alkali.
– Add hydrochloric acid (HCl). Do the limewater test and if the limewater goes cloudy, then carbon dioxide has been produced and the anion is a carbonate. On the other hand, if you add HCl to an unknown anion solution and it produces a choking smell, then that anion is a sulphite.
Carbonate
Sulphite
Limewater is a calcium hydroxide. When carbon dioxide comes through into the lime water (through downward delivery since it’s more dense than air), it reacts with it to form calcium carbonate (limestone or chalk), and this makes the lime water cloudy.
- Add hydrochloric acid and barium sulphate to the solution and if a white precipitate forms immediately, then the anion is a sulphate.
An ionic equation would be
Halide ions – Acidify the solution of chloride, bromide or iodide by adding nitric acid. Then add some silver nitrate to it (in effect you’ve added AgNO3) and a precipitate forms. A chloride produces a white precipitate of silver chloride, a bromide a cream precipitate of silver bromide and an iodide a yellow precipitate of silver iodide. For these examples, we’ll use lithium as the metal in the solutions (i.e. lithium chloride, lithium bromide etc.). These types of reactions are precipitation reactions. Precipitation reactions are where at the end of the reaction a precipitate (solid) is formed.
Chloride
An ionic equation would be
Bromide
An ionic equation would be
Iodide
An ionic equation would be
These are the results from conducting these tests of each of the samples once. The ticks (✓) and crosses (✗) indicate whether the specific sample passed the test for the certain anion.
Reliability in stage 2
Stage 2 wasn’t very reliable for many reasons. Firstly, the flame test could only be carried out once, which is quite unreliable since the results we achieved could have easily been anomalous. This was thankfully prevented by the fact that we compared our results to other groups’ in the class. Our group comparing results with them and vice versa meant that we only had to do the experiment once, whilst simultaneously the other group did theirs. This saved time because it meant we didn’t have to do the experiment again. In the time it took one group to do their experiment, there were actually about 4-5 more results obtained as a result of different groups doing the experiment at the same time. This is similar to the reliability in the anion testing. We were able to compare our results with other people and if any didn’t match, we could, if time permitted, do those tests again to see whether they would produce different results. Also, since the type of results we achieved was qualitative (based on observation; as opposed to quantitative, which is based on numerical data), we could not get an average from the results. As you can see, our results are not very reliable since sample B passed two anion tests when it should’ve only passed one.
How reliability could’ve been improved in stage 2
Reliability could’ve been improved in many ways. If we had a lot more time, we could’ve done the experiments again. This would have made it really easy to distinguish true results from anomalous results. If our results were quantitative, we could’ve found out the average and take that as our final answer. Of course, with the equipment that was available in class it would’ve been impossible to achieve quantitative results for stage 2. If we could do the anion testing again, I would do sample B, because according to our results, it was a sulphate AND a chloride. This is clearly wrong, but the results we achieved from the experiments.
Validity in stage 2
I think that our experiments in stage 2 were quite reliable. Firstly, we tried to make sure we did everything according to instructions and the equipment was clean. However, in the flame test, as earlier described; we were confused over the colours of the two samples’ flames since they were remarkably similar. After putting the wire loop, with sample substance on it, through the flame, we had to sterilise the wire loop with hydrochloric acid (HCl) so there was none of sample A left over when we scooped up some sample B. This is flame contamination and it is likely that it happened that day since other groups faced similar problems.
How validity could’ve been improved in stage 2
Our results could have been more valid if the wire loop spent some more time in the hydrochloric acid, thus, reducing the chance of flame contamination. Also, the tests we did may not have covered all of the possibilities for anions and cations there are out there. Our experiment results could have been more valid if there was one person putting in substances such as barium sulphate. This would increase validity because then the person would have their own certain amount of substance that they naturally put in. Some people naturally use a lot and others don’t. This is why I think it’s important that only one person does it or the group decide on the approximate volume of substance they will put in.
Stage 3 – hard and soft water
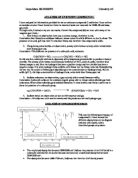
In stage 3, we were given two samples of water, A and B, and we had to find out which sample was ‘hard’, and which sample was ‘soft’. Knowing that hard water used more soap for the same amount of lather than soft water, the experiment we conducted was based on how much lather each sample of water produces.
Apparatus
- Two different samples of water
- Burette
-
Conical flask (capacity of 100cm3)
- Soap solution
- Stand
- Retort clamp
- Retort bosshead
- Bung
Method
- Place the stand in a sturdy space on the table. Fasten the retort bosshead to the stand about four fifths of the way up. Fix the retort clamp to it and secure the burette to that so it’s vertical (facing straight down). Make sure the tap end of the burette is on the bottom.
-
Making sure the tap is closed; fill the burette with the soap solution up to the mark where it reads ‘0cm3’.
-
Fill the conical flask with 10cm3 of sample A.
-
By turning the tap, add 1cm3 of the soap solution into the flask. Immediately after the 1cm3 has been added, turn the tap off.
- Take the flask, put a bung on it, and agitate it by shaking it about.
- Take the bung off and repeat from step 4 until a lather has been produced which you and your group are happy with as a benchmark.
- Note down the volume of soap solution required to produce that amount of lather.
- Wash the conical flask and bung thoroughly or get a new one of each.
- Repeat from step 3 to 7 but this time with sample B.
Explanation for the steps
- The stand need to be sturdy because the weight of the burette containing the soap solution can create a slight imbalance which could cause the whole thing to topple over when it’s accidently nudged by someone. Remember to fasten the bosshead and clamp quite tightly because if it unfastens it will just unnecessarily waste time and resources.
-
You must make sure the tap is closed; otherwise the soap solution will come in one end and out the other. This will waste the soap solution and will also mean that you’ll have to clear it up. You also need to make sure that the soap is filled to the ‘0cm3’ mark, as this will be useful in later stages of this experiment.
- Filling the conical flask to a certain amount is valuable because then you’ll know how much to fill it when you do the other sample later.
-
The tap will open a valve which, with the help of gravity, will allow the soap solution to pour into the flask. Stopping it at every 1cm3 gives you intervals which will be helpful because then you won’t have to guess when you should close the tap. Instead, you’ll have a definitive amount of soap solution you’re letting in one go.
- To be able to shake the flask properly, you need to put a bung on it otherwise some of the sample can just splash out and you results may get corrupted. The bung gives you freedom to shake the flask as much as you want.
- Having a benchmark will help you with the second sample since you’ll know when the lather is the same as the one from the sample before. This will make it easy to compare results with the two samples.
-
The soap solution at the start was at the ‘0cm3’ line on the burette. After the lather, it will be down to ‘[number]cm3’. Note that number down as it tells you how much the volume of the soap solution has decreased by.
- You must make sure that there are no remnants of sample and/or soap solution from the previous sample in the new flask or washed-out flask. This is to maintain a fair test. If available, the simplest thing to do is get new ones of each seeing as it saves quite a lot of time, and is more reliable because someone’s washing up may not be perfect.
- Repeating steps 3 to 7 to the other sample is need if you are to find out which sample is which.
Results
We used up all of the soap in the burette and even used more soap, but the lather still wasn’t good enough. We decided that we should stop because we would just be wasting soap and not getting very far. Because it took sample B 8cm3 of water to produce a good enough lather, we concluded that sample B was soft water and therefore sample A the hard water.
Apparatus diagrams
Reliability in stage 3
I think that our results were quite reliable, although I would’ve like it if we got to do the experiment at least once more to see whether sample A really didn’t produce a lather at our benchmark after using a whole burette’s worth of soap solution and a bit more. The results were qualitative, so even if we were able to do the experiment again, it would be impossible to get an average because you can’t obtain an average from something that can be just looked at with no numerical data from it. Therefore, the only reason we would want do the experiment once more was to see if the results (lather) were the same or similar as before.
How reliability could’ve been improved in stage 3
If we had more time in class, we could’ve done the experiments again. Also, we didn’t know what to expect. For instance, when doing the flame test, if the metal cation is sodium, we know that the colour we’re expecting in ‘intense yellow’, regardless of the amount of sodium we use. However, when we do this test, we don’t know how much lather to expect because that’s relative to the amount of sample and soap solution you use. Additionally, we forgot to compare our results with others’ results. If we did this, we could find out if sample A really didn’t produce a lather to our standards.
Validity in stage 3
Our test was quite valid since, instead of washing the conical flask and bung, we used new ones of each. I think that one of the reasons for getting no results for sample may have been down to the fact that we set the ‘benchmark’ too high. I think this because we executed the experiment, for some unknown reason, on sample B first; and that happened to be the sample which was the soft water. Now we knew that soft water produced a lather better than hard water (for the same amount of soap), but we didn’t know that the difference between them would be this high. When we had to shake the flask about to try and create a lather, it wasn’t very fair because every single time (after 1cm3 of soap solution was added) we shook it, we shook it in different directions, and we shook some much longer than others. What's more, other people in my group had to shake it as well, and their styles were different to everyone else’s style of shaking.
How validity could’ve been improved in stage 3
If we did the experiment again, I would set the standard for lather much lower than it was the day we did this experiment. I think that next time we would have only one person shaking the conical flask and they would try to shake it as identical to the last shake as possible. This would help make our test a fair test; and fair testing is crucial for valid results.
References
- GCSE SCIENCE CHEMISTRY and PHYSICS - High School Science - gcsescience.com. [and some of its subpages]
http://www.gcsescience.com/index.html
- Beer Brewing Water - Best Water for Brewing Beer
http://www.beverageanswers.com/beer/water.html
- Yahoo! UK & Ireland Answers [and some of its subpages]
http://uk.answers.yahoo.com/