The pressure inside the bottle is partially from the gas being collected and partially from the water vapor that has escaped from the surface of the water in the jar. The water inside the jar will reach an equlibruim state where the number of molecules leaving the surface is the same as the number returning. The equilibrium pressure of water is temperature dependent and is called the vapor pressure of water.
Dalton's Law of Partial Pressures tells us that the total pressure in the container must be the sum of the pressures of the gas we collected and the water vapor.
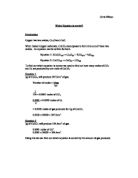
PT = Pgas + PH2O
This equation can be used to calculate the pressure of the gas collected. Once the pressure of the collected gas is known, the number of moles of gas can be calculated using the ideal gas law:
PV= nRT
Where:
- P = Pressure of the gas
- V = Volume of water displaced
- n = number of moles of gas
- R = the ideal gas constant
- T = the temperature of the gas
Procedure (This was taken from microscale 16) I have adapted for the use of copper carbonate
Measure the mass of 0.2 g of CuCO3to the nearest 0.01 gram directly in the test tube.
Fill a 25-mL or 50-mL graduated cylinder with water to the top, cover, invert, lower into a filled trough, and uncover beneath the water surface.
Place the stopper with the delivery tube (plastic tube) into the test tube. Place delivery tube into the inverted graduated cylinder. Heat the copper carbonate slowly and uniformly over a laboratory burner.
Bubbles will collect in the graduated cylinder. The rate of
gas release will begin to slow down when decomposition is near completion. When the bubbling stops, remove the heat and the delivery tube at the same time.
Hold the graduated cylinder perpendicular in the water and read the bottom of the meniscus to determine the amount of water displaced by the gas.
Record the temperature of the water (which will also be the same temperature of the gas) and obtain the barometric reading.
Safety Wear safety goggles and an apron in the lab at all times. Do not ingest chemicals. Use caution around open flames.
Caution students to remove the gas delivery tube from under the water as soon as bubbling stops. (If not, as the gases cool, water may be sucked back into the tube causing it to break.)
This is an accurate experiment but their tends to be heavy loss of gas evolved
We can reduce this loss by using sealent betewn gas tube and rubber stopper
Procedure for secound possible test
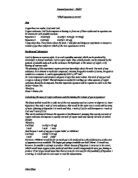
Assemble the apparatus shown (except for the test tube) and add water to the levels shown in the liter bottle and the beaker using water, use glycerol (glycerine) as a lubricant when inserting the piece of 6 mm glass tubing in the stopper that fits into test tube A. Glycerol may be used for the other connections.
Fill tube F connecting the liter bottle C with beaker D by blowing through the rubber tube B (blow GENTLY) with the pinch clamp OPEN. Raise and lower beaker D to expel any air bubbles from tube F. At this point the liter bottle should be nearly full but tube B should not touch the water in the flask. Close the pinch clamp as close to the beaker as possible.
Obtain an sample of Copper Carbonate, weigh a clean, dry, Pyrex test tube supported by a beaker, on the Mettler balance to three decimal places (the nearest milligram). After weighing the tube and beaker assembly REMOVE IT FROM THE BALANCE , add the unknown sample to the test tube using a paper funnel, return the assembly to the balance pan and weigh it again. RECORD ALL WEIGHING DATA DIRECTLY ON YOUR TABLE.
Attach the test tube to the remainder of the assembly. Incline the test tube upward at an angle of about 30o. Before beginning the heating process test the assembly for leaks by opening the pinch clamp. If no water flows when the clamp is opened there are no leaks. If a leak is present check the connections until you have found and corrected the leak. Have the instructor check your apparatus and initial your report form.
Equalize the pressure inside the liter bottle with atmospheric pressure as follows: With the pinch clamp open raise beaker D until the water level in the beaker is the same as that in the liter bottle. During this process DO NOT ALLOW THE TUBE IN BEAKER D TO COME OUT OF THE WATER (or air will get into the system). Close the pinch clamp. Discard the water in beaker D. Read the barometric pressure (see page 80-81) and RECORD IT IN YOUR REPORT FORM.
Open the pinch clamp. Leave in the beaker any water that may flow. Heat the test tube starting at the top of the salt mixture and working downward, at a rate that gives a moderate, steady rate of evolution of oxygen without propelling the mixture up the test tube toward the rubber stopper. If fumes appear inside the test tube discontinue heating until they disappear. Once the experiment is started and water begins to flow MAKE SURE TUBE F REMAINS UNDER WATER or air will get into the system and cause the found volume of gas to be wrong. Continue heating for 15 minutes. Allow the apparatus to cool to room temperature WITH THE PINCH CLAMP OPEN. When the apparatus is cool to the touch (which will require several minutes) equalize the pressure then close the pinch clamp.
Remove test tube A from the apparatus, insert it in its supporting beaker, and weigh the assembly. Set aside for later reheating. Remove the stopper from the liter bottle, insert a thermometer into the liter bottle, leave for a few minutes, and record the temperature (as the temperature of the gas). Look up the vapor pressure of water at this temperature in the Table below and RECORD IT IN YOUR REPORT FORM. Measure the volume of water in Beaker D by pouring it into a graduated cylinder. Read the volume to the nearest mL and record in your report form. Reheat the test tube for 5 minutes, cool and reweigh. Repeat this procedure until the weight lost between heatings is no greater than 0.05 g. Use the last weight obtained to calculate the weight of oxygen lost from the sample.
Dispose of the residue in the test tube by WASHING IT DOWN THE SINK WITH LOTS OF WATER. DO NOT THROW IT IN THE WASTEPAPER BASKET OR THE SOLID WASTE CONTAINERS.
VAPOR PRESSURE OF WATER
temp. (oC) Vapor Pressure temp. (oC) Vapor Pressure
torr torr
18 15.5 24 22.4
19 16.5 25 23.8
20 17.5 26 25.2
21 18.6 27 26.7
22 19.8 28 28.3
23 21.2 29 30.0
DIAGRAM OF THE ASSEMBLY TO BE USED IN THE EXPERIMENT
Tube F MUST NOT touch the bottom of the liter bottle (leave 1/4 inch gap).