Coli, while this technique only calls upon an enzyme and temperature cycling. A very small amount of DNA is able to be amplified into large quantities over a relatively short period of time.
The PCR reaction takes place within a thermal cycler. This machine is able to rapidly and accurately adjust temperature at different parts of the reaction to fully accommodate each step necessary. There are four major components necessary to successfully amplify DNA through PCR; a DNA template containing the DNA to be copied, Taq (Thermus aquaticus) DNA polymerase, primers that establish the beginning and end of the region to be increased, free nucleotides, and buffers within the reaction.
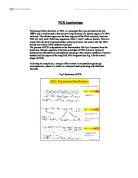
There are three main steps involved with one cycle of PCR. Denaturing is the first step, where the solution the template DNA is in is be heated to 94-96°C. This breaks the Hydrogen bonds that hold the two strands together, and also activates the Taq DNA polymerase, which is thermostable.
Originally DNA polymerase needed to be replenished after every heating cycle because it would be destroyed at the temperature needed for DNA hydrogen bonds to be broken. However thermophilic bacteria were found living around geysers in temperatures that exceed 110°C. The DNA polymerase extracted from these organisms was not destroyed at the high temperatures needed for PCR, making the process much more efficient. The most common DNA polymerase used in PCR comes from the Bacterium Thermus Aquaticus.
Following denaturing, a process called annealing takes place, in which primers need to attach themselves to the DNA strands to mark the region that will be amplified. Primers are short strands of DNA – usually 18 to 25 base pairs in length – that are complementary to the ends of the DNA fragment to be copied. Annealing takes place at temperatures ranging from 45-60°C. The temperature entirely depends on the primers used, and it is usually about 5°C lower than their melting point. The primers are the point where the DNA polymerase begins to synthesize the new DNA strands. This final step is called extension, and the temperature at which it takes place at is usually around 72°C.
The whole cycle of PCR does not take up a lot of time. Denaturing takes between two and five minutes, annealing takes one to two minutes, and extension takes about one minute. However multiple cycles are needed to amplify the DNA to proper amounts – around 30 cycles in total, depending on the efficiency of the process and the size of the template DNA.
After DNA has been amplified, it must be subjected to gel electrophoresis. Gel electrophoresis is the process by which DNA strands are separated on the basis of electric charge, size (base pairs), and shape and then compared to predetermined lengths of DNA. To separate the molecules an electric charge is applied to a gel matrix and since DNA is negatively charged it travels towards the anode. Agarose, a colloid extracted from seaweed is one of the most common materials used to make the gel. The pores in agarose are extremely large, and when compared to polyacrylamide gels the final resolution is inferior. Ethidium bromide is also added to the gel, as it fluoresces under UV light and makes the bands of DNA distinct and visible.
Research Question:
“Is the individual being tested genotypically heterozygous or homozygous for the presence or absence of the Alu insertion?”
Hypothesis:
“The individual being tested will either be genotypically homozygous or heterozygous for the presence or absence of the Alu insertion.”
Variables:
The controls in this experiment were:
- Same primers were used
- Same DNA strand was extracted
- PCR ensured that the amount of DNA extracted from check cells did not affect the result as the DNA was amplified enough for gel electrophoresis to work successfully.
- Micropipettor ensured that measurements were precise
- Using a PCR machine instead of manually transferring the DNA solution into different temperatures
- Electricity was applied to the gel for the same amount of time
- Electricity applied to the gel was the same strength
- Testing was conducted in the same gel electrophoresis apparatus, ensuring that each well the DNA is in was subject to the same conditions
The independent variables for this experiment were:
- Testing for the Alu insertion on the TPA25 (tissue plasminogen activator) locus on chromosome 8, as there are other places the Alu insertion is found
- Testing for the Alu insertion and not a different insertion
The variables listed above are possible variables for this experiment. However in this lab those variables did not affect the outcome because it was a professionally done laboratory testing for the same DNA template, and every sample was subject to the exact same procedure.
Planning (b):
Materials:
- Gloves
- flocculent pellet
- disposable transfer pipet
- Chelex
- paper cup
- P1000 micropipette
- pipet μl tips
- microtube rack
- PCR tube rack
- crushed ice
- two dual gel boxes
- power supply
- agarose gel
- microcentrifuge
- thermal cycler
- PCR tray
- plastic bags for gel disposal
- PCR grid
- gel electrophoresis grid
- base pairs ladder
- control DNA
- 6 ml saline solution
- PCR and microcentrifuge tube rack
- gel trays
- combs
- ethidium bromide
- 10 ml screw cap tube
- 1.5 ml tube
- boiling water bath
Procedure:
Isolating DNA from Cheek Cells
1. Add 6 ml of saline solution to a 10 ml screw capped tube.
2. Pour all of the saline solution into your mouth and vigorously swish for 10 seconds. Do not discard the empty tube that contained the saline solution.
3. Expel the sample solution into a paper cup.
4. Pour the sample solution from the paper cup back into the tube that contained the saline solution and close cap tightly.
5. Spin sample in preparatory centrifuge on high speed for 10 minutes.
6. Carefully pour off supernatant (liquid on top) into sink and place tube containing your cells on ice.
7. Set the P1000 micropipettor to 500 µl and pipet the Chelex solution in and out of the pipet tip several times to suspend the Chelex beads. Before the Chelex has a chance to settle, add the 500 µl to the centrifuge tube containing your cell pellet.
8. Mix cells and Chelex by pipeting up and down several times until no visible clumps of cells remain.
9. Using the same pipet tip, transfer 500 µl of your resuspended sample into a clean 1.5 ml tube. Be sure to label the cap of the tube with your initials.
10. Place your tube in a boiling water bath for ten minutes.
12. Carefully remove your tube from the boiling water bath and place on ice for one minute.
13. Place your tube in a microcentrifuge (opposite someone else1s tube!) and centrifuge for 30 seconds.
14. Use a fresh pipet tip to transfer 200 µl of supernatant (clear solution on top) to another clean 1.5 ml tube. Label with your name.
15. This contains your DNA which you can use as the template for amplification by the polymerase chain reaction.
Preparing for PCR Reaction and Gel Electrophoresis
1. Prepare PCR reaction and load into PCR machine.
2. Mix by tapping the tubes gently.
3. Spin down briefly in the microcentrifuge.
4. Add 100*l of mineral oil on top of the reaction mixtures and place the tubes on ice.
5. Leave tube # A4 at room temperature for 15 min.
6. Place all the tubes in the DNA Thermal Cycler and initiate the program specified for the DNA samples in use.
7. Prepare a 1% agarose minigel in TBE buffer.
8. At the end of the PCR reaction, take a 10 ml aliquot of each reaction without including the oil overlay and transfer to 1.5 ml microtubes.
9. Add 2 ml of gel loading buffer to each 10 ml aliquot. Load in gel along with 1kb ladder molecular weight marker.
10. Run the gel for 1 hour at 80 Volts constant voltage.
11. Stain, destain and photograph the gel as usual.
12. Analyze the DNA fragments on the gel.
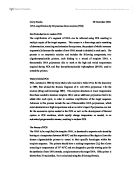
Data Collection:
The following two charts depict the final result of gel electrophoresis, and the data indicates whether the person tested is homozygous positive, homozygous negative, or heterozygous in the Alu insert. A line at the level of the 400 kilo bases marker indicates that the individual is homozygous positive; a line at the level of the 100 kilo bases marker indicates that the individual is homozygous negative; and a line at both the 100 kilo bases marker and the 400 kilo bases marker indicates that the individual is heterozygous.
Lindsay’s Gel
- Two bands seen, one 100 kilo bases in length and the other 400 kilo bases in length, indicating the individual is heterozygous
- One band seen at the 100 kilo bases length, indicating the individual is homozygous negative.
- One band seen at the 100 kilo bases length, indicating the individual is homozygous negative.
- One band seen at the 100 kilo bases length, indicating the individual is homozygous negative.
- One band seen at the 400 kilo bases length, indicating the individual is homozygous positive.
- One band seen at the 100 kilo bases length, indicating the individual is homozygous negative.
- One band seen at the 100 kilo bases length, indicating the individual is homozygous negative.
Jenna’s Gel
- Two bands seen, one 100 kilo bases in length and the other 400 kilo bases in length, indicating the individual is heterozygous
- Two bands seen, one 100 kilo bases in length and the other 400 kilo bases in length, indicating the individual is heterozygous
- One band seen at the 100 kilo bases length, indicating the individual is homozygous negative.
- One band seen at the 400 kilo bases length, indicating the individual is homozygous positive.
- Two bands seen, one 100 kilo bases in length and the other 400 kilo bases in length, indicating the individual is heterozygous
- One band seen at the 400 kilo bases length, indicating the individual is homozygous positive.
The following is a table indicating if the individual is homozygous positive, homozygous negative, or heterozygous for the Alu insert.
Data Processing and Presentation:
The following graph depicts the amount of people that are heterozygous, homozygous negative, or homozygous positive for the Alu insert
The following chart shows the percentages of individuals that had the same result in the test for insertion of the Alu insert.
Calculation of Percentage- A fraction or ratio with 100 understood as the denominator; for example, 0.98 equals to 98%, ½ is equal to a percentage of 50%
Heterozygous – 4/13=0.308*100=30.8; 31%
Homozygous Positive – 3/13=0.2307*100=23.01; 23%
Homozygous Negative – 6/13=0.461*100=46.1; 46%
Conclusion and Evaluation:
Conclusion:
The small sample size of this experiment does not allow for a thorough interpretation of the results when trying to determine whether the outcome is related to a variable such as gender or race, or if one outcome is predominant over the others. The results demonstrated that the frequency of being heterozygous for the Alu insert was 0.308, the frequency of being homozygous positive for the Alu insert was 0.2307, and the frequency of being homozygous negative for the Alu insert was 0.461. Homozygous negative was the most common genotype, and homozygous positive was the least common one, but once again a larger sample size is needed to be able to draw any other conclusions.
Evaluating procedures and results:
To be able to better interpret the results, each individual being tested should make known to the class both their father’s and mother’s origin as Native American (North), Native American (South), African, Asian, Australasian, European, or All (origin unknown). That was it would provide more sufficient data when trying to determine if the absence or presence of the Alu insert in the sample size is related to race (as already stated by previous research), or possibly even gender.
Improving the investigation:
As this was a professionally done experiment suggestion for improvement is not possible at the current level of biological knowledge provided in this course
Resources:
http://www.geneticorigins.org/geneticorigins/pv92/aluframeset.htm (Dolan DNA Learning Center, March 18, 2006)
http://www.genome.org/cgi/content/full/7/11/1061 (Genome Research, March 18, 2006)
http://www.anthro.utah.edu/~rogers/bio5410/Lectures/a_alu.pdf (University of Utah, March 18, 2006)
http://www.ncbi.nlm.nih.gov/books/bv.fcgi?rid=genomes.box.6040 (Genomes, March 19, 2006)
http://www.accessexcellence.org/RC/CT/polymerase_chain_reaction.html (Mark V. Bloom, March 19, 2006)
http://www.accessexcellence.org/LC/SS/PS/PCR/PCR_technology.html (Connie, March 19, 2006)
http://biology.clc.uc.edu/fankhauser/Labs/Genetics/Buccal_DNA_isolation/DNA_from_buccal_cells.htm (University of Cincinnati, March 19, 2006) – Step by step procedure for PCR with pictures