Background information on enzymes
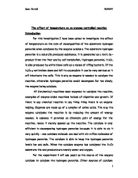
Enzymes are made of protein and they are biological catalysts – they speed up reactions. Enzymes are very specific, i.e. they will only break down certain chemicals, and in this experiment that is hydrogen peroxide. Below is a diagram showing how an enzyme breaks down a substrate (lock and key process.)
As you can see the “groove” on the enzyme is the active site, which is a specific shape according to it’s function. The substrate (hydrogen peroxide) specially fits into the enzyme’s active site. When they join the substrate is broken down and then released. When the molecules are heated they move around faster and vibrate more. This is an advantage because the enzyme and substrate molecules move around faster and collide with each other more often, so more hydrogen peroxide molecules collide with the catalase, therefore the catalase can catalyse more of the breakdown of hydrogen peroxide. Though when the enzyme molecules are heated up too much they can start to denature, this is when the enzyme looses it’s shape and the substrate essentially doesn’t fit into the active site, so it can’t be broken down anymore.
Variables
Independent
The variable I will be investigating is the temperature. I will be heating the yeast and hydrogen peroxide to the specifically desired temperature. I will investigate temperatures at 10°C, 20°C, 30°C, 40°C, 50°C, 60°C. The other variables I could investigate are: concentration of H2O2, concentration of catalase (e.g. diluted yeast), surface area of catalase (e.g. surface area of an apple), and pH of H2O2, but I have chosen temperature to investigate.
Dependent
I am going to measure the amount of water displaced by the oxygen given off in the catalysation of hydrogen peroxide by catalase. The readings will be taken off of a calibrated (sealed) syringe in cm3 every 10 seconds for 1 minute 30 seconds. I will place the syringe over the end of the delivery tube in a water bath to measure the displacement.
Fair test
For best optimized results I will try to keep a fair-test. I will:
1. Use the same volume and concentration of hydrogen peroxide and yeast for every experiment, (the concentration of hydrogen peroxide is and the concentration of yeast is and has been measured by the teacher before each lesson). I will be using 0.5cm3 of undiluted yeast and undiluted H2O2.
2. Use the same equipment and method for each experiment.
3. Ensure that the solutions of H2O2 and yeast are at the exact desired temperature.
4. Read the results off the syringe properly.
Safety considerations
To stay safe follow the following safety points:
-
Wear safety goggles at all times, especially when dealing with H2O2.
- Wear a lab coat at all times.
- Handle hot objects carefully.
-
Wash hands after using H2O2, especially if it comes in contact with your skin – it will burn.
- Lab rules must be obeyed.
- Always wipe up any spills.
Preliminary work
During my preliminary work I used the same method that is described further below. At first I found that using 5 cm3 of yeast and 5 cm3 of hydrogen peroxide was far too much as it kept on overflowing and that 0.5 cm3 of each is very sufficient. I found out that you must ensure the bung is properly secured onto the test-tube otherwise the oxygen is released out. I learnt to be more cautious when setting up the apparatus and making sure that there were no air bubbles trapped in the syringes, for accurate measurements. Once I found the correct measurements I should use I did the experiment and found some results at 100C, which I have included in my table of results further down
Apparatus
500ml beaker
Some plasticine
10ml calibrated syringe
2x1ml syringe
Stopwatch
6xTest tubes
2xsmall beaker
Test tube rack
Delivery tube
Water bath at 10°C, 20°C, 30°C, 40°C, 50°C, 60°C
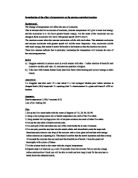
Diagram
Method
- Set up the apparatus as above.
- Fill 10ml syringe with water and submerge in the beaker, ensuring no air bubbles are present as this could affect your results.
-
Make sure the yeast and hydrogen peroxide are heated up to the temperature being investigated, e.g. 20°C
-
Measure out the 0.5cm3 needed of yeast and hydrogen peroxide.
- Pour the yeast into the test-tube of hydrogen peroxide.
- Then quickly put the bung attached to the delivery tube on the test-tube firmly, trying not to let any gas escape, and ensuring the bung is on properly so no gas is leaking out.
- Start the stopwatch at the same time as putting the bung on
-
After every 10 seconds, write down the amount of water that has been displaced in the syringe (cm3). Do this for 1min 30sec.
- Write down your results and repeat steps 2 to 8 twice more for three results in total per temperature. This is so that I have more reliable results when I take an average.
-
Then repeat steps 2 to 9 for every temperature being investigated, e.g. 10°C, 20°C, 30°C, 40°C, 50°C, 60°C.
Results
Tables to show how much water was displaced by oxygen for each temperature.
Results at 100C
Results at 200C
Results at 300C
Results at 400C
Results at 500C
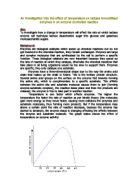
Analysis
As you can see from the graphs the optimum temperature at which the rate of decomposition of hydrogen peroxide is 400C. For every graph the same trend applies that the water is displaced very quickly for the first 40 seconds, then the graphs start to flatten, and this is when the reactions are slowing down. I have found that as the temperature increases as does the rate, until you reach 500C then the enzymes start to denature and the whole reaction slows down. I have also found that at the start of each experiment is when most of the oxygen is produced because the enzymes are decomposing the substrates when they first contact, and by the end of the 90 seconds there are not many enzymes and substrates to react with left.
Conclusion
In my investigation I have found that by looking at my results, that as I increase the temperature the reaction becomes quicker, meaning more oxygen is produced. Although once at a certain temperature the catalase enzymes start to denature causing the reaction to slow down. The temperature at which they start to denature is 500C. The reason why the rate of reaction increases when I increase the temperature is because the enzymes and hydrogen peroxide particles collide with each other and vibrate faster due to the heat energy being transferred into them. The results completely support my hypothesis, because I said the enzymes would start to denature at 500C, which the results show and support. I also said in the hypothesis that the rate of reaction would increase in proportion to the temperature – which is what happened.
Evaluation
By looking at my results I feel that they were fairly good, accurate results, with no major anomalies. The graphs themselves show good sloping curves. I think the reason there were a few slight anomalies was maybe because of slight misreadings or small impurities in the equipment used. Another reason could be that a small amount of oxygen escaped before the bung was put on, or even that if the bung was pushed on very hard a small surge of oxygen could have been pushed into the measuring syringe. Looking at the tables of results some readings for the same temperature seem to have large differences between them. This could be because not all the yeast was properly poured into the hydrogen peroxide test-tube. A major fact that could have affected my results might have been that even though hydrogen peroxide decomposes very slowly, there is still some gradual break down, especially when left in the light in a clear beaker – which is what happened. Overall I personally think the experiment went well, my hypothesis was right, the method worked, and especially considering that it was all performed under school lab conditions.
If I had the opportunity to do the experiment again I would try to use more restricted lab conditions. I would try to measure the volume electronically with an electronic counter. Possibly do the experiment in a thermostatically controlled environment.