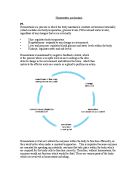
- Blocked/Narrowed Pancreatic Duct
- Hereditary or
- Unknown (this is referred to as Diopathic)
The pancreas is one of the organs that are part of the digestive system. The epithelial cells, which are divided into two main types, acinar and duct cells. The acinar and duct cells both from a continuous layer, which separates the interstitial space of the pancreas. This interstitial space is the space, which is in between the cells but outside the blood stream from the lumen of the gland. The epithelial layer looks like a bunch of grapes on a stalk. This is the main pancreatic duct. Then there are smaller branching stalks, which are the pancreatic ductal system.
When it comes down to digestion, the Pancreas is the main organ that ensures the process takes place properly as it releases the digestive enzymes, Trypsin and Lipase. These enzymes are released so that proteins, fats and carbohydrates can be broken down into molecules and absorbed more easily by the small intestine. The digestive enzymes are proteins. This means that the pancreas has to synthesise lots of protein and store it for release when it is needed. The acinar cells carry out the synthesis of the digestive enzymes. The acinar cells contain rough endoplasmic reticulum (this is because they produce so much protein).
The correct storage and release of these digestive enzymes is very important because these enzymes can be quite dangerous to the body as they are able to digest the body’s own tissues.. The inactive forms of the enzymes are stored in zymogen granules. When needed, the granules are released across the acinar cell plasma membrane into the lumen.
The pancreas also produces hydrogen carbonate (HCO-3) ions. These HCO-3 ions are alkali. When they reach the small intestine they neutralize the acid from the stomach and provide the correct pH in the small intestine (pH 5.0- 6.0). People that have pancreatitis sometimes do not secrete enough HCO-3. This means that the pH in the small intestine can become to acidic (pH 4.0 or lower).
This stops the pancreatic enzymes from working. Lipase, which digests fats, is mainly affected. Therefore, people with pancreatitis have trouble digesting and absorbing fatty foods.
There are a few different theories about how the enzymes can become activated and start digesting the tissue and start to cause inflammation. One of the best-understood causes of pancreatitis is gallstones. Insoluble crystals of bile salts cause them. If a gallstone escapes from the gall bladder and gets stuck in the bile duct pancreatic juice and bile back up in the pancreas and gall bladder. The backing up of pancreatic juices leads to inflammation of the pancreas. There are some very rare inherited forms of pancreatitis.
Molecular biology has made it possible to find out the genes that are responsible in affected families. One mutation is in a gene that encodes trypsin. This mutation leads to a “super trypsin” being made. This “super trypsin” can be activated too early and does not stop being activated. It probably becomes activated in the acinar cells. This will eventually destroy the cells and will lead to inflammation.
Heavy drinking in alcoholics also increases the risk of chronic pancreatitis and certain diets/foods in tropical countries.
Some British researchers have also found that long term exposure to volatile chemicals and solvents is another risk factor for pancreatitis.
There is no ‘cure’ for pancreatitis. Treatment during an attack of pancreatitis consists of painkillers and plenty of fluids. However, if the attack is extreme, surgery may be needed. This may be if severely damaged tissues need to be removed from the patient or if gallstones have brought it on then they may have to be removed. Antibiotics may also be needed if there is a bacterial infection.
There are different ways of preventing any more attacks of pancreatitis depending on the cause of it. If the cause has been linked to drinking then it is advisable to cut down or stop completely. If the attack was brought on by gallstones then the gall bladder can be removed. It is also advisable that the person cuts down on their intake of fats and proteins. This is because this is the main reason for the secretion of pancreatic enzymes.
Some doctors give the person anti oxidants. This is because there is some evidence that free radicals are involved in the diseased process of pancreatitis. However this is still not proven.
This information and diagram is from Biological Sciences review, volume 13, number 5, May 2001.
Below is a table showing the main differences between a normal and a diseased pancreas:
Tissue fluid is produced by a process called ultra filtration. This is when small molecules and ions are separated from the larger molecules and cells. Tissue fluids consist of blood plasma without the proteins. The walls of the capillaries act as a filter holding back the large plasma protein molecules and the cellular components of the blood. Water and other parts that make up the plasma go through as well. The actual filter is the basement membrane, which the capillary endothehelial cells rest on.
When blood reaches the arterial end of the capillary it is under pressure because of the pumping action of the heart and the resistance to the blood flow (because the capillaries are narrow). Hydrostatic pressure forces the fluid part of the blood through the capillary walls into the intercellular spaces. Because of the plasma proteins the outward flow is opposed by the osmotic pressure of the blood. The hydrostatic pressure of the blood is grater than the osmotic pressure. Therefore there is a net flow of fluid out of the capillaries.
Once formed the tissue fluid circulates amongst the cells and then eventually returns to the blood system. At the venous end of the capillary system the hydrostatic pressure of the blood is quite low and there is osmotic pressure. The hydrostatic pressure has decreased. The main reason for this is the capillaries open into the wider venules, which have less resistance to blood flow. The osmotic pressure has increased. This is because the loss of water from the blood has concentrated the plasma proteins. The osmotic pressure is now exceeding the hydrostatic pressure. This means that tissue fluid flows back into the capillaries and so is returned to the circulation system. The pressure causing this flow is quite small. Because it is o small not all the tissue fluid follows this route. The residual tissue fluid is drained into the lymph vessels. This is where it becomes lymph where it eventually passes into the veins.
The tissue fluid should be returned to the blood system at the same rate that it is formed. This is very important. If the tissue fluid is formed faster than it can be removed it builds up in the tissues. If this happens the tissues will swell up causing a condition called Oedema.
The cells are bathed in tissue fluid. From the tissue fluid, the cells obtain all the things (substances) they need. They also release any unwanted substances into the tissue fluid. As it is formed from the blood, it must be kept constant. The factors that must be kept constant are:
- The concentration of glucose.
- The concentration of different ions e.g. sodium and potassium.
- The osmotic pressure.
- The temperature.
- The pH.
Information from a handout, Chapter 21 The Principles Of Homeostasis, The formation of tissue fluid.
TASK 3 – UNIT 17
At the start of this Task, I will carry out some preliminary work on each of the 4 tests for Pancreatitis, briefly writing up each of the tests
Test 1 – Plasma Amylase With Starch:
Method:
Step 1 – Firstly add 5cm3 of 1% Starch to a test tube
Step 2 -- Then I added 1cm3 of an Amylase sample and mixed it.
Step 3 – I then started the stop clock
Step 4 – Every 1 minute I took 2 drops of the mixture and added it to a spotting tray with 2 drops of Iodine
Step 5 – I continued step 4 until and ‘end point’ of Brown was obtained and then stopped the clock and noted the time.
Results: During this experiment I found it extremely hard to obtain any results. One reason for this could be a problem with the starch, as the mixture in the tray wouldn’t star at Blue-Black no matter how many times I tried it.
Advantages & Disadvantages:
I found this test to have no real advantages as any results obtained are speculative and it is extremely difficult to determine an ‘end point’ of Brown. To establish a proper end point would probably be to time consuming anyway.
Test 2 – Plasma Amylase Changing From Blue To Clear:
Step 1 – Firstly I added 10cm3 of Starch to a boiling tube
*Step 2 – I then added 2 drops of Iodine to the starch to produce a Blue-Black colour
Step 3 – I then added 1cm of an Amylase sample and mixed it together.
Step 4 – I then started the stop clock
Step 5 – I waited until the contents of the test tube became clear, stopped the clock and noted the time.
*Modification – Adding the Iodine produces the Blue colour mentioned on the task sheet, however it says nothing about adding the Iodine
Test 2 – Plasma Amylase Changing From Blue To Clear (Continued):
Results: At first it was impossible to reach an end point of clear because there was no blue colour to start with. I then decided to modify the method slightly by adding the Iodine to obtain the blue colour. After applying this modification, I managed to carry out the experiment reasonably well, but the end point is again, open to interpretation, however I did find it easier to carry out this test instead of Test 1.
Advantages & Disadvantages:
The advantage of this test is that it is less time consuming then Test 1 and is also a lot easier to carry out. The test itself is pretty easy to perform. The disadvantage however is that again the end point is open to subjectivity because what some people will say is clear, others will say it is not, but it is possible to obtain a result.
Test 3 – Faecal Trypsin Test – Change From Cloudy To Clear:
Method:
Step 1 - Firstly I will add 5cm3 of Caesin suspension to a test tube
Step 2 – I will then add 1cm3 of a Trypsin sample and mix.
Step 3 – I then started the stop clock
Step 4 – I then waited for the mixture to become clear, stopped the clock and noted the time
Results: The results for this test were really hard to make out as the suspension contained little ‘bits’ that made the solution seem cloudy but it turned out that it wasn’t. This level of subjectivity made obtaining results difficult.
Advantages & Disadvantages:
For this test I can detect no real advantages as it provides subjective results and any results that can be obtained are just qualitative. This leads me to seriously consider the value of performing this test
Test 4- Faecal Fat – Colour Change To Pink
Method:
Step 1 – Add 5cm3 of a Milk Sample to a test tube
Step 2 – Add 1cm3 of Lipase and 1cm3of pH indicator (Universal Indicator)
Step 3 – Note the colour and start the clock immediately.
Step 4 – Time for how long it takes to produce an obvious colour (i.e. from orange to red) this shows there has been a fall in pH and note the time at this end point.
Results: This test proved to be slightly time consuming but the results are worth it. There is only slight subjectivity with the colour change but can be interpreted very well.
Advantages & Disadvantages:
In this test, I found it hard to interpret the end point when using Universal Indicator but when I switched to Methyl Red, the end point became easier to establish. It would therefore be more advantageous for me to use Methyl Red then Universal Indicator. Also, the time period is rather long but it provides a good set of results so the test is worthwhile to perform.
After assessing all four tests, my decision is thus:
To carry out task 4, I will do tests 2 and 4 from the Preliminary Work.
The reason for me doing these tests is that I found them to be the tests where it is easier to determine the end point. I say this because when carrying out the tests, I found it easier to define the end point, whereas with tests 1 and 3 the test either took too long or was near impossible to determine an end point. Also I have found them to both be tests which produce semi-quantitative results allowing me to distinguish between No Pancreatitis, Mild Case of Pancreatitis and Severe Pancreatitis.
When it comes to accurately detecting the end point, Tests 2 and 4 allow for better determination of the point where a result can be obtained compared to tests 1 and 3. With test 2, the end point is determined by the mixture losing it’s blue colour and becoming clear. This end point is easy enough to establish, Test 4’s end point is harder to establish but is easier then detecting the end points in 1 & 3. The end point for test 4 comprises of the colour changing from green to yellow or Yellow to orange but as it reacts quickly this makes it slightly difficult to detect the change.
To control the concentration of the enzyme, it is simply a case of using a 1cm3 syringe to collect the required amount each time, allowing a fair and controlled amount to be obtained each time. Controlling the temperature is just as easy as the mixture can be placed in a prepared water bath set at something like 370C and allowed to react in the water bath.
When it comes to reaching the end point, the two tests provide results at a reasonable rate of time but with Test 2 it is quicker then Test 4 as Test 4 is monitored over a 20 minute time period, while test 2 needs less time to allow the reaction to take place and for the colour to disappear. This allows me to detect the results far better then with Tests 1 and Test 3.
Variables:
During all the tests I am going to keep the temperature at a constant level (37OC) and this is because my results could be deemed unfair and inaccurate. Also, I might give the wrong diagnosis to each sample. To enable me to keep the temperature constant at 37OC, I am going to be using a water bath (as mentioned in the methods). Things such as the Starch Concentration (1%) and Enzyme and Milk Volume will also be kept the same throughout. However, the amount of fat in the Milk will be varied so I can distinguish between results.
The reason for keeping certain variables constant is to allow a fair test and to ensure accurate results.
TASK 4 – UNIT 17:
Firstly I will carry out test 2 using the following modified Method:
Test 2 – Plasma Amylase:
Step 1 – Firstly I added 10cm3 of Starch to a boiling tube
*Step 2 – I then added 2 drops of Iodine to the starch to produce a Blue-Black colour
**Step 3 – I then added 1cm3 of Amylase sample ‘A’ and mixed it together, all the while holding the test tube in a water bath set to 37OC
**Step 4 – I then started the stop clock, keeping the tube in the water bath
Step 5 – I waited until the contents of the test tube became clear, stopped the clock and noted the time.
Step 6 – I will repeat steps 1 – 5 for Samples B, C and D
*Modification – Adding the Iodine produces the Blue colour mentioned on the task sheet, however it says nothing about adding the Iodine
**Modification – Mixing it in a water bath and keeping it in there allows temperature to remain constant and therefore allow the enzymes to work properly.
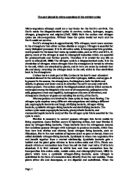
Results: After successfully performing my experiment I obtained the results (shown in tables on the next page) and I used these to plot 2 Graphs. Graph 1 shows Sample Against Time, while Graph 2 shows Sample Against Rate and these can be found on the pages that follow:
Test 4 – Faecal Fat
Method:
Step 1 – Add 5cm3 of a Milk Sample to a test tube
*Step 2 – Add 1cm3 of Lipase and 1cm3 of Methyl Red pH indicator and place into a **water bath
Step 3 – Note the colour and start the clock immediately.
***Step 4 – Over a 20 minute time period, monitor the sample until a Pink Colour is obtained. This is the end point.
*Modifications 1 & 2: I chose to use Methyl Red as it makes it easier to establish an end point compared to Universal Indicator. ** Use of water bath is to keep the temperature constant at 37OC.
**Modification 2: I chose to use the water bath (again set at 37OC) as it provides a constant temperature for the enzymes to work in.
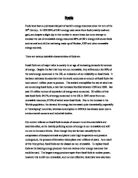
Results: After performing the tests, I managed to obtain the following results, using the key next to the results to plot the graph below:
Key To Results
Task 5:
After performing my tests, I can make the following Diagnoses:
Patients A and D both have Severe Forms of Pancreatitis, though Patient D’s form looks more severe then Patient A.
Patient B has a milder form of Pancreatitis
Patient C’s results show they are not suffering from Pancreatitis
Despite the fact that I kept the variables as controlled as possible and that I carried out the tests properly, I know that they are not of the same standard as clinical tests. I can say this with a degree of confidence, as they would not incur the limitations that I did. They not only have more equipment then I did but it is better and they can even carry out more diagnostic tests then I can and even the data they can obtain from these tests is a lot more quantitative then the results I was able to obtain. Below is a description of the tests I carried that would also be suitable in a clinical laboratory:
Amylase Based Tests:
With Plasma Amylase tests there is one drawback and this is that the results may not indicate an occurrence of Pancreatitis as other diseases/conditions (such as Diabetes Ketoacidosis/DKA or even in ectopic pregnancies). Suffers of Severe Pancreatitis will produce high levels of Plasma Amylase when tested, but, just because someone tests negative for Plasma Amylase it doesn’t mean they do not have Pancreatitis. To confirm a negative Pancreatitis result, a Lipase based test may need to be carried out (See below). The Data used for differentiating between a Normal Patient and someone suffering from Pancreatitis is as follows:
Normal Range of Amylase: 70 - 235U/L (U/L = Units per litre)
Pancreatitis Sufferers Range: 250- 4200U/L (with a mean of 769).
Lipase Based Tests:
Of the two plasma- based tests, Plasma Lipase is preferred to Plasma Amylase as it can provide a more accurate set of results. As with Plasma Amylase, there is data available for comparison of results and this is as follows:
Normal Range: 0 – 200U/L (U/L = Units per litre)
Pancreatitis Sufferers: 114 – 7352 and with a mean of 1617U/L
Lipase Based Tests (Continued):
As you can see, the ranges provided are specific. An example of this is when I look at the normal range for Faecal Fat I can see that is between 0 and 200U/L. The problem that my tests have is that they are not able to provide me with data such as this.
In reference to Tasks 1& 2, if a patient received a Negative Results for a Pancreatitis Test (Here it is Patient C) then the test would either require a repetition or another test may have to be carried out
Should a sample return with a Positive Test for Pancreatitis (Patients A and D in this case) or even Mild Pancreatitis (Patient B) then this confirms that the digestive enzymes are becoming activated inside of the Pancreas itself instead of the duodenum where they should be and are therefore transported through the body via the plasma.
It is because of this that we are able to carry out tests on the blood plasma due to the high levels of amylase in the plasma. A Lipase test is also carried out because a sufferer of Pancreatitis would have raised levels of fat in their faeces Damage to the pancreas due to pancreatitis stops the pancreas functioning properly by not producing digestive enzymes; the person will suffer from weight loss and fat malabsorption.
The reason it is important to test for Pancreatitis as soon as symptoms develop is because the disease is very serious because the pancreas begins to digest itself. For digestion to occur the Pancreas must produce the required enzymes and these digestive enzymes are important because they break down carbohydrates, fats and proteins so that the small intestine can absorb them. As with all enzymes, the digestive enzymes are made of proteins and this means that the Pancreas must create and store a large amount of protein ready for release when called for. Should the enzymes become activated while being stored, they can flow into the blood stream and it is this, which causes the pancreas to digest itself. This is why they are at first inactive when released. The reason for the enzymes activating early is because of Trypsinogen has been made into its active form, Trypsin, so therefore the other enzymes become activated.
Task 6:
My technique for diagnosing these samples was limited and the main reason for this is because my results that I obtained were only qualitative and not quantitative. This is because I was working on Colour Changes not particular values and on occasions, this colour change was difficult to observe and one example of this is when testing the levels of faecal fat where the darker the pink colour, the higher the severity of pancreatitis. When I actually got some results 3 of the samples looked to have the same colour, and it was only when I asked my teacher that I was able to distinguish between severe and mild pancreatitis. Another example of this is when testing plasma amylase, as I had to observe another colour change, where the quicker the change the higher the severity of the disease. At times I found it difficult to determine the end point.
My techniques had limitations (which I have described above). However, when these tests are carried out in a clinical lab, both the tests and data that they give are more superior to mine. The main reasons for this is that the results that you obtain from the tests carried out in a clinical lab give quantitative results. There is a ‘normal’ range of the amount of amylase that a person that is not suffering from pancreatitis has. This range is 70- 235U/L. A person who is suffering from pancreatitis exceeds this range and their levels of amylase can go up to 250- 4200U/L.
In a clinical laboratory the length of the test is longer then mine, and also the results are quantitative whereas my results are qualitative. A normal person’s values for a faecal fat test are 7g/24h whereas a pancreatitis patients values of faecal fat are greater than 15g/24h and Because these are quantitative results, they are far superior to mine.
Task 7:
These days, there are many ways of diagnosing Pancreatitis and I have chosen to describe one of them below:
Trypsin Based Tests:
Several different tests have been developed that looks at the levels of trypsinogen in the plasma or urine. Immunoreactive trypsinogen (use antibodies for trypsinogen to detect the enzyme) tests are done on plasma. A ‘dipstick’ for testing urine for trypsinogen has now been developed.1 Trypsin in the faeces is measured by using digestion of gelatine on X- Ray film. 5g of faeces are needed and pancreatitis is diagnosed if the test is positive at a dilution of •1/10.5 Trypsin in the faeces can also be measured using spectrophotometry. However, decreased levels are not obvious until •95% of the pancreas has been destroyed2.