Materials and Equipment:
Equipment:
- Magnetic stirrer with bar.
- Conical flask.
- Delivery tube with stopper.
- Gas-collection tube.
- Water trough.
- Laboratory stands.
- Utility clamps.
- Measuring-cylinder (50ml).
- Micro-spatula.
- Stop-clock.
- Water bath.
- Polystyrene cup.
Materials:
- 1.00M hydrochloric acid.
- Magnesium ribbon (10 cm strips).
- Zinc metal (mossy).
- Steel wool.
-
0.20M solutions of copper (II) nitrate; nickel (II) nitrate and cobalt (II) nitrate; iron (II) ammonium sulfate(s).
- Distilled water.
Methods and Procedure:
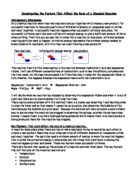
Diagram 1: The diagram above shows how to assemble the apparatus for the experiment.
Part I - The Effect of Surface Area:
- The apparatus was assembled as shown in the diagram above.
- 20 ml of 0.2M HCL acid was taken in a measuring cylinder. The diluted acid was put into a conical flask, the magnetic stirrer bar was added and the solution was allowed to stir for a few seconds.
- A 10 cm piece of magnesium ribbon was taken; then it was placed in the conical flask.
- The flask was closed immediately with the stopper on the delivery tube and the stopwatch was started.
- The volume of gas produced each minute was recorded in Table 1 over a period of 10 minutes.
-
Steps 1-5 above were repeated except, the magnesium ribbon was folded so that the exposed surface area was reduced to about half.
-
Steps 1-5 above were repeated except, the magnesium ribbon was folded so that the exposed surface area was reduced to about a quarter.
- Finally at the end of the experiment, the magnesium ribbons were thrown into the waste bin and the conical flasks were all washed.
Part 2 - The Effect of Reactant Concentration:
- The apparatus was assembled as shown in diagram above.
- 20 ml of 0.2M HCL acid was taken in a measuring cylinder. The diluted acid was put into the conical flask, the magnetic stirrer bar was added and the solution was allowed to stir for a few seconds.
- A 10 cm piece of magnesium ribbon was taken; it was cleaned with some iron wool and placed in the conical flask.
- The flask was closed immediately with the stopper on the delivery tube and the stopwatch was started.
- The volume of gas produced each minute was recorded in Table 2 over a period of 10 minutes.
-
Steps 1-5 above were repeated except, in step 2 18 ml of acid was taken and added to 2 ml of distilled water in the conical flask (i.e. a concentration of 0.18M acid).
-
Steps 1-5 above were repeated except, in step 2 16 ml of acid was taken and added to 4 ml of distilled water in the conical flask (i.e. a concentration of 0.16M acid).
-
Steps 1-5 above were repeated except, in step 2 14 ml of acid was taken and added to 6 ml of distilled water in the conical flask (i.e. a concentration of 0.14M acid).
-
Steps 1-5 above were repeated except, in step 2 12 ml of acid was taken and added to 8 ml of distilled water in the conical flask (i.e. a concentration of 0.12M acid).
- Finally at the end of the experiment, the magnesium ribbons were thrown into the waste bin and the conical flasks were all washed.
Part 3 - The Effect of Temperature:
- The apparatus was assembled as shown in diagram above.
- 10 ml of 0.2M HCl acid was taken in a measuring cylinder and 10 ml of distilled water was added (i.e. a concentration of 0.10 M acid).
- The diluted acid was put into the conical flask the magnetic stirring bar was added and the solution was allowed to stir for a few minutes to allow its temperature to come to room temperature. The temperature was recorded in table 3.
- A 10 cm piece of magnesium ribbon was taken; it was cleaned with some iron wool and placed in the conical flask.
- The flask was closed immediately with the stopper on the delivery tube and the stopwatch was started.
- The volume of gas produced each minute as recorded in Table 3 over a period of 10 minutes.
- Steps 2-6 above were repeated except a conical flask with 0.10M HCl that had been cooled in some ice was used.
- Steps 2-6 above were repeated except a conical flask and acid solution were heated in a water bath to about 92°C.
- Finally, Steps 2-6 above were repeated again except a conical flask and acid solution were heated in a water bath to about 56°C.
- At the end of the experiment, the magnesium ribbons were thrown into the waste bin and the conical flasks were all washed.
Part 4 - The Effect of Catalysts (Metal Ions):
- The apparatus was assembled as shown in diagram 1.
- 25 ml of 1.0M HCl acid was measured out with a measuring cylinder and was put in a conical flask. The magnetic stirrer bar was added and the solution was allowed to stir for a few seconds. A small lump of zinc was taken and placed in the conical flask.
- The flask was closed immediately with the stopper on the delivery tube and the stopwatch was started.
- The volume of gas produced each minute was recorded in Table D over a period of 10 minutes.
-
Steps 2-4 above were repeated except that about 20 drops of 0.2M copper (II) nitrate solution were added to dilute the acid in step 2.
-
Steps 2-4 above were repeated except that about 20 drops of 0.2M cobalt (II) nitrate solution were added to dilute the acid in step 2.
-
Steps 2-4 above were repeated except that 2-3 crystals of iron (II) ammonium sulfate were added to dilute the acid in step 2.
-
Steps 2-4 above were repeated except that about 20 drops of 0.2M-nickel (II) nitrate solution were added to dilute the acid in step 2.
- Finally at the end of the experiment, the magnesium ribbons were thrown into the waste bin and the conical flasks were all washed.
Data and Graphs:
Analysis and Conclusion:
The results are clear, reliable and relevant. It is believable because they corresponds in clearly with the given theories and principles.
The rate during the reaction does not stay constant, it changes throughout the reaction, and its greatest is at the start of the reaction but gets slower as the reaction proceeds. I think this mainly to do with the fact the longer the reaction has taken place the more of the reactants react leaving fewer reactants with less chance of reacting. A successful collision is when the reactants react they successfully collide with each other. The chance of a successful collision can be increased or decreased by using many different factors. I’ve been able to analyze the data given and graphs with the reference help from chapter 22, section 22.1 of Merrill’s Chemistry Book, I’ve managed to conclude the following:
Surface Area:
From the first graph, we can see that the greater the surface area is, the rate of the chemical reaction will also greatly increase. This is proven to be true, for the greater the surface area of the reactants the more particles there are available for a successful collision.
Temperature:
Temperature alters the rate of a reaction by supplying the reactant particles with more kinetic energy, the more kinetic energy the reactants have the faster they move around increasing the chance of having a successful collision. As we can see from graph 3, the rate of the reaction at a temperature of 60°C increased greatly over the rate of reaction at a temperature of 40°C. In reality this is proven to be correct, for the greater the temperature the faster the rate of a reaction.
Catalysts:
A catalyst is a substance that changes the rate of a chemical reaction but remains chemically unchanged itself. As we can see from the graph 4, the cobalt ions manage to make the big difference in speeding up the rate of the chemical reaction, unlike the rest of the catalysts. This could be because of the each catalysts different electron configurations, which would give us different properties for each catalyst and that could alter the rate of the chemical reaction.
Concentration:
Concentration affects the rate of a reaction because the higher the concentration of particles the greater the chance of a successful collision. The general trend is that the concentration is directly proportionate to the rate of the reaction. As we can see from graph 2, as I have stated before as the concentration increases the rate of the chemical reaction greatly increases also.
Improvements:
If I was to do this experiment again I would probably make it more accurate by:
- Using a Burette to measure the amount of gas given off. This would measure a lot more accurately the amount of gas given off.
- Using smaller particles of magnesium and zinc and similar weight. So I could match up surface area and weight more accurately each time.
- Checking if the concentration of acid is proportional to the rate of the reaction.
- Taking control of the stopwatch. There is lots of room for human error here but mainly this can be somewhat neglected.
- Using some kind of a gadget that can start the stopwatch in the same instant of the first bubble when appears.
- Using more purified distilled water will enhance the experiment.
- In this experiment, Mg was used regardless of its real length. It is believed that applying the experiment with measured lengths of Mg ribbons may provide us with results and proofs that will drive to discover a certain pattern that will finally lead us to a fixed law (equation).
Literature Cited:
- Merrill’s Chemistry Book.